A webcam is essential hardware if you use video calling for work or just to keep in touch with your friends and family. While most Webcams, either inbuilt or externally connected, can be detected as plug-and-play devices, if you want to use a webcam to record video and take pictures in Windows 11/10, follow this post.
Almost every Webcam OEM rolls out software for its camera. The app lets you take pictures, record videos and also add effects while you are on a video call. You can always download the software from their website or the drive with the box.
If software is not your thing, and all you want is plain, point-and-shoot video and pictures, the built-in Camera app in your Windows 11/10 OS should be able to do it fairly easily.
How to use webcam to take picture in Windows 11/10
Windows 11/10 has a Camera app which can access your webcam. Search for the Camera app and launch it. It offers you to do the following:
- Take Picture
- Shoot Video
- Time Lapse
- Configure settings for video resolution, and size of the picture.
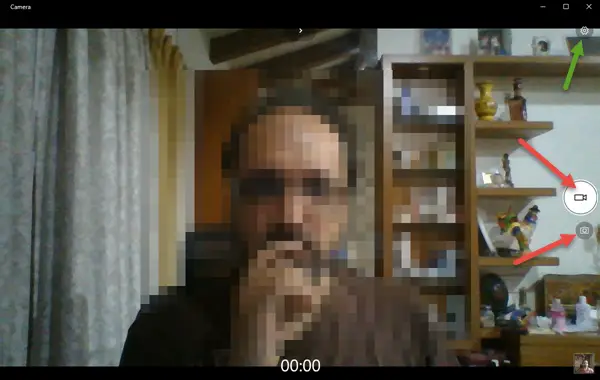
Click on the icon which says take a Photo. It will take a picture, and save it to Camera Roll folder in your user account’s Pictures folder – ie. in C:\Users\<username>\Pictures\Camera Roll folder. It also offers a timer feature and photos burst mode.
How to use webcam to record video in Windows 11/10
To take a video, look for a video camera icon, just above the picture icon. Select to switch. Now click on that icon, and it will start recording. Only when you press the video camera icon again will it stop.
In both video, and camera mode, you will be able to access set of icons on the top-middle of the app which will allow you to adjust the exposure and focus. To open its Settings, click on the wheel icon in the top right corner.

Launch the camera app, and you can start taking photos and videos, which are saved in the camera roll folder in your account’s pictures folder.
Windows 7 users may be required to use a webcam recording software.
Leave a Reply