A new feature in Windows 11/10, Windows Hello brings biometric security to the new operating system from Microsoft. This feature eliminates the need to login into any Windows device using passwords and is a more secure way to sign in to your Windows device, app or service. This post will show you how to set up and use Windows Hello in Windows 11/10 to sign in.
Windows Hello supports facial recognition and works by scanning the iris. It also supports fingerprints. The highlight of it is the Infrared Technology support that allows the facial recognition feature to work in almost all kinds of lighting situations. The departure from the normal behavior of having to enter a password every time you log in is thus very welcome.
Read: PIN vs Password in Windows – Which offers better security?
How to set up and use Windows Hello in Windows 11 to sign in?

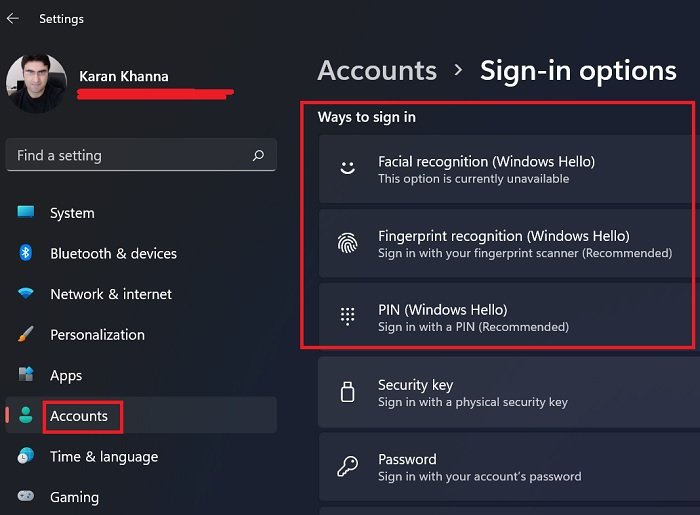
While most options have changed significantly while migrating from Windows 10 to Windows 11, the case of Windows Hello is like the same wine in a different bottle. However, the description and text for the Windows Hello options have changed, thus making it difficult to understand what is what. The procedure to set up and use Windows Hello in Windows 11 sign-in is as follows:
- Right-click on the Start button and select Settings.
- In the Settings menu, go to the Accounts tab in the left pane.
- In the right pane, click on Sign-in options.
- In the menu for Ways to sign in, there are login options. The options which mention “(Windows Hello)” are the ones associated with Windows Hello.
- Simply add your identity to the one which matches your needs.
How to use Windows Hello in Windows 10

When you this feature, your device will authenticate you with a camera or fingerprint reader. Setting up Hello is pretty easy.
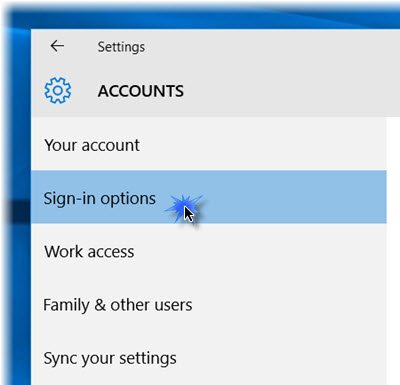
Press Win+I to open the Settings app. Click on ‘Accounts‘ section. Under the Accounts section, select Sign-in options.
Scroll down, and you will see Windows Hello. This section allows you to sign in to Windows 10, apps and services using your Fingerprint or Face.
Clicking on the desired option will open a Get started wizard, which you can follow to complete the formalities.
Related: How to disable Windows Hello prompt using GPEDIT or REGEDIT.
You can set up a Fingerprint by clicking on one of the available options – Add a fingerprint, Add another fingerprint or Remove one. Press your thumb to your device’s fingerprint scanner to register it.
You can also set up your ‘Face‘. Face your camera and allow it to capture the 3D view of your face
Your device must have a Windows Hello compatible camera and a fingerprint scanner and must also meet other Windows Hello requirements. Check out the list of PCs that support Windows Hello.
Once done, you can click the Improve recognition tab to perform more captures. You can also configure whether it should auto-unlock as soon as you become visible and if turning your head is required. Now when the machine is locked, you should see a small eye icon and text alongside it.
That’s it!

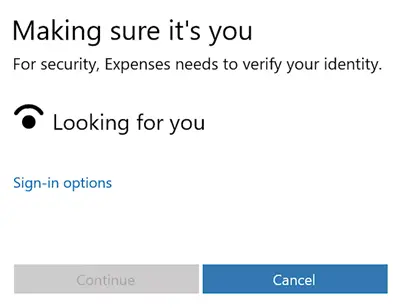
Once you have completed the procedure, whenever you need to sign in, whether its Windows 11/10, apps or services, you will see a Making sure it’s you screen. Once verified, it will display a Yup, it’s you message. Clicking on Continue will let you move forward.
This data that identifies your face, iris, or fingerprint never leaves your device. Windows does not store pictures of your face, iris, or fingerprint on your device or anywhere else. It is encrypted before it’s stored on your device.
This post shows how to set up Windows Hello or Fingerprint Reader on Windows or Surface devices.
What would happen if my hardware doesn’t support a certain Windows Hello login method?
In case your system lacks a certain hardware for Windows Hello login, then it would prompt We couldn’t find a <device> compatible with Windows Hello <feature>. Obviously, you wouldn’t be able to use that method.
In case you are sure your system has the connected hardware and you are still unable to access it for Windows Hello, try updating all drivers in your system using the Intel Driver and Support assistant.
Why does it prompt to set a PIN for Windows Hello when trying to use other login identity features?
It prompts to set a PIN because other identity features might fail. It is quite possible that the finger recognition tool fails to recognize your finger or the face recognition tool doesn’t identify your face. In such a situation, you could use the PIN. Thus, the PIN is mandatory for Windows Hello login.
Related: Windows Hello keeps asking me to set up a PIN
Why would you use the “Windows Hello only” feature?
Windows Hello makes your system safe because the password is a cloud-based identity for Microsoft single sign-on. However, Windows Hello is device based. Now the real power of Windows Hello lies in the fact that password login is disabled on your system. Thus, the option for the same has been provided. If you wish to use Windows Hello as the only possible method for logging in to your system, then please select the option for the same.
Isn’t Windows Hello mandatory for every Windows 11 system?
When you try booting in to your Windows 11 system for the first time, then the system does prompt for the Windows Hello creation but there’s a way to skip the procedure and most users are aware of the option now.
Learn more about Windows Hello and Microsoft Passport.