The beautiful images you see on your lock screen now and then come under the category of Windows Spotlight. These stunning images come from various sources from photography of famous, historical, and other subjects. If you have never seen these before, let me tell you that they are truly beautiful and perfect to be one’s desktop wallpaper or even a background image in certain apps like (WhatsApp) or Homescreen backgrounds for other devices. Unfortunately, they are stored somewhere deep inside system files inside of the operating system, and hence, normal users can not access them or read them properly. So, we need a solution to bring these images to a separate folder.
While you can display Windows Spotlight backgrounds on your Desktop via Settings, in this post, we will show you how to use Windows Spotlight as a Desktop Wallpaper Slideshow using PowerShell.
In case you want to access these images manually, follow this path using the Run box,
%LocalAppData%\Packages\Microsoft.Windows.ContentDeliveryManager_cw5n1h2txyewy\LocalState\Assets
But in spite of being an image file, each file stored in that folder does not have any extension at all. So, you manually need to put an extension in the suffix part and check if that file contains the image that you are looking for. But this is kind of a tiring process, right? We always need the things we are looking for on a computer faster.
How to use Windows Spotlight as Desktop Wallpaper Slideshow using PowerShell
I would recommend reading the whole article first.
To begin with, you would need this Powershell script file to be downloaded. We recommend not letting this file be moved anywhere once you store it in a permanent location. This is so because this file must be run every time you need a wallpaper migrated as a file.
$files = gci $Env:LocalAppData\Packages\Microsoft.Windows.ContentDeliveryManager_cw5n1h2txyewy\LocalState\Assets | where Length -gt 1kb

if ($files) {
    $shell = New-Object -ComObject Shell.Application
    $folder = "$Env:USERPROFILE\OneDrive\Pictures\Wallpaper\Spotlight\"

    if (!(Test-Path $folder)) { mkdir $folder }

    $files | % {
        $_ | Copy-Item -Destination $folder\$_.jpg
        Get-Item $folder\$_.jpg
    } | % {
        $namespace = $shell.namespace($folder)
        $item = $namespace.ParseName($_.Name)
        $size = $namespace.GetDetailsOf($item, 31)
        if ($size -match '(\d+) x (\d+)') {
            $width = [int]($Matches[1])
            $height = [int]($Matches[2])
        }
        if (!$size -or $width -lt 1920 -or $height -lt 500) {
            Remove-Item $_
        }
    }
}
Now, every time this script is invoked, the spotlight images stored in the location mentioned above will be copied to your destination location and an extension will be added as a suffix.
It is worth noting that the destination is by default set to ‘Pictures\Wallpaper\Spotlight\‘ inside the OneDrive folder.
To change this location, set your preferred location in line 6 of the script. You can edit the script using Notepad or a similar editing tool like Visual Studio Code.
Now, as this script runs, the wallpapers are fetched and stored in the set destination folder. But the automation part is left.
Automate the running of this script
For this, I recommend using the Task Scheduler to schedule a Task with Create Basic Task Wizard.
Start by first downloading this file.
Now, open Task Scheduler by finding it from the Cortana Search Box.
After the Task Scheduler is opened, click on Import Task and select the XML file that we just downloaded.
Then, a window will pop up containing fields to help you create tasks.
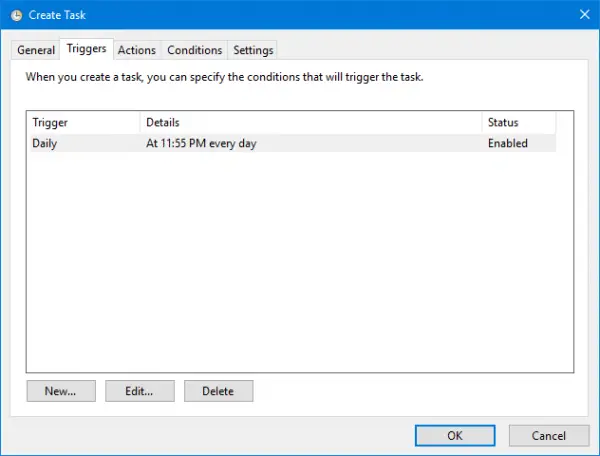
Navigate to the tab labeled as Triggers and then set the time and the period at which this script should run. And then finally click on OK.

Now, navigate to the tab labeled as Actions and then select the first and the only entry there and click on Edit.
In the Edit Action window that comes up, under the field of Program/Script, click on Browse and select the Powershell script file that we saved earlier and then finally click on OK and then click on OK again.
Finally, close the Task Scheduler.
Now, you can delete the XML file for the Task Scheduler.
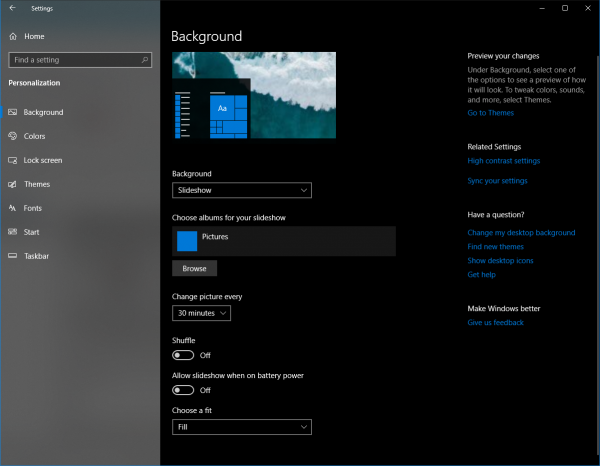
Finally, to set these images as a slideshow for the Desktop Backgrounds, start by opening Settings.
Then click on Personalize.

For the drop-down called Background, select Slideshow.
Now click on the button called Browse.
And finally, select the folder where all the pictures are stored as the destination.
This method was originally posted on cmdrkeene.com.
Related read: You can use Windows Spotlight Tool, JpegSync, Windows Spotlight Extractor or Lock Screen Reflection to save Spotlight Lock Screen images & use them as Wallpapers.
Leave a Reply