This post will show you how to use Audacity on Windows 11/10 to edit Audio, make music, record computer audio, remove background audio, make a mashup, etc.
Audacity is open-source, free-to-use audio recording and editing software available for Windows, Mac, and Linux systems. It is one of the popular and most used audio editing software with many features to compete with the paid programs available on the Internet. On Audacity, you can record audio, edit it, add effects to it, import an audio file, edit it, create music, and carry out many audio-related tasks without paying a dime.
Audacity Free Digital Audio Editor & Recorder for PC
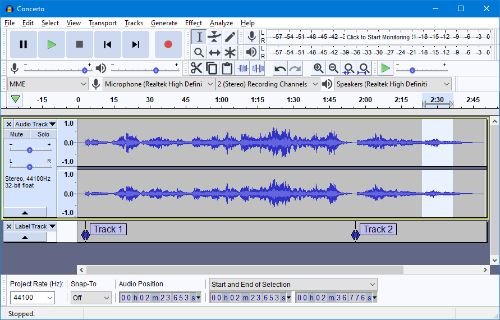
Audacity is one of the most popular names in the music-mixing community. While Audacity offers a wide range of software products, our discussion is focused on the music editor and recorder. Audacity is a free, open-source, cross-platform audio editor and recording application that will work great on Windows. You can use it for most basic music-making functions. However, the best part is that Audacity can be used to interact with a community.
It can handle many audio formats and even help you apply audio effects such as normalization, trimming, and fading in and out to your audio files.
Audacity Features
Audacity has some really cool and interesting features that can help you out, every time you edit your audio. It has a professional-looking and easy to use Multi-language interface. Check out all the features in the following feature list:
- Large audio format support includes OGG, Vorbis and many others
- Sound playback option
- Unlimited Undo layers
- Good Plug-in support (LADSPA)
- Multi-channel support
- Recorded live audio
- Noise Removal
- wxWidgets
- Supported effects by Nyquist
- Conversion to digital
- Convenient sound editing with cut copy paste commands
- Mixing with different tracks at the same time.
Unfortunately, Audacity does not ship with an MP3 encoder. This is because the algorithm to encode or create MP3 files is patented and therefore cannot be included. But Audacity does offer the ability to use other MP3 encoders – which you will need to download separately.
How to use Audacity on Windows 11/10
If you are just starting out on Audacity and want to learn to use it, the following guide to basics will help.
- Basic tools on Audacity
- How to Record audio using Audacity
- How to reduce noise in Audacity
- How to increase volume in Audacity
- How to import an audio file into Audacity
- How to split audio in Audacity
- How to trim audio in Audacity
- How to slow down audio in Audacity
- How to Bass Boost in Audacity
- How to export audio in Audacity
Let’s get into the details of each function and know how to do them in Audacity.
1] Basic tools on Audacity
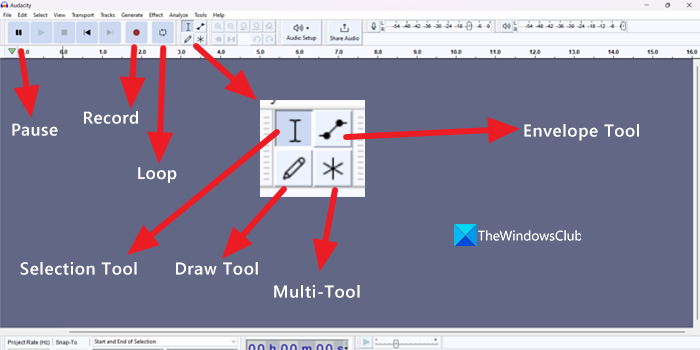
There are some basic tools on Audacity that we use regularly to perform various tasks on it.
- Pause: While playing audio (using the Play button beside it) we can pause it by clicking on the Pause button on the toolbar. There is also a greyed-out Stop button that can stop playing audio without remembering the last point.
- Record: As we know, Audacity is used to record audio and edit it though we can import external audio into it. The record button starts the recording when you clicked on it.
- Loop: It is used to play audio tracks we record or import on Audacity to find any mistakes or to observe the audio by listening to it repeatedly.
- Selection Tool: The selection tool on Audacity helps you to select a specific part of the audio track you are working on. You just need to select the tool by clicking on it and then clicking and dragging on the audio track to make a selection.
- Draw Tool: The draw tool is a wonderful tool to edit the audio if we get used to it on Audacity. It lets you redraw the waveform of your audio track to adjust its levels, volume, etc.
- Multi-Tool: The multi-tool lets you select all the separate tools on Audacity at once. When you click on the Multi-Tool button, it automatically selects another separate tool according to the mouse pointer and key presses. You will notice which tool is selected by the mouse pointer. It lets you use multiple tools at once without selecting them manually.
- Envelope Tool: The envelope tool on Audacity is used to correct and adjust the track volume differences at different points on the track smoothly without disturbing the quality of the flow of the track. It is done by adjusting the waveform using the tool.
2] How to Record audio using Audacity
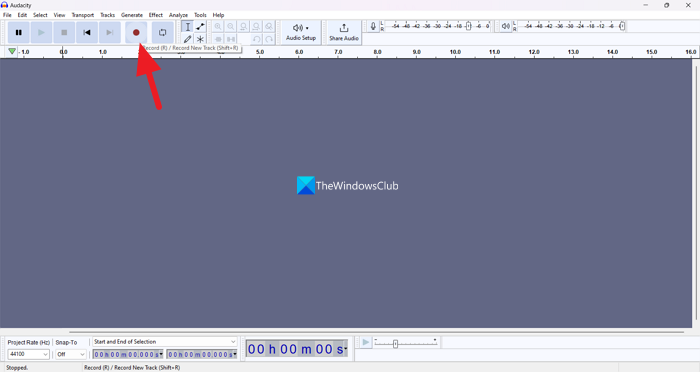
To record audio on Audacity, you must have a microphone, internal or external. It needs to be working. Then, only you can record audio on Audacity. You just have to click on the Record button on the toolbar to start a recording. After you have completed recording, click on the Stop button which activates once you start recording, or just hit the Space bar on your keyboard to stop the recording.
3] How to reduce noise in Audacity
Reducing the noise of audio in Audacity is a simple task. To do so,
Select a part of your audio track that contains only noise using the Selection tool
Click on Effect in the Menu bar and hover over to Noise Removal and Repair. Select Noise Reduction.
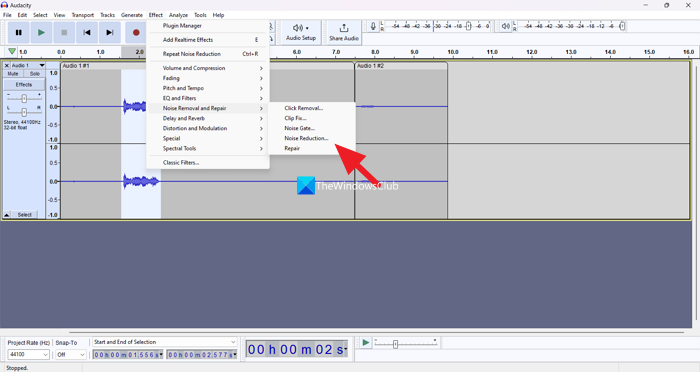
It will open a Noise Reduction window. Click on the Get Noise Profile button to make Audacity determine noise from the main sound of the track by feeding it the noise.
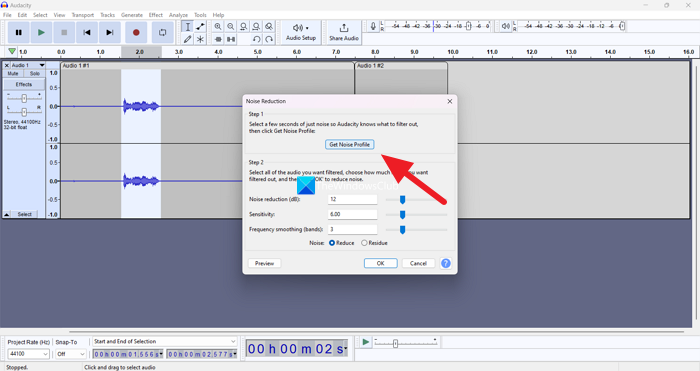
It will automatically close the Noise Reduction window. Now, select the area in which you want to remove noise from the track and click on Effect, hover over to Noise Removal and Repair, and select Noise Reduction. It will again open the Noise Reduction window. Under Step 2 on the windows, adjust the levels according to your choice by using the Preview button. Then, click OK to apply the noise reduction.
4] How to increase volume in Audacity
If the recording or the audio track you are working on Audacity sounds low, you can increase the volume of the track easily in a few steps. Select the part of the track or the whole track if you want to increase the sound of the whole track. After selecting, click on Effect in the menu bar, hover over to Volume and Compression and select Amplify.
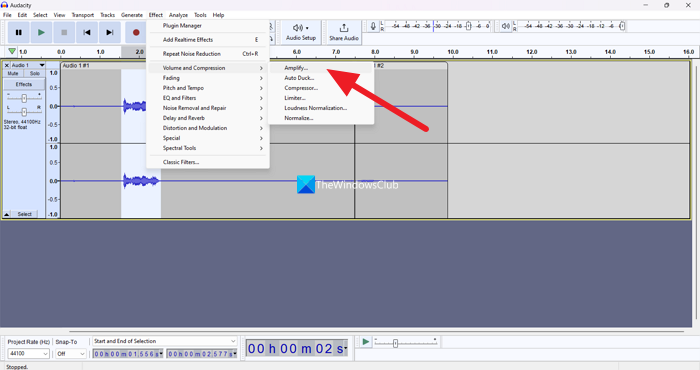
It will open a small Amplify window. Adjust the Amplification level and set the New Peak Amplitude to -3.0 (recommended) and click Apply to increase the volume of the audio track.
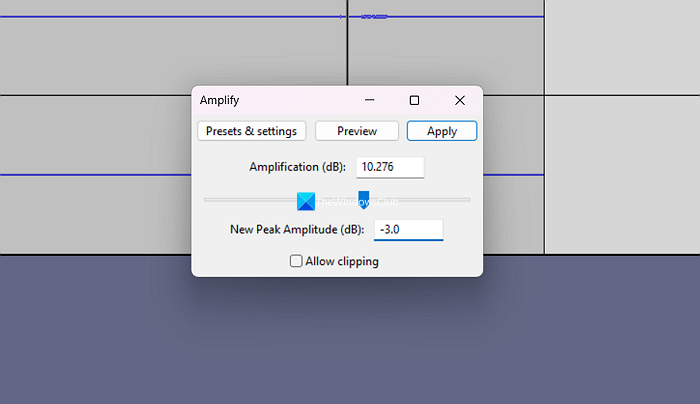
It will increase the volume of your audio track or the selection you made.
5] How to import an audio file into Audacity
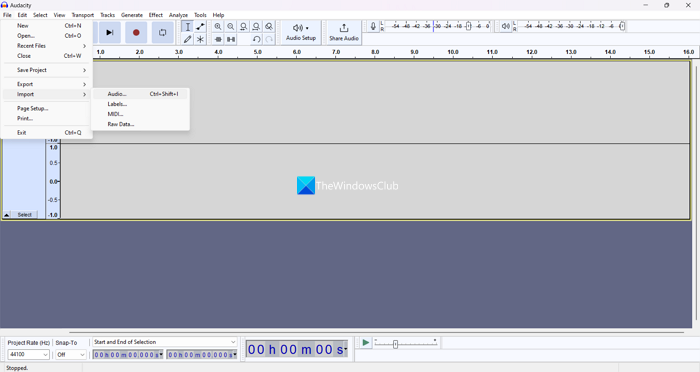
Importing audio into Audacity is a simple process. Just click on File in the menu bar and hover over to Import and select Audio. Then, browser the audio using the Explorer window and click OK. The track you have selected will now be added to Audacity to edit it. You can also use Ctrl+Shift+I on the keyboard to import.
6] How to split audio in Audacity
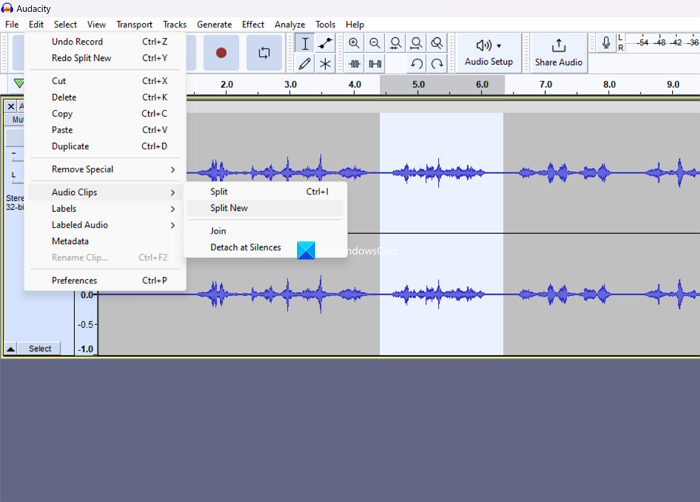
To split an audio or a track in Audacity, select the part you want to split using the Selection Tool and click on Edit in the menu bar. Hover over to Audio Clips and select Split if you want to just split the audio. Select Split New if you want to split it and make the split audio a new track below the existing track. You can also use the Ctrl+I shortcut to split audio after making a selection.
7] How to trim audio in Audacity
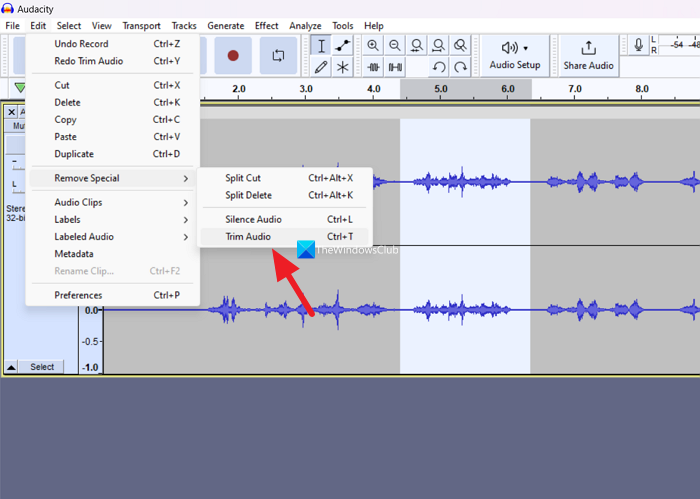
Select the part of the audio track you want to keep and click on Edit in the menu bar. Hover over to Remove Special and click on Trim Audio or use the Ctrl+T shortcut on the keyboard after making the selection. It will keep the part you have selected and deletes other parts.
8] How to slow down audio in Audacity
Select the part of the audio you want to slow down or select the entire track if you want to slow down the entire track. Click on Effect and hover over to Pitch and Tempo and select Change Tempo.
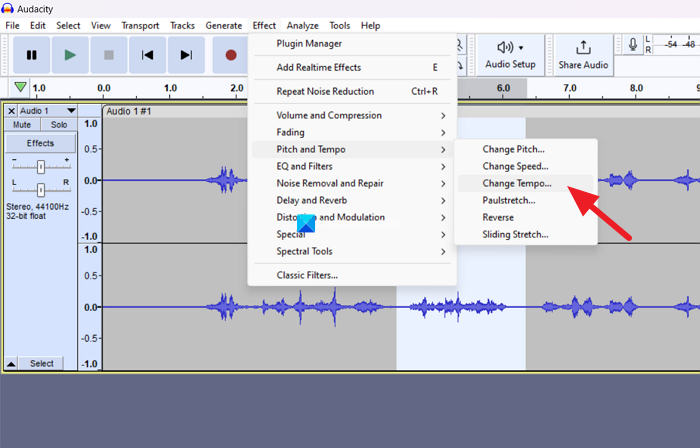
It will open the Change Tempo window. You will see a slider on it. Drag it to the left side to slow down the track as per your need. After you are done with it, click on Apply to apply the change to the track.
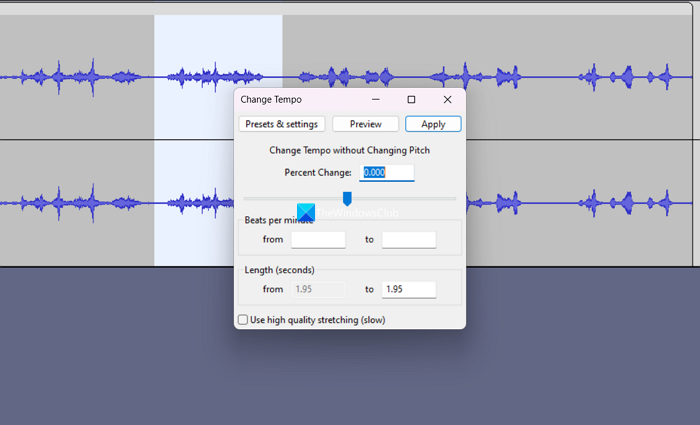
You can also increase or speed the audio track by dragging the tempo slider to the right side. It’s that simple to slow down or speed up an audio track on Audacity.
9] How to Bass Boost in Audacity
To boost the bass on Audacity, select the track and click on Effect in the menu bar. Hover the mouse pointer over to EQ and Filters and select Bass and Treble.
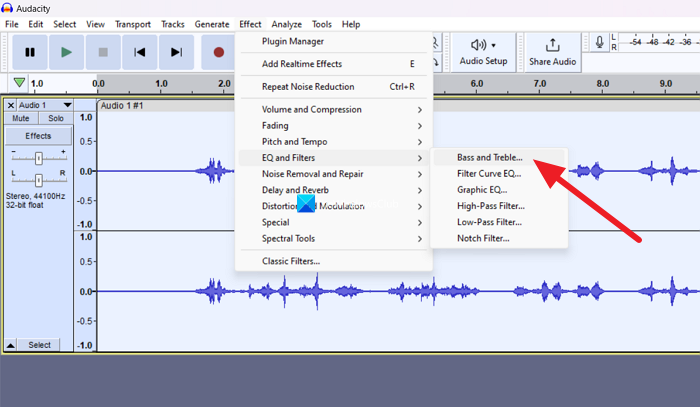
It will open the Bass and Treble window. Adjust the Bass as per your need by adjusting the bar and see how it sounds using the Preview button. Once you are done with adjusting the bass, click on Apply to apply the bass to the track.
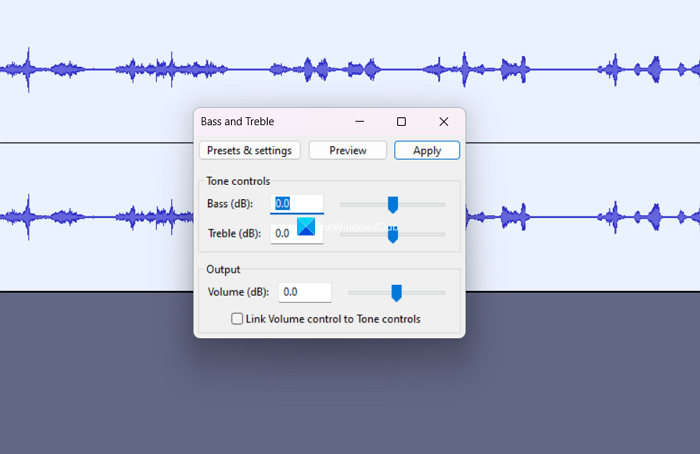
You can also adjust the treble in the same way.
10] How to export audio in Audacity
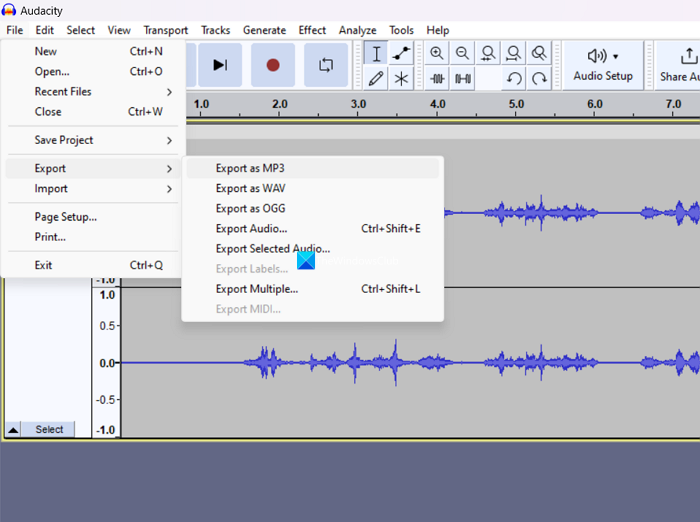
Once you are done with recording and editing the audio on Audacity, you can export it into WAV, MP3, or OGG formats as you like. Audacity by default exports the audio file in WAV format. To export audio on Audacity, click on File in the menu bar and hover over to Export and select Export as (whatever the format you need) and name the file and save it on your PC.
That’s it. This is how you can use Audacity on Windows PC to record, edit and export audio. Hope this guide helps you to start your audio editing journey on Audacity.
Audacity Download
Audacity was developed by a group of tech enthusiast volunteers and is now distributed under a GNU/GPL license. It has clocked over 90 million downloads at SourceForge. If you like what you have read, you can go here at sourceforge.net to download Audacity.
Audacity Format Support
Audacity offers good format support and can edit Ogg Vorbis, MP3, WAV, or AIFF sound files. It can also record and edit 16-bit, 24-bit, and 32-bit (floating point) samples. It can also create WAV or AIFF files and import MPEG audio. As far as format support is concerned, you will not face any problems.
Read: Best Free Audio Editors for Windows
How do I make my voice sound better on Audacity?
To make your voice sound better on Audacity, you need to get a better microphone and reduce noise. There are countless microphones available in the market, and you can choose any one of them according to your budget and requirements. However, you can follow the aforementioned guide to reduce noise on Audacity.
How do I edit a song in Audacity?
To make music using Audacity or edit a song in Audacity, you need to download it from the official Audacity website and install it on your PC. Then, you need to learn the basics of Audacity and start experimenting with it by recording and editing them. That way you can learn to record your music and edit it and export it.
Related read: Fix Audacity FFmpeg error on Windows PC.
Leave a Reply