If you want to check and verify the Windows 11/10 ISO file hash using PowerShell, you should follow this tutorial. A simple PowerShell command can show the file hash of an ISO of Windows 11/10 or any file that may have on your computer. Here, we are going to show you the process to check the file hash regularly or by defining a specific algorithm.
The file hash is a unique element that tells a lot about a file and does a background check as well. You can frequently verify the file hash and match it with the previous one to know whether the data has tampered, changed or modified, altered, or anything else by someone. It helps you find and remove duplicate files as well. Before getting started with this tutorial, make sure that you always have the ISO of Windows 11/10. If not, you can follow our detailed guide to download the latest Windows ISO from the official website.
How to verify Windows 11/10 ISO file hash
To verify the Windows 11/10 ISO file hash using PowerShell, do the following:
- Press Win+X button together.
- Select Windows PowerShell from the list.
- Enter CD command to select the file directory.
- Type get-filehash command with the file path.
- Find the hash on your screen with the algorithm.
Verify authenticity & integrity of Windows ISO
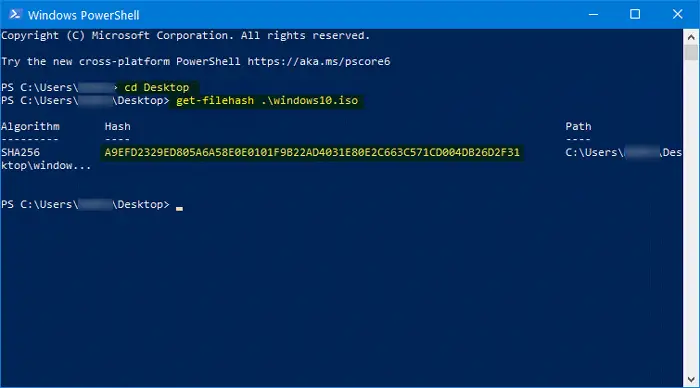
You need to open Windows PowerShell on your computer. For that, you can use the Taskbar search box. Alternatively, you can press Win+X button together, and select Windows PowerShell from here. After that, you need to enter the following command to select the file directory where you have placed the Windows 10 ISO.
cd [directory]
By default, PowerShell opens in C:\Users\<user-name>. If your file is in the Desktop, you need to enter this-
cd Desktop
Similarly, you should enter cd Downloads if your file is in the Downloads folder. After that, enter a command like this-
get-filehash .\[file-name]
For example, if the name of the Windows ISO is mywindows10.iso, you need to enter the command like this-
get-filehash .\mywindows10.iso

After hitting the Enter button, it should show three things –
- Algorithm,
- Hash, and
- Path.
It supports SHA1, SHA256, SHA384, SHA512, MD5, MACTripleDES, and RIPEMD160.
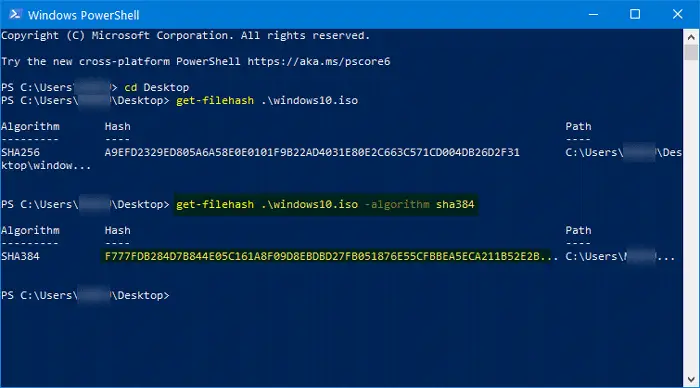
Therefore, if you want to change the algorithm and verify that specific hash, you should enter a command like this-
get-filehash .\mywindows10.iso -algorithm sha384

Now, as a result, you can see SHA384 under the Algorithm column alongside the hash and full path.
I hope this simple tutorial will help you.
You might like these:
Leave a Reply