If you are experiencing the frustrating abrupt termination of a Virtual Machine during startup, you are not alone. Many users are stuck in the same situation, with their work or project halting in the middle of progress. However, this is something that can be fixed easily. In this troubleshooting guide, we will see what to do when you receive error message –
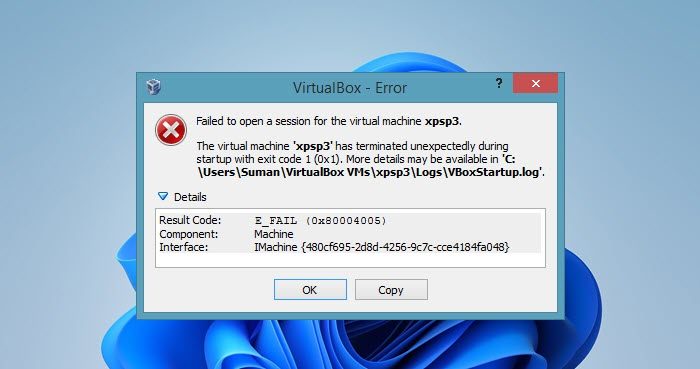
Failed to open a session for the virtual machine, The Virtual Machine has terminated unexpectedly during startup with exit code 1 (0x1).
Result Code: E-Fail (0x80004005)

The Virtual Machine has terminated unexpectedly during startup
If the Virtual Machine has terminated unexpectedly during startup with exit code 1 (0x1), follow the below solutions to resolve the issue.
- Restart the device
- Delete the saved data
- Install the VirtualBox kernel driver
- Start the machine in the Headless Mode
- Re-install Virtualbox
Let’s get this troubleshooting guide on the road.
1] Restart the device
First and foremost, we recommend power cycling the host computer as this single step can address several underlying problems. A reboot refreshes the system’s memory, clears out the cache, and resets all the system processes and services. By restarting, we are providing a clean slate for both the OS and virtualization software, so do it, and then check whether the issue persists or not. If it does, move on to the next solution.
2] Delete the saved data

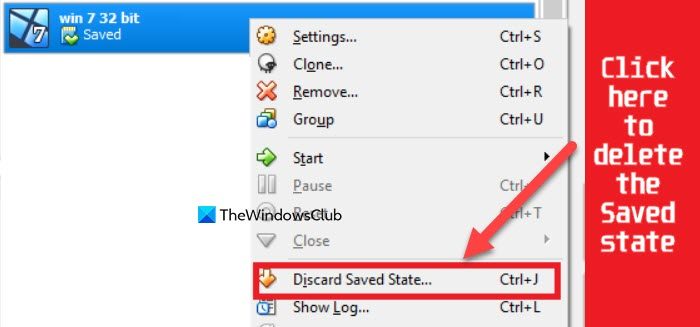
The next plausible reason could be the damage to the Virtual machine’s files, settings, or data, which ultimately leads to errors and malfunctions, such as the one we are facing. Deleting the data is necessary to restore proper functionality and prevent further issues. To do the same, right-click on the Virtual machine, select the Discard Saved State button, and then reboot the PC. Once it opens up, restart the machine, and check whether the issue is solved or not.
3] Install the VirtualBox with the Kernel driver

Next, we are going to install the VirtualBox Kernel Driver, as doing so enables the Virtualization software to properly interact with the host system’s hardware. This ensures stable and effective VM performance. Follow the steps mentioned behind to install the VirtualBox Kernal Driver.
- First of all, go ahead and uninstall Oracle VirtualBox from your computer.
- Once the process is done, reboot the PC and ensure no 3rd party antivirus software is running. Now, launch the File Explorer, and go to the following location:
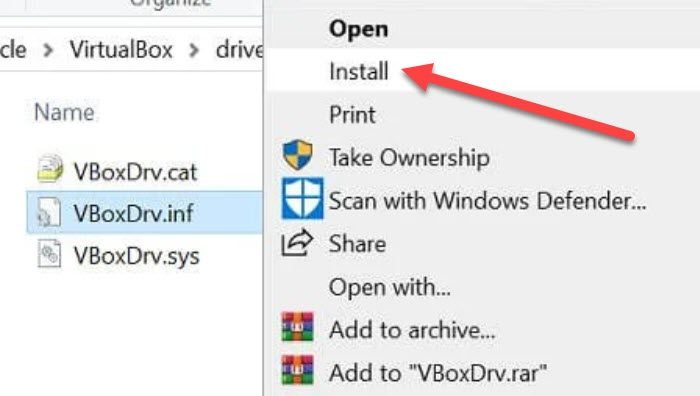
C:\Program Files\Oracle\VirtualBox\drivers\vboxdrv\VBoxDrv.inf
- Now, right-click on VBoxDRv.inf, and then select the Install button, followed by Yes when prompted.
- Click the OK button when the process is completed, and relaunch the Virtual Machine.
4] Start the machine in the Headless State Mode

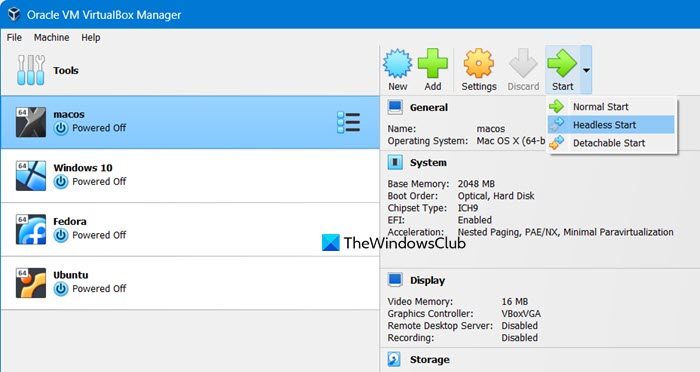
Starting the machine one Headless Mode starts the VM without a window for remote display only, basically in a detachable UI. In this solution, we are going to do the same. Therefore, launch VM VirtualBox, select the Machine, and click on the drop-down arrow beside the Start Icon. Select the Headless Start option, wait for a few seconds, and then select the Show option. And that’s it, however, this needs to be done every time after opening the Virtual Machine until Oracle decides to fix it.
5] Re-install Virtualbox
The last but not least resort is to uninstall VirtualBox and then install it again. This clears out the existing corrupted or problematic VM instance and provides a reliable and functional Virtual environment for the VM.
Here’s how to do the same:
- Open Settings, go to Apps > Installed app.
- Look for Oracle VirtualBox, click on the three dots, and select Uninstall.
- Once done, power cycle the PC, and then go to virtualbox.org and download the latest version of VirtualBox.
- After it’s downloaded, right-click on the downloaded file, and select the Run as Administrator option. Wait for the process to complete, and then reboot the PC.
- Open the VirtualBox manager, and launch the Machine.
Hopefully, everything will be fine, and users will be able to install the Guest Additions and return to their previous work.
That’s it!
Read: USB device is busy with a previous request — VirtualBox error
What is the Error Code E_fail in VirtualBox?
Besides the errors we face, users are sometimes also hit with the error code E_fail in the VirtualBox. This error code displays Failed to open session for the Virtual Machine, E_FAIL (0x80004005) error message. This might happen due to a lack of administrative privileges, or due to a corrupted Machine State. To know how to fix this, head to this article where we discussed what to do when VirtualBox Failed to open session for the virtual machine, VT-x is not available (VERR_VMX_MO_VMX), E_FAIL (0x80004005)
How do I reset my default virtual machine?
To reset the virtual machine, open VirtualBox, right-click on the machine and select Reset to open Run Power Control. You then have to follow the on-screen instructions to reset the machine. The process will take some time; once done, check if the issue is resolved.
Also Read: VirtualBox Aborted: The VM session was aborted on Windows PC.