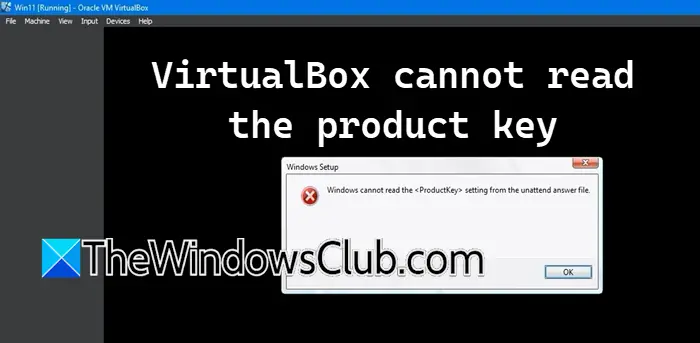
When trying to install Windows on a VirtualBox Virtual Machine we encountered an error that says that the VirtualBox cannot read the product key. Due to this, the installation process fails to go beyond the ‘Setup is starting’ process. In this post, we are going to talk about this issue and see what you can do to resolve it.
Windows cannot read the <ProductKey> setting from the unattended answer file.

Fix VirtualBox cannot read the product key
If the VirtualBox cannot read the product key, follow the solutions mentioned below.
- Delete the unattended configuration file
- Make changes to the VM’s configuration
- Download a new ISO file and create a new VM
- Make sure that the Windows native hypervisor is off
Let us talk about them in detail.
1] Delete the unattended configuration file

First, we will delete the configuration file related to your virtual machine, as it is possible that the files are corrupted or misconfigured. Do keep in mind that this will not delete your personal files, just the files containing the VM’s configuration information. To do so, follow the steps mentioned below.
- First of all, power off the virtual machine by right-clicking on the machine and selecting Stop.
- Now, again right-click on the machine and select Settings.
- Switch to Expert mode.
- Go to the Advanced tab, and copy the location of the Snapshot Folder.
- Open File Explorer and paste the location in the address bar.
- Now, delete all the unattended configuration files.
- Go to System > Motherboard, select Floppy from the Boot Order, and then untick it.
- Finally, click on Ok.
Once done, start the virtual machine and see if you are able to go beyond the setup screen. If you again receive the error message, delete the unattended files as mentioned earlier one more time, and then go to the next solution.
2] Make changes to the VM’s configuration

You may encounter this issue if the virtual machine’s configuration is improper. So, we need to make some changes to your VM’s settings and see if the issue is resolved. In order to do so, follow the steps mentioned below.
- In VirtualBox, right-click on the VM, and click on Settings.
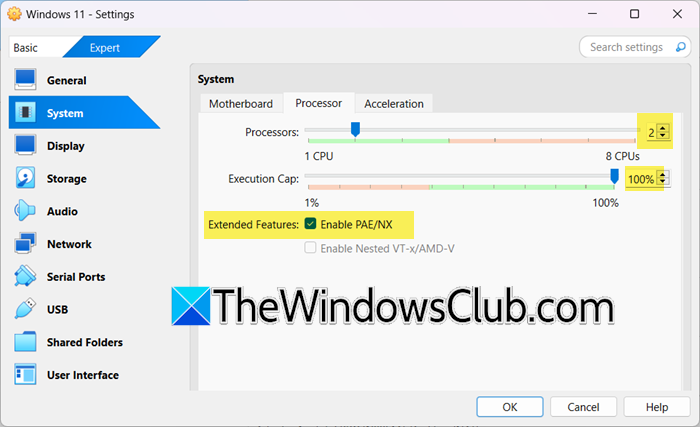
- Now, go to System > Processor and make sure that the CPU is at least 2 and the Execution cap is 100%. Also, make sure that the Enable PAE/NX is checked.
- Go to Display > Screen, check if Enable 3D Acceleration is enabled, and increase Video Memory to 256.
- Click on Storage, from the Storage device, select the Unattended storage device, and then click on the Remove button. And then from the Attributes section placed on the right section, tick Live CD/DVD.
After saving all the changes we asked you to make earlier, then, check if the issue is resolved.
3] Download a new ISO file and create a new VM

You may encounter this issue if the ISO file that you are using is corrupted. So, in order to resolve it, we recommend you delete the file that you are using and then download a fresh copy from the official Microsoft website. Once you have downloaded the ISO file, follow the steps mentioned below to create the virtual machine.
- In VirtualBox, click on New, and then start creating the machine normally.
- When you reach the screen where you are required to select the ISO file, do not select it, and move forward.
- After creating the machine, right-click on it, and click on Settings.
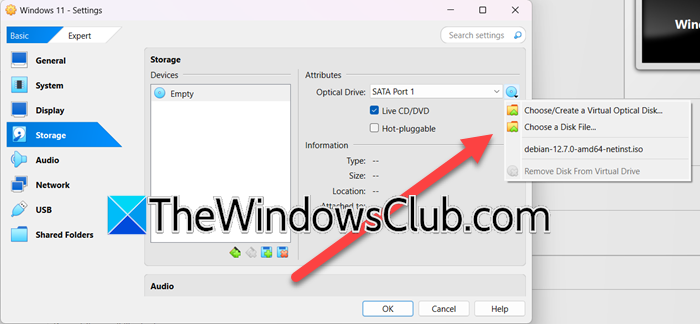
- Go to Storage > Attributes, and then click on the Disk icon.
- Now, select Choose a disk file, navigate to the location where you have kept the new ISO file, and then add it.
- Finally, start the virtual machine and try installing the operating system.
Hopefully, you will be able to install the disk without any issues.
4] Make sure that the Windows native Hypervisor is off

You need to ensure that the native Hypervisor of Windows, that is, Hyper-V is disabled as that can interfere with VirtualBox and cause peculiar issues. To do so, follow the steps mentioned below.
- Open Control Panel.
- Change the View by to Large icons.
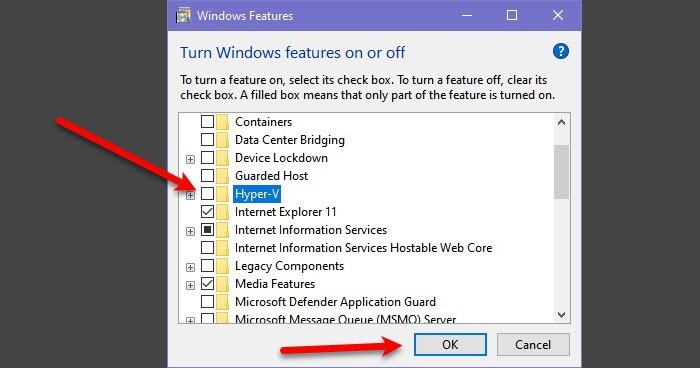
- Now, go to Programs and Features > Turn Windows features on or off.
- Untick Hyper-V and click on Ok; wait for the feature to get uninstalled.
- Reboot your computer.
Once your computer starts back up, you must check if the issue is resolved.
Hopefully, you can resolve the issue using the solutions mentioned in this post.
Read: Test drive Windows 11 in VirtualBox – Detailed screenshot guide
How to fix Windows product key errors on VirtualBox?
If you encounter a Windows product key error on VirtualBox, you need to delete the unattended configuration file and then make some changes to the configuration of your machine. Additionally, we need to check if Hyper-V (Windows Hypervisor) is enabled, if it is enabled, we might have to disable it. In order to do all this, we recommend you follow the solutions mentioned earlier.
Read: How to speed up a VirtualBox Virtual Machine and make it run faster
Why the Product key is not working?
If you are entering a product key and it’s not working, check if it has been used on a different device or if it has surpassed the allowed limit of devices as per the purchased license. Go through the documentation to find out if that’s the case. If not, you can contact Microsoft Support here on microsoft.com and raise a dispute.
Also Read: Fix VirtualBox Installer Installation failed error.
Leave a Reply