VirtualBox is a powerful tool for running virtual machines, but connectivity issues can lead to a lack of access to the Internet on virtual machines. If you are also experiencing the same issue, no worries. In this article, we will see what you can do if the VirtualBox can’t connect to the Internet.
Why is my virtual machine not connecting to the Internet?
The Virtual Machine may be unable to connect to the Internet due to misconfigured network settings, a disabled network adapter, or outdated drivers. Additionally, conflicts between the VM and the host system or firewall restrictions can also be the contributing factor to the issue. In the next section, we are going to see how to resolve the issue.
Fix VirtualBox can’t connect to the Internet
If the VirtualBox cannot connect to the Internet, execute the solutions mentioned below:
- Bridge Wi-fi network adapter
- Enable the Virtual Machine’s Network adapter
- Run Network troubleshooter
- Check Firewall Settings
- Reinstall VirtualBox
Let’s get started with the troubleshooting guide.
1] Bridge Wi-fi network adapter
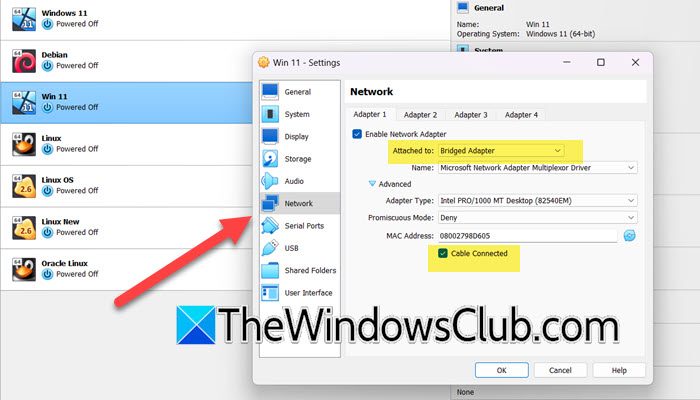
Networking issues can prevent VirtualBox Virtual Machine from connecting to the Internet. Users should bridge the Wi-fi network adapter as it allows the VM to behave like a separate physical device connected directly to the network. This will bypass the connectivity issue, and here’s how to do it.
- First of all, shut down your virtual machine if it is running.
- Now, right-click on the VM in the VirtualBox and select Settings.
- Go to the Network tab.
- Tick Enable Network Adapter, and set the Attached to option to Bridged Network.
- Expand Advanced and then tick Cable Connected.
- Click Ok.
Close the Setting option, reboot VirtualBox, open the VM, and launch a web browser to make sure that the Internet is working.
2] Enable the Virtual Machine’s Network adapter
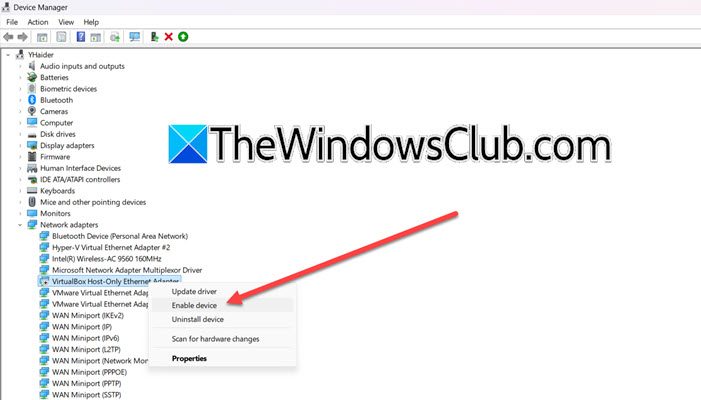
The Internet connection can also be severed if the adapter is not enabled as the VM simply won’t be able to send or receive any network traffic. We are going to enable the adapter to give VM the ability to connect to the network. Follow the procedure mentioned to do the same.
- Press Win + X to open the Quick Link menu and launch Device Manager.
- Navigate to the Network Adapters section, expand it, and right-click on the network adapter related to VirtualBox.
- Click on Enable device if you see that option.
After the adapter is enabled, check if the issue is resolved or not.
3] Diagnose your network
If enabling the adapter did not resolve the issue, we recommend running the Network troubleshooter. This will automatically check for common issues like misconfigured network settings, problems with network adapters, and such.
- Click Win + R to open the Run dialog box, type control, and click the Ok button.
- Go to the Network and Sharing Center, and from the left pane, select the Change Adapter Settings option.
- Right-click on the Virtual Network Adapter, click Diagnose and follow the on-screen prompts to initiate the process. Once done, click on the Apply the recommended solutions/changes button if prompted.
Check whether the issue persists.
4] Check Firewall Settings
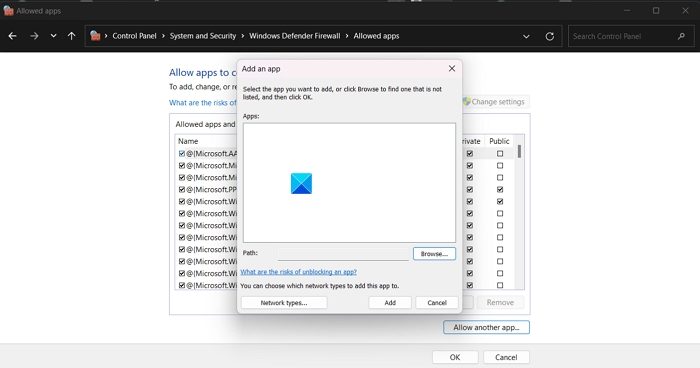
We need to make sure that the host machine’s firewall or antivirus is blocking the VM traffic. If you want to do the same, you can follow the steps mentioned below.
- Open Windows Security by searching it out of the Start Menu.
- Now, go to Firewall & network protection.
- Click on Allow an app through firewall.
- Now, click on Change Settings.
- Ensure that VirtualBox and VBoxHeadless entries have both Private and Public checkboxes selected.
- If it is not listed, click on Allow another app > Browse, navigate to the location where VirtualBox is installed, and select it. Make sure to allow it through Private and Public networks.
Finally, check if the issue is resolved.
Read: Failed to create a proxy device for the USB device VirtualBox error
5] Reinstall VirtualBox
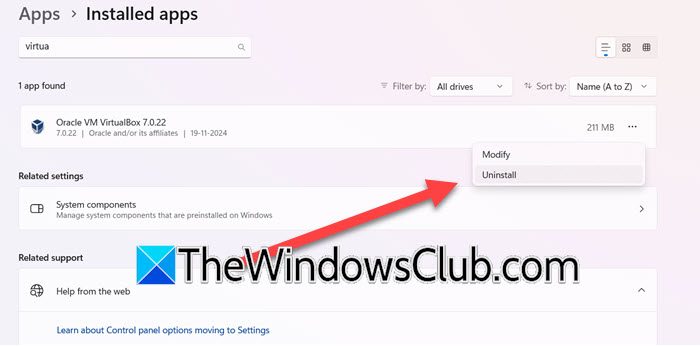
The last resort to fix this issue is to download VirtualBox again. If none of the above solutions worked, then there are chances of installation files or software components corruption. Furthermore, a new installation will also clear up issues and fix bugs if there are any. In such situations, users can uninstall VirtualBox, and then go to the official page, to re-download it. To uninstall VirtualBox, follow the solutions mentioned below.
- Click Win + I to open Settings, navigate to Apps > Installed apps, and then search for VirtualBox.
- Select the three dots option, and click the Uninstall option. Once done, navigate to File Explorer and delete any files related to VirtualBox.
- Now, reboot the PC, and then navigate to the VirtualBox download page, and download the latest version.
Once done, restart the VirtualBox, and check if the VM can connect to the Internet.
Read: VirtualBox Aborted: The VM session was aborted on Windows PC
How to check if VM is connected to the Internet?
To check if the VM is connected to the Internet, launch the VM and try accessing a website via any web browser. Alternatively, users can also use the command prompt in the VM and run the Ping command to test the connectivity.
Also Read: VMWare VM unable to connect to the Internet.
Leave a Reply