When it comes to viewing your favorite movies or videos on Windows platform, VLC multimedia player is the recommended choice. It’s a good program but is known to cause undesirable problems occasionally – especially, when the program’s default settings focus more on compatibility than quality. For instance, sometimes the black levels in images may not be displayed correctly and may appear as gray. The image is washed-out or milky, like the ones seen below.

The media player is more important than anything else for playing any kind of multimedia files like movies or videos. This open source media player is extremely powerful, easy to use, and can be customized according to user requirements hassle-free. VLC’s extremely impressive features play most of the multimedia files, including streaming protocols, and run on all the platforms. Moreover, the VLC player supports most of the video file formats without the need of additional media codecs. This feature-enriched media player is available for free download.
Apparently, some VLC media player users have reported a few issues playing video on VLC. The users see a distorted video and may observe a strange color at random intervals during video playback. The video fails to render a proper color, and colors appear to wash out. The root cause of the problem may be an issue with graphics drivers or a codec that fails to properly decode a video.
If you are facing VLC washed out colors & color distortion problems, then with few minor tweaks, you can restore the normalcy of VLC player. Here are a few suggestions to fix the issue.
VLC washed out colors & color distortion problem
At first glance, it might be difficult to notice the change. However, if you play the same video in different video players, say VLC Media Player and Windows Media Player, on two different screens and compare the images, the difference should be readily discernible.
So, if you notice any color difference, particularly black levels, try adjusting the system’s configuration to your requirements.
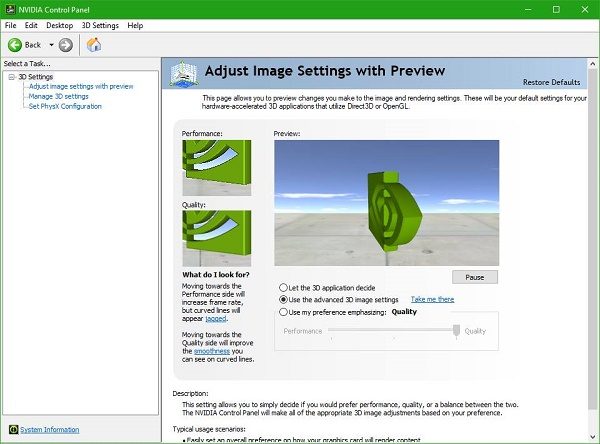
1] Adjust video color with NVIDIA settings
Right-click on the desktop of the computer system and select NVIDIA Control Panel from it. If you cannot find/locate the entry, press the Windows-key, type NVIDIA Control Panel, and select the option from the search results.
There, under ‘Select a Task‘ section, you’ll see 3 Headings-
- 3D Settings
- Display
- Video.
Choose ‘Video’ and go to ‘Adjust Video Color Setting’.

Here, enable “With the NVIDIA Settings” option and switch to the Advanced tab.
Now, select Full (0-255) instead of Limited (16-235) in the Dynamic Range menu.
Click on Apply to make the change.
Once done, you will notice the change in the display.
2] Change the Video card Settings
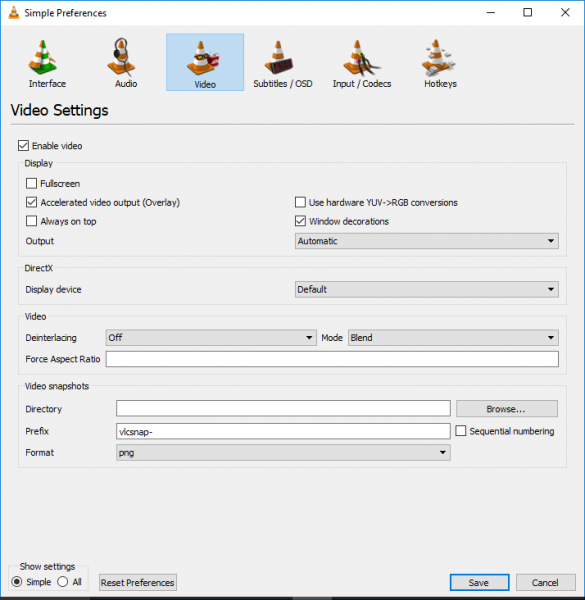
The issue mainly occurs with a problem on video on VLC with Hardware YUV>RGB conversion selected on Nvidia cards. By default VLC plays all the video of YUV MKV content with RGB 16 to 235 instead of 0,255. That is the VLC plays video in TV format from RGB 16 to 235. Disable the function that converts each frame from YUV which is a television format to RGB. This is a client-side fix for a YUV content.
Open VLC media player.

Go to Tool and click on Preference from the drop-down menu.
Click on Video.
In the Video Settings untick the option for Use hardware YUV> RGB conversions.
Enable Accelerated video output (Overlay).
Enable Window decorations.
Save to apply the changes.
Restart the VLC player.
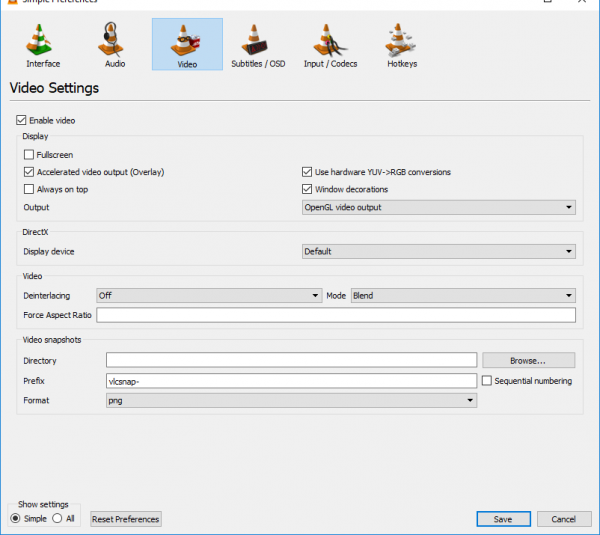
3] Set OpenGL as the Output video method
Go to Tool and click on Preference from the drop-down menu.
Click on Video.
Locate the Output video method and select OpenGL video output from the drop-down.

Save to apply the changes.
Restart the VLC player.
If this does not help then select ‘Tools’ from the menu, navigate to ‘Settings’ and choose ‘Video’. Then you can try the following, in the order of decreasing playback performance:
- Switch to DirectX (DirectDraw)
- If that does not work, switch to Windows GDI video output and see.
I hope something helps.
Related read: VLC Media Player skipping and lagging.
Leave a Reply