There could be times when the VLC media player might not be working on Windows 11 PC. In such situations, you can go through these tips and tricks to troubleshoot the issue. There could be several reasons why you might come across this issue. Here we have elaborated some of the common causes and the solutions to get rid of this problem.

VLC not working in Windows 11
If VLC media player is not working in Windows 11/10, follow these steps to resolve the issue:
- Download from the official website
- Toggle hardware decoding
- Change Video Output settings
- Reset VLC settings
- Update VLC media player
- Reset File/Disc/Network cache setting
- Reinstall VLC media player
To know more about these steps in detail, keep reading.
1] Download from the official website
If the media player is not opening or working at all, make sure you have downloaded it from the official website. Many attackers and scammers often use a replica of popular software to scam common users. In most cases, those tools might not work properly on your system. That is why it is recommended to download the app from the official website only. The official website’s address is videoland.org.
Read: Why is VLC Media Player currently banned in India?
2] Toggle hardware decoding
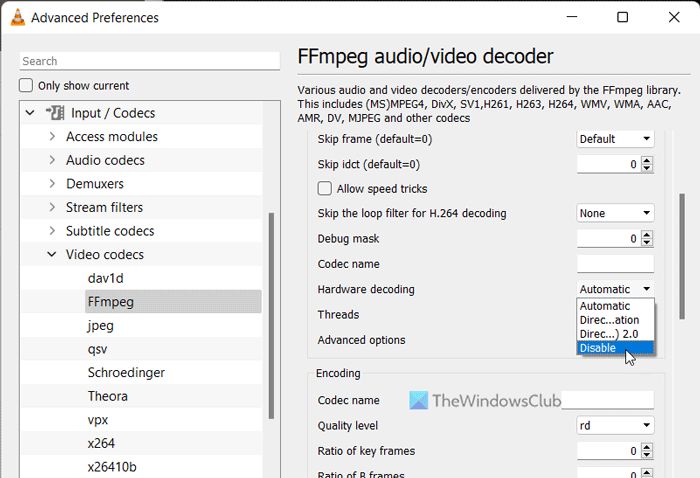
If you use hardware decoding or hardware acceleration in the VLC media player, you might encounter this problem on Windows 11 Beta or Dev channels. There could be times when VLC might not be working when this functionality is turned on. It happens because your system fails to process the request correctly. That is why you can disable hardware decoding for FFmpeg and check if it resolves the issue or not.
To disable hardware decoding in the VLC media player, follow these steps:
- Open the VLC media player on your computer.
- Click on the Tools menu and select Preferences.
- Click on the All radio button.
- Head to the Input / Codecs section.
- Expand the Video codecs menu.
- Select the FFmpeg option.
- Find the Hardware decoding option.
- Select the Disable option from the drop-down menu.
- Click the Save button.
Then, check if VLC opens correctly or not.
3] Change Video Output settings
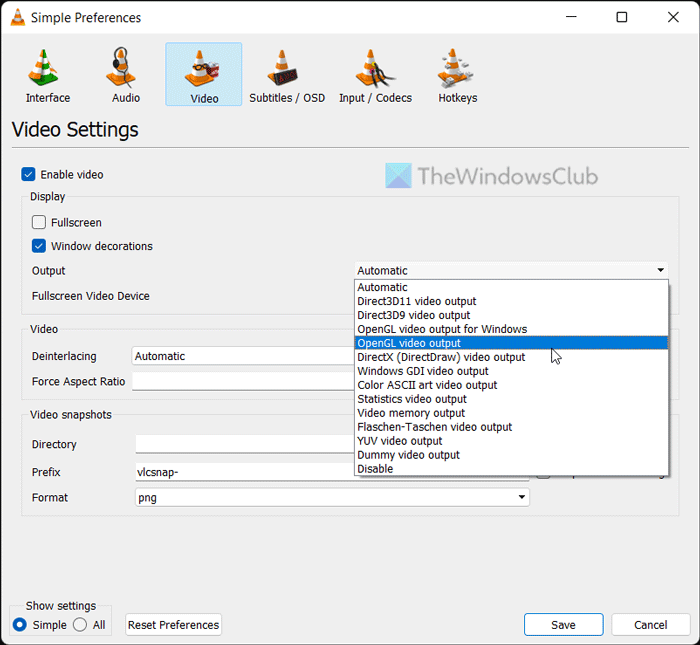
By default, VLC chooses the output device automatically. However, the same setting could cause the aforementioned issue on your computer. That is why you can opt for a specific device to troubleshoot the issue.
To change video output settings in the VLC media player, follow these steps:
- Open the VLC media player.
- Click on Tools > Preferences.
- Switch to the Video tab.
- Expand the Output drop-down menu.
- Select the DirectX (DirectDraw) video output option.
- Click the Save button.
Next, you can check if it has solved the issue or not.
4] Reset VLC settings
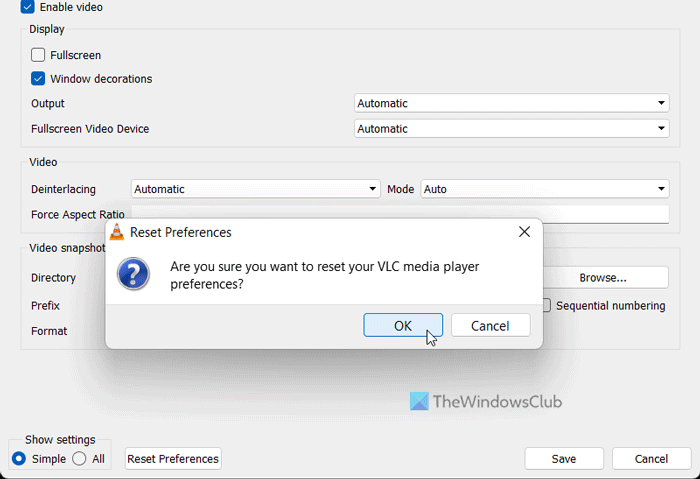
The VLC media player comes with countless options and features to customize the preferences as per your requirements. If you have changed a lot of options or settings incorrectly in the media player, it could cause the issue as stated above. That is why it is better to reset the VLC media player’s preferences so that you can get the factory defaults without reinstalling the app.
To reset the VLC media player’s preferences, follow these steps:
- Open VLC media player.
- Click on Tools > Preferences.
- Click the Reset Preferences button.
- Click the OK button in the popup window.
After that, you can restart the VLC media player and check if the problem remains or not.
5] Update VLC media player
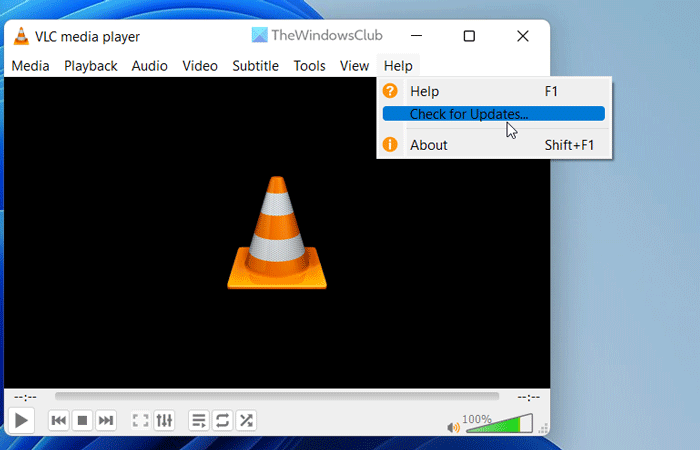
VLC media player allows users to download and install the update automatically. However, if you have disabled this setting during installation, you need to check for updates manually. Let’s assume that the VLC media player has some bugs or glitches, and that is blocking you from opening the app. That is why it is recommended to update the VLC media player immediately.
To check for VLC media player updates, follow these steps:
- Open the VLC media player on your PC.
- Click on the Help menu.
- Click on the Check for Updates option.
- Let it check for available updates.
If an update is available, you will get an option to download and install it on your computer. Do that, restart the media player, and check if you can open it usually or not.
6] Reset File/Disc/Network cache setting
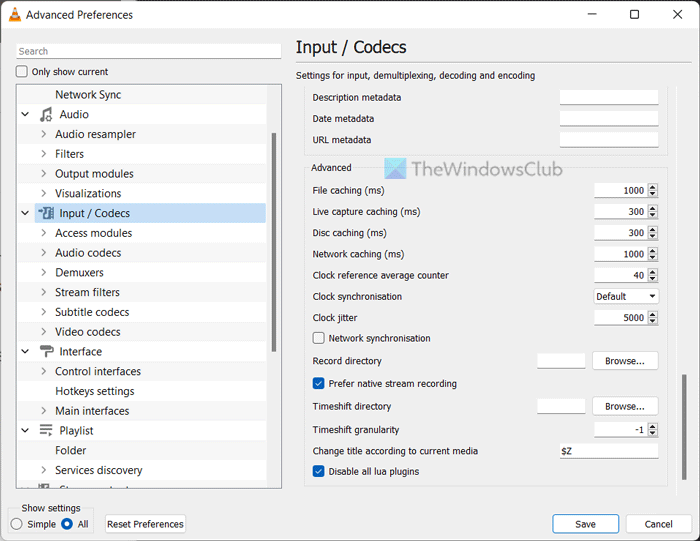
Changing the File caching, Disc caching, and Network caching could cause this issue on your PC. That is why it is always recommended to set it to the default settings. However, if you have changed it earlier to test something, you need to set it to the factory defaults.
For that, do the following:
- Open VLC media player.
- Click on Tools > Preferences.
- Select the All radio button.
- Click on the Input / Codecs menu.
- Head to the Advanced section.
- Set File caching as 1000.
- Set Disc caching as 300.
- Set Network caching as 1000.
- Click the Save button.
After that, check if you can play audio and video in the VLC media player or not. Hopefully, there will not be any issue. However, if the problem remains, you need to follow the final solution.
Read: Adjust, delay, speedup Subtitle Speed in VLC Media Player
7] Reinstall VLC media player
It is probably the last thing you need to do when no other solutions have worked for you. At times, some internal files might get corrupted due to a malware or adware attack. In such situations, you need to uninstall the media player, download it from the official website, and reinstall it on your computer. As Windows 11 comes with 64-bit architecture, you need to download the 64-bit version, which works better than the other edition.
If nothing helps, you may want to uninstall VLC Media Player and switch to another media player or a free VLC alternative.
Does VLC player work on Windows 11?
Yes, the VLC media player works smoothly on Windows 11 as well as Windows 10 PC. No matter which build or edition of Windows 11 you use, you can certainly download, install and use the VLC media player on Windows 11 PC. For your information, VLC media player is one of the popular free media players for Windows users.
Related: VLC washed out colors & color distortion problem.
Why is my VLC file not working?
If the VLC media player is not opening or playing files on Windows 11 PC, you can follow the aforementioned solutions. At times, some internal conflicts can cause this issue on your computer. If so, you can go through these tips and tricks to troubleshoot the issue within moments.