Subtitles are crucial for videos, especially when they’re inaudible or not in your local language. This is why it’s annoying when subtitles are missing from your videos. VLC Media Player subtitles can get subtitles either from a separate file or directly from a video with subtitles hardcoded in it.
If subtitles are not showing on your videos, it could be a problem from VLC Media Player or the video itself. Either way, I’ll show you how to fix the annoying missing subtitles issue in VLC Media Player.
VLC subtitles not showing
If subtitles are not showing in your VLC videos, try out the following troubleshooting steps before trashing the video.
- Enable the subtitle.
- Troubleshoot the subtitle file.
- Import subtitle file to VLC video.
- Adjust subtitle effects.
- Try a different video.
Continue reading to find out how to perform the above actions.
How to bring back subtitles in VLC videos
1] Enable the subtitle
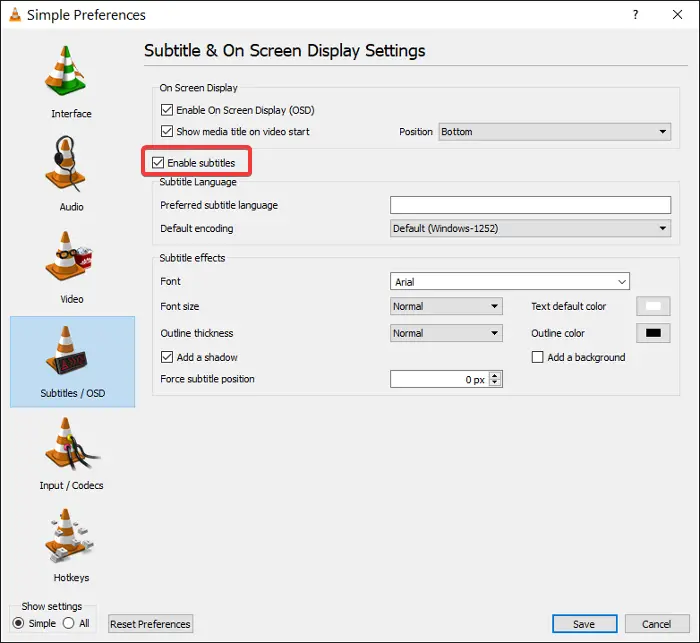
Launch VLC Media player and press the CTRL + P key combination to open Preferences. You can also get here by going to Tools > Preferences.
Switch to the Subtitles/OSD tab and mark the Enable subtitles checkbox.

Click on the Save button and restart VLC Media Player.
When VLC launches, play a video that has subtitles. If the subtitles don’t show up, click on the Subtitles menu, then go to Sub Track, enable it, and choose your preferred subtitle.
2] Troubleshoot subtitle file
VLC Media Player can load a video’s subtitles from a separate video file, which is usually in the SRT, SUB, SSA, or ASS formats. For this to happen, the subtitle file must have the same name and saved in the same directory as the video.
Therefore, if the video utilizes a separate subtitle file, the first thing you should do is rename the file to the video’s exact name. Then, move the subtitle file to the same folder as the video.
Also, you may want to open up the subtitle file. You can use Notepad or a similar program to do this. When you open the subtitle file, confirm that the file isn’t empty and contain subtitle text and times.
Read: How to download subtitles in VLC media player
3] Import subtitle file to VLC video
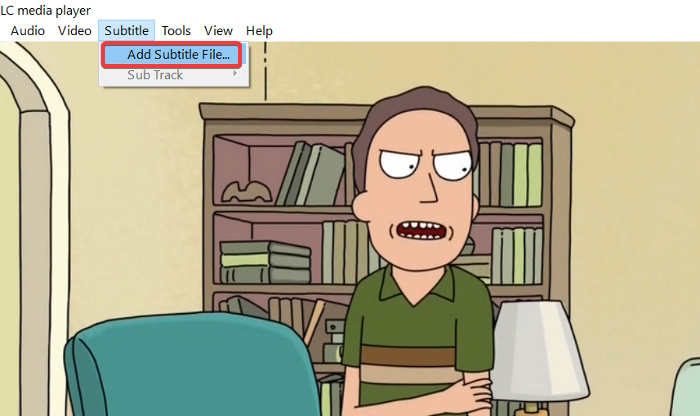
When you’re sure that you have a healthy subtitle file, it’s time to link it to the video. First, play a video with VLC. While it plays, click on the Subtitle menu, go to Subtitle > Add Subtitle File, and choose the subtitle file.

4] Adjust subtitle effects
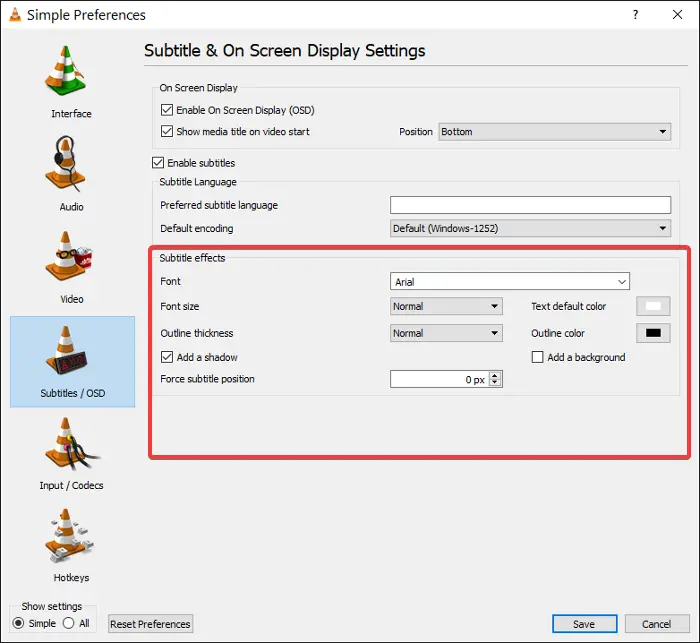
Launch VLC Media Player and click on the Tools menu. Next, go to Preferences. Click on the Subtitles/OSD tab to find the subtitle appearance settings.
Head over to the Subtitle effects area. Set the Text default color to white and change the Outline color to black. You can as well use other visible colors.

Change the Font size to Normal and the Force subtitle position to 0px. Finally, keep the Add a background checkbox unmarked.
Read: How to use mouse gestures in VLC Media Player.
5] Try a different video
By the time you’ve attempted the above troubleshooting steps, you should get back the subtitles. However, if all of those methods don’t work, you can be guess that the subtitle issue is from the video and not VLC Media Player.
To be sure that the video doesn’t have subtitles, try playing a different video that has subtitles.
If the subtitles show up on this other video, then I’m afraid your only bet would be to download another version of the video with subtitles.
Leave a Reply