This post offers the most applicable solutions to the VMconnect.exe application error; Cannot connect to a virtual machine on a host computer running Hyper-V in a server or client-based setup. The vmconnect program ships with Hyper-V and is located in the following directory C:\Program Files\Hyper-V\vmconnect.exe.

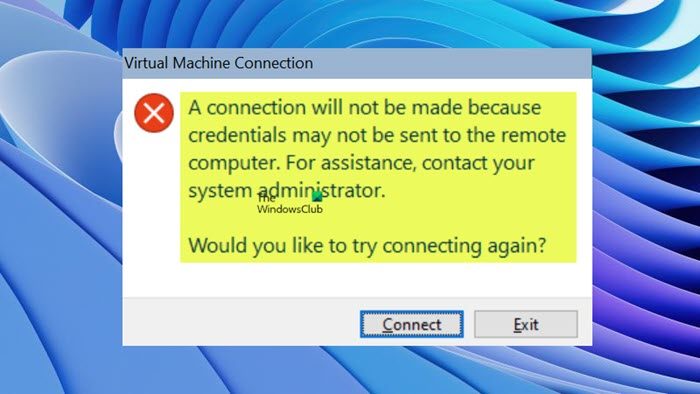
This error occurs when you attempt to use the VMconnect.exe application to connect to a virtual machine on a Windows Server or Windows client Hyper-V-based computer. Below is the full error message you may receive when the error occurs:
A connection will not be made because credentials may not be sent to the remote computer. For assistance, contact your system administrator.
Would you like to try connecting again?
What is VMconnect?
For those new to the proprietary Hyper-V virtualization technology, Virtual Machine Connection (VMConnect) is a tool you can use to connect to a virtual machine to install or interact with the guest operating system in a virtual machine. Some of the tasks you can perform by using VMConnect include the following:
- Start and shut down a virtual machine
- Connect to a DVD image (.iso file) or a USB flash drive
- Create a checkpoint
- Modify the settings of a virtual machine
Read: How to create Hyper-V Virtual Machine Desktop Shortcut in Windows
VMconnect.exe application error; Cannot connect to the virtual machine
This VMconnect.exe application error; Cannot connect to virtual machine issue occurs if the Credential Security Service Provider (CredSSP) policy on the Windows machine Hyper-V-based computer is not enabled to authenticate user credentials from a remote location. To resolve this issue, you can do any of the following and see what works for you:
- Delete saved credentials in Hyper-V
- Modify (create CredSSP policy) the registry
- Enable authentication of remote credentials from a user via Group Policy
Let’s see the steps involved in the resolutions mentioned.
1] Delete saved credentials in Hyper-V
Hyper-V will cache credentials used to gain access to guest virtual machines. To avoid potential security breaches, the option to delete credentials allows any saved credentials to be removed from the system.
Since you cannot connect to a virtual machine in Hyper-V due to the VMconnect.exe application error, it’s likely the saved credentials cache is corrupted and just needs a reset. So, to delete the saved credentials in Hyper-V to resolve the issue at hand, follow these steps:
- In the Hyper-V MMC snap-in, right-click the Hyper-V server that hosts the virtual machine to which you want to connect.
- Click Hyper-V Settings.
- Click User Credentials,
- Next, uncheck the Use default credentials automatically (no prompt) option.
- Click Apply.
- Click Delete Saved Credentials.
- Click Delete. If there are no saved credentials, the Delete button will be greyed out.
- Click OK.
Repeat the steps above for each Hyper-V server you want to be prompted for credentials when you connect to a virtual machine.
Read: Allow or Prevent saving of Remote Desktop Credentials in Windows
2] Modify (create CredSSP policy) the registry

This error will occur if the CredSSP policy is not set up correctly on the machine. In this case, you can manually create the policy entry under several registry subkeys which will enable only authentication of the Microsoft Virtual Console Service on the machine. Since this is a registry operation, it is recommended that you back up the registry or create a system restore point as necessary precautionary measures. Once done, you can proceed as follows:
- Press the Windows key + R to invoke the Run dialog.
- In the Run dialog box, type regedit and hit Enter to open Registry Editor.
- Navigate or jump to the registry key path below:
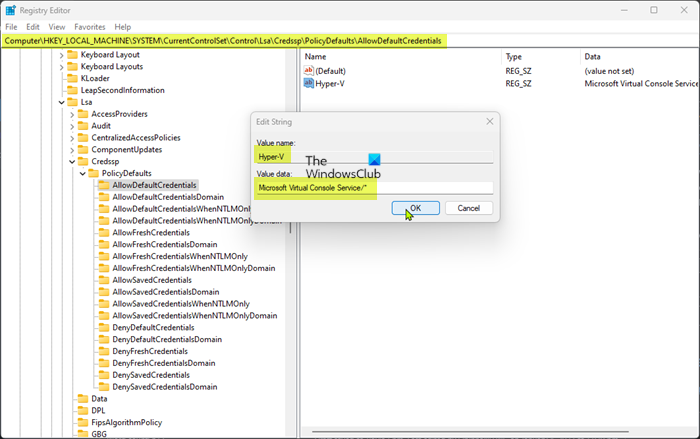
HKEY_LOCAL_MACHINE\SYSTEM\CurrentControlSet\Control\Lsa\Credssp\PolicyDefaults\AllowDefaultCredentials
- At the location, on the right pane, right-click on the blank space and then select New > String Value to create the registry key Hyper-V and hit Enter.
- Next, double-click on the new entry to edit its properties.
- Type Microsoft Virtual Console Service/* in the Value data field.
- Click OK or hit Enter to save the change.
- Now, repeat these steps for the following remaining registry subkeys:
HKEY_LOCAL_MACHINE\SYSTEM\CurrentControlSet\Control\Lsa\Credssp\PolicyDefaults\AllowFreshCredentialsHKEY_LOCAL_MACHINE\SYSTEM\CurrentControlSet\Control\Lsa\Credssp\PolicyDefaults\AllowFreshCredentialsDomainHKEY_LOCAL_MACHINE\SYSTEM\CurrentControlSet\Control\Lsa\Credssp\PolicyDefaults\AllowFreshCredentialsWhenNTLMOnlyHKEY_LOCAL_MACHINE\SYSTEM\CurrentControlSet\Control\Lsa\Credssp\PolicyDefaults\AllowFreshCredentialsWhenNTLMOnlyDomainHKEY_LOCAL_MACHINE\SYSTEM\CurrentControlSet\Control\Lsa\Credssp\PolicyDefaults\AllowSavedCredentialsHKEY_LOCAL_MACHINE\SYSTEM\CurrentControlSet\Control\Lsa\Credssp\PolicyDefaults\AllowSavedCredentialsDomainHKEY_LOCAL_MACHINE\SYSTEM\CurrentControlSet\Control\Lsa\Credssp\PolicyDefaults\AllowSavedCredentialsWhenNTLMOnlyHKEY_LOCAL_MACHINE\SYSTEM\CurrentControlSet\Control\Lsa\Credssp\PolicyDefaults\AllowDefaultCredentialsDomain
- Exit Registry Editor when done.
Read: Authentication error has occurred, Function requested is not supported
3] Enable authentication of remote credentials from a user via Group Policy

To configure Group Policy settings on the Windows Hyper-V-based computer to enable authentication of remote credentials from a user, follow the steps outlined below. The GPO configuration will use any Service Principal Name (SPN) from any computer to enable authentication of remote credentials.
- In the Run dialog box type gpedit.msc and hit Enter to open Group Policy Editor.
- Inside the Local Group Policy Editor, use the left pane to navigate to the path below:
Computer Configuration > Administrative Templates > System > Credentials Delegation
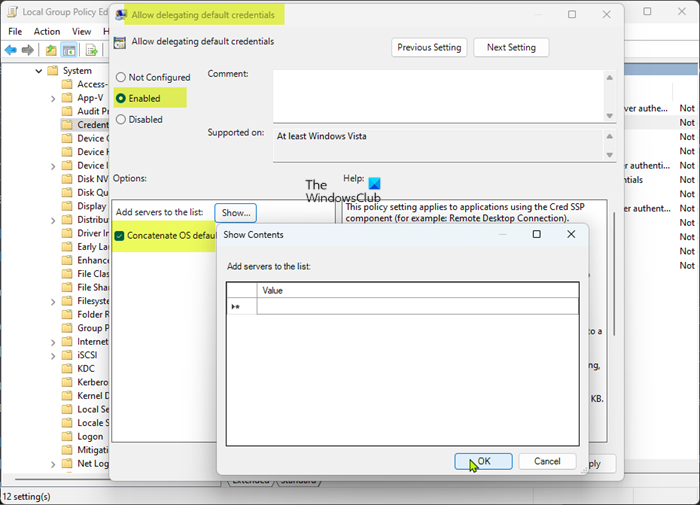
- On the right pane, double-click on the Allow delegating default credentials to edit its properties.
If you are using NTLM authentication, select and modify the Allow delegating default credentials with an NTLM-only server authentication entry instead.
- In the opened policy window, set the radio button to Enabled.
- Next, checkmark the Concatenate OS defaults with inputs above option.
- Next, click the Show button
Now, verify that the computer of the remote user is included in the list. If necessary, you can manually type in the remote user’s computer in the Value field. You can also use wildcard characters (for example the *) to select all computers.
- When done, click OK to exit.
- Click Apply > OK to save the changes.
- Close Group Policy.
Read: Your Credentials did not work in Remote Desktop on Windows
How do you fix the virtual machine could not be started because the hypervisor is not running?
The error message Virtual machine could not be started because the hypervisor is not running may be displayed if you have not set the Hyper-V hypervisor to open automatically after boot. In this case, to resolve the issue, you can use the bcdedit command to reconfigure it in the boot data file to set Hyper-V to launch automatically. Generally speaking, this error could be due to wrong BIOS settings that has disabled virtualization, Hyper-V feature, or DEP. It could also be due to modified Windows settings, or latest update.
Leave a Reply