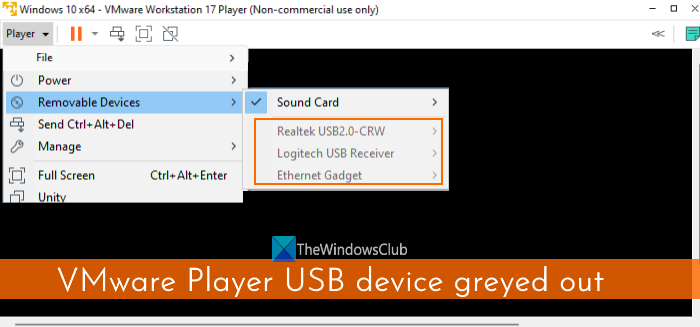
Some users have complained that when they open the VMware Player (or VMware Workstation Player) on their Windows PC and power on the virtual machine, they are unable to access the removable USB device(s) such as USB camera, USB hard drive, etc., connected to the host machine. For some users, a few USB devices are greyed out, and for others all the devices are disabled. If you also face this issue, then we will help you fix this VMware Player USB device greyed out problem with some easy solutions.

If a removable USB device is incompatible with VMware Player, then it can’t be used with a virtual machine. But, if the device is compatible and you still have this problem, then the solutions covered in this post will surely be helpful.
VMware Player USB device greyed out
To fix the VMware Player USB device greyed out issue, you can use the fixes listed below. Before that, first, reconnect the USB device(s) to the host system, and see if the USB device(s) are enabled for the Guest OS for which you have this problem. Also, run the VMware Workstation Player as administrator and update it by downloading all software components. If the problem continues, use the solutions listed below:
- Check if USB Controller is Present
- Modify the VMX configuration file of your Virtual Machine
- Make sure USB VMware Arbitration Service is Running
- Create a new Virtual Machine.
Let’s check these solutions one by one.
1] Check if USB Controller is Present

For a virtual machine created using VMware Player, a USB Controller device is required to use the USB devices. Though the USB Controller is added by default when you create a new virtual machine, if it is removed for some reason or not added while installing the VM, then that could be the reason you see that all or some USB devices are greyed out. So, check if USB Controller is present for that particular VM and add it if it’s not present. For this, use the following steps:
- First, power off or shut down the virtual machine and exit the VMware Workstation Player
- Launch the VMware Player again
- Select a virtual machine from the left section for which you have this USB device greyed out issue
- Open the Player menu present on the top-left corner
- Access the Manage menu
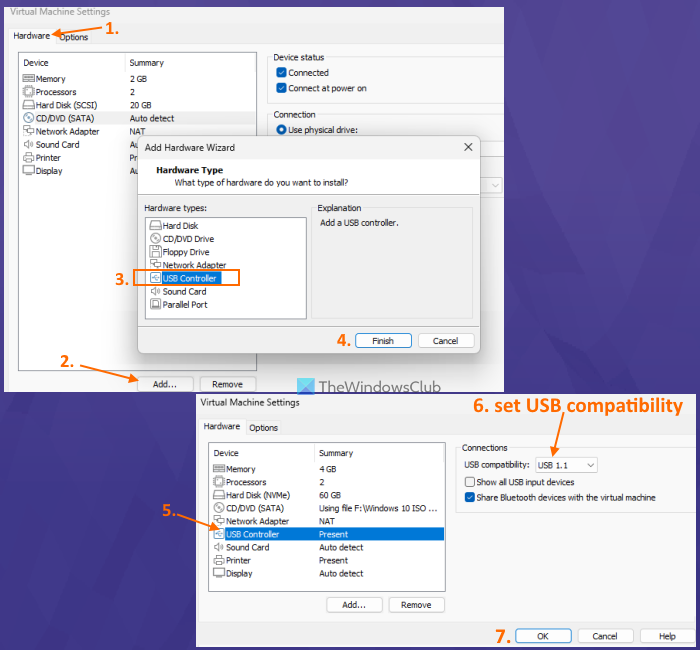
- Click on the Virtual Machine Settings… option. A window will open
- Switch to the Hardware tab in that window
- In the Devices list, look for USB Controller. If it is present, select the correct USB compatibility (USB 3.1, USB 2.0, etc.) from the right section, and press the OK button
- If the USB Controller is not present, click on the Add button in the bottom left section
- An Add Hardware Wizard box will open. There, select USB Controller in the Hardware types, and press the Finish button
- The USB Controller device for that particular VM will be added. Select it and set the USB compatibility using the drop-down menu if the default compatibility is not correct
- Press the OK button
- Play the virtual machine
- Access the Player menu, then the Removable Devices menu, and USB devices should be enabled and not greyed out.
Related: Not enough physical memory is available to power on this virtual machine
2] Modify the VMX configuration file of your Virtual Machine

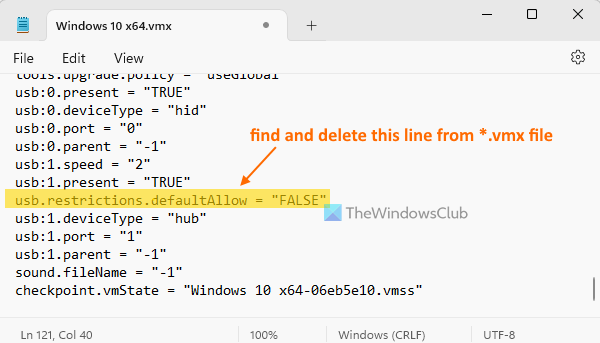
This is one of the best solutions to fix this problem. Each virtual machine created using VMware Player contains a *.vmx configuration file in its installation location. If that VMX file contains a line that sets USB devices to restrictions, then this is the reason why USB devices are visible as greyed out. That line would have been added to the VMX file during the VM creation process. You need to find and remove that line. For this, modify the VMX configuration file of your virtual machine using the steps added below:
- Shut down the virtual machine and exit the VMware Player. Otherwise, you may have trouble modifying the VMX file
- Now access the folder where the virtual machine is created and all its data is present on your host computer. The default location for creating a virtual machine is C:\Users\Username\Documents\Virtual Machines. Replace Username with the actual username and access the virtual machine folder. For example, if you have created a Windows 10 x64 VM, then under the Virtual Machines folder, you will see a Windows 10 x64 folder. All the files and folders related to that VM will be there. If you have set a custom location for creating the VM, then access that particular location
- Find the *.vmx file (say Windows 10 x64.vmx) and open it in Notepad or some other text editor software
- Now look for a line that says restrictions.defaultAllow = “FALSE” and delete it
- Save the VMX file
- Open the VMware Workstation Player and play the virtual machine
- Open the Removable Devices menu and you should able to access and connect to USB devices that were earlier greyed out.
3] Make sure VMware USB Arbitration Service is Running

VMware USB Arbitration Service allows the USB devices that are plugged into the host operating system to be usable by the guest operating system or virtual machine. But, if this service is not running, then it may create trouble in using the USB devices and that’s why you would see that USB devices are greyed out when you try to access them in VMware Player after playing a virtual machine. So, you should make sure the VMware USB Arbitration Service is running and it should run automatically by changing its Startup type. The steps are:
- Type services in the Search box of your Windows 11/10 PC and press the Enter key
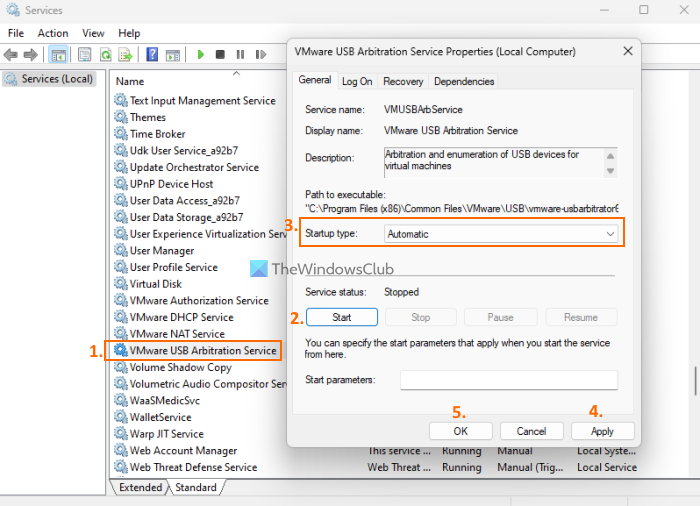
- In the Services window, scroll down and double-click on the VMware USB Arbitration Service
- The Properties window of this service will open. Press the Start button to run the service
- Now to make sure the service runs automatically, set the Startup type to Automatic using the drop-down menu
- Press Apply button and OK button.
4] Create a new Virtual Machine
If this problem has started after moving the virtual machine to a new host or new location in the same host, then it might be possible that VM files are not moved properly which is further causing this issue. So, if this is the case and these solutions don’t work, then you may need to create a new virtual machine using VMware Player for the new host or location. This would be time-consuming but worth trying.
Hope these fixes will help.
How do I enable USB devices in VMware?
A compatible USB device (say an external USB hard drive) that is plugged into your physical machine is enabled automatically in VMware Player. You only need to connect it to use with a virtual machine. For this, start a virtual machine in VMware Workstation Player, open the Player menu, select the Removable Devices menu, access the USB device, and click on the Connect option.
In case you don’t see a compatible USB device to connect, then open the Virtual Machine Settings, select USB Controller, and turn on the Show all USB input devices option. Now access the Removable Devices section for that VM, and then connect your USB device.
Why is my VMware Tools greyed out?
If the Install VMware Tools option is greyed out in VMware Player, then it can happen because the image of the tools is already mounted or your system is missing a virtual optical drive, etc. To fix this problem, access the Virtual Machine Settings window using the Manage menu. Remove the CD/DVD Drive device and Floppy Drive device from the Hardware tab, and add the CD/DVD Drive device again. Set Use physical drive option for CD/DVD Drive to Auto Detect mode. Now you should be able to use the Install VMware Tools option.
Read next: How to install Windows 11 on VMware Workstation Player.
Leave a Reply