By managing Presence Sensing settings in Windows 11 you can turn on or turn off your computer screen automatically when you approach or leave it. This tutorial will show you how to wake Windows 11 PC when you approach using Presence Sensing.
If your PC has a presence sensor (or human presence detection) built-in, then you can configure this native feature of Windows 11 to wake your device when you are close to it automatically. You will also be able to determine the distance between you and your PC to wake it when you approach it.
The Presence Sensing feature also lets you automatically turn off your computer or laptop screen when you leave it. Again, for that, you can determine the distance to let your computer know you are away to turn off the screen. This post includes all the steps for both options separately. Later, we will also show you how to enable and use new Presence Sensing settings on Windows 11 in this post.
Wake Windows 11 PC when you approach using Presence Sensing

Here are the steps to wake Windows 11 PC when you approach your device using the Presence Sensing feature:
- Open the Settings app using the Win+I hotkey
- Access Power & battery page available under the System category
- In the Power section, expand the Screen and sleep option
- Turn on the Automatically wake up my device when I approach option. Here, do note that if you don’t see this option in your Windows 11 desktop or laptop, then that means your PC doesn’t have a presence sensor. Also, you may also see an Automatically dim my screen when I look away option which is a pretty nice option. If you see this, turn it on if you want
- Now to set your Presence setting, click on the > icon (More options) of this option
- Use the drop-down menu available for Wake my device when I’m this close option and determine your distance from the available options.
Now the Presence Sensing feature is set successfully and it will wake your Windows 11 computer as per the settings configured by you.
In case you need to turn off this setting later, use the steps covered above and use the toggle for Automatically wake up my device when I approach option to turn it off.
Automatically turn off your Windows 11 screen using Presence Sensing
The steps to automatically turn off your Windows 11 screen using the Presence Sensing feature are as follows:
- Right-click on the Power button and use the Settings option. The Settings app will open with the System category
- Click on the Power & battery option on the right part
- Select the Screen and sleep option to expand it
- Turn on the Automatically turn off my screen when I leave option
- After turning it on, use the More options (> icon) of this option
- Now use the drop-down menu available for Consider me gone when I’m this far away option to determine the distance using any of the available options
- After this, open the drop-down menu for Then, turn off my screen after this amount of time option to set the wait time (say 4 minutes).
Now when you are away from your Windows 11 PC, it will detect that you’re gone (based on the distance determined by you) and automatically turn off the screen after the time selected by you.
Later, when you want to disable or turn off this feature, use the steps mentioned above and turn off the Automatically turn off my screen when I leave option.
While some devices with human presence detection sensors come with their own settings (such as Presence Aware in HP), Windows 11’s Presence Sensing feature is also a good option to use. The good thing is Windows 11 also comes with new settings for the Presence Sensing feature. Let’s learn more about it.
Related: Computer automatically waking up from Sleep in Windows PC
Enable and use new Presence Sensing settings in Windows 11
Windows 11 now comes with new Presence Sensing settings that let you enable or disable access to Presence Sensing and which desktop apps can access the Presence Sensing feature. You will also be able to see which apps have accessed Presence Sensing previously.
Though the new settings page for the Presence Sensing feature is pretty useful, it’s still under development and can be enabled and used only in the preview build of Windows 11. So, if you are using Windows 11 Preview build 25300 or higher, you can enable and use this feature easily. Let’s see how.
Enable new Presence Sensing settings in Windows 11

To enable Presence Sensing settings in Windows 11, you need to use ViVeTool on Windows 11 (a popular command line tool to enable/disable hidden or experimental features). The steps are:
- Download the ZIP file of ViVeTool from github.com and extract it into a folder
- Select the ViVeTool.exe in that folder
- Press the Ctrl+Shift+C hotkey to copy the path of that EXE file
- Run Command Prompt as administrator. If you want, you can also open the Windows Terminal app with administrative privileges and open the CMD window there
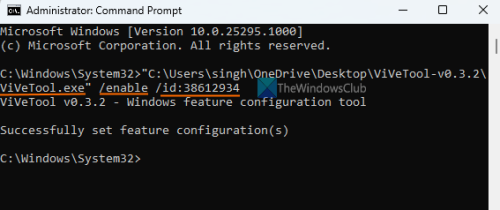
- Paste the ViVeTool.exe file’s path in the Command Prompt window. Continue with your command and add an enable parameter and an ID parameter along with a feature ID for Presence Sensing. The complete command would be:
ViVeTool.exe /enable /id:38612934
After successfully executing the command, reboot your Windows 11 PC. You have enabled Presence Sensing settings. Now let’s see how to use it.
How to use new Presence Sensing settings in Windows 11

The steps to use Presence Sensing settings in Windows 11 are as follows:
- Open Windows 11 Settings app
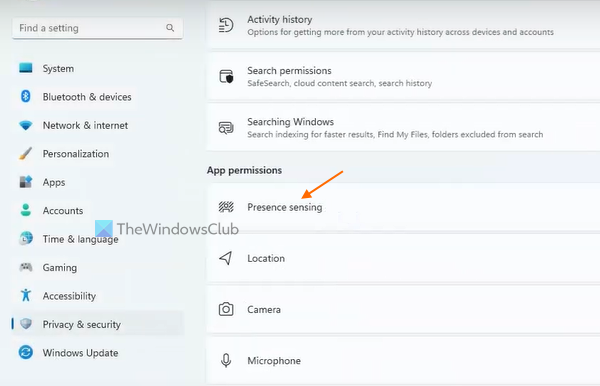
- Select the Privacy & security category available on the left section
- Under the App permissions section, click on the Presence sensing option
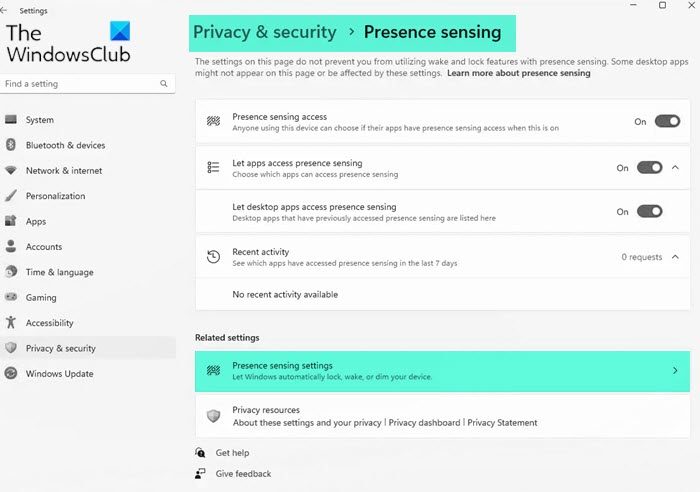
- Now you can see all the available settings for this feature which include:
- Presence sensing access: When this setting is on, anyone who is using this device can choose if their apps have access to this feature when the feature is turned on
- Let apps access presence sensing: When you have enabled or turned on this setting, you will be able to choose the apps (like Camera) that can access the Presence Sensing feature
- Let Desktop apps access presence sensing: This setting is used to see those desktop apps that have previously accessed Presence Sensing. Under the Recent activity section, you will see a list of all such apps that accessed Presence Sensing in the last 7 days.
A Related settings section is also present below under these settings which includes a Presence sensing settings option. If you click on that option, it will move you to the Screen and sleep section where you can configure the main settings of the Presence Sensing feature (as described in the starting).
Why does my computer wake up from sleep by itself Windows 11/10?
If a task is scheduled to run at a specified time, then that could be the reason why your computer is automatically waking up from sleep by itself on Windows 11/10 system. Your computer devices, wake timers, etc., can also be the reason for it. To fix the issue, you should disable wake timers, check scheduled tasks, find devices that are allowed to wake up your computer from sleep and disable unwanted devices, disable Wake on Magic Packet for your network adapter, etc.
What is wake on touch screen Windows 11?
Wake-on-Touch is an optional capability coming to Windows 11 devices that will help you wake your device from sleep using your finger(s). If a touch screen device is supported to use this feature, then you can open the Settings app, and turn on the Touch the screen to wake option present under the Touch section of the Bluetooth & devices category. In addition, you can also turn on the Three- and four-finger touch gestures option for this feature.
Read next: Windows Laptop Battery drains in Sleep Mode.
Leave a Reply