The webcam is one of the most commonly used utilities of a computer. Generally used for video-chatting with your friends or conducting professional tasks over a video conference on platforms like Skype, it has helped millions of users for a long time. But you can have experience glitches and hiccups while using the webcam, like the application freezing upon start. There can be a couple of reasons behind your webcam freezing, most of which have a handy solution which you yourself can implement.
Webcam freezing in Windows 11/10
Today, I will walk you through the most common causes of your webcam freezing, lag, or crashing on your Windows 11/10 computer and how to rectify those issues.
- Workaround in the Registry
- Run Microsoft Store apps troubleshooter
- Check if your webcam driver is outdated
- Download drivers
- Check Security software.
1] Workaround in the Registry
The Windows Registry is a database that stores settings for several Windows applications. A simple tweak in the Registry editor can prevent the webcam on Windows computers from constantly freezing. While this solution is simple, modifying the Windows Registry can cause irrevocable harm to your computer if done incorrectly. Thus, users are recommended to be thorough with the operation at hand and, if not, seek a professional’s help.
In order to do so, you have to follow the steps below:
Press the Windows+R key combination which will open the Run command. Herein, type ‘Regedit’ in the box and click Ok. This will open the Registry Editor.
Then, follow the path as prescribed below
HKEY_LOCAL_MACHINE\SOFTWARE\Microsoft\Windows Media Foundation\Platform
On the left sidebar, you’ll find ‘Platform’ under ‘Windows Media Foundation’. Right-click on Platform, hover over to ‘New’, and select DWORD (32-bit) Value. This is going to create a new value in this section.
Rename the value as ‘EnableFrameServerMode’. Right-click on it to modify and set the Value data as 0.
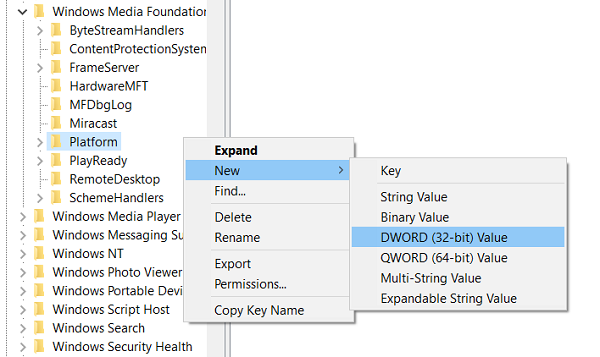
The next part of this procedure depends upon the version of Windows you are using; if you’re using the 32-bit version, the job is done and you can close the Registry Editor, but if it is the 64-bit one you have to navigate to the following path:
HKEY_LOCAL_MACHINE\SOFTWARE\WOW6432Node\Microsoft\Windows Media Foundation\Platform
Here, you have to follow the same steps as mentioned above; add a DWORD value, name it as EnableFrameServerMode, set its value at 0, and close the Registry Editor.
The changes you have made will be applied automatically, so you can open the application(s) where your webcam was freezing to check if the issue still persists.
You can easily restore your initial settings by visiting the Registry Editor locations as mentioned above and deleting the DWORD values you’ve created.
Related: Webcam keeps turning off and on again.
2] Run Microsoft Store apps troubleshooter
An alternate solution to the problem is to troubleshoot the Windows apps. This can be done by following the steps below:
Open the Windows settings by pressing the Windows+I key combination, or by searching for settings in the taskbar’s search pane.
Click on ‘Update and Security’ and select Troubleshoot from the left sidebar.

Here, select Additional troubleshooters which will open a separate window.

Scroll down to the bottom to find Windows Store apps. Select it and click on ‘Run the troubleshooter’.
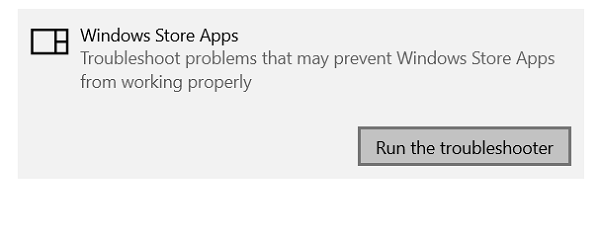
Restart your computer to apply the settings and check if the issue has been resolved.
Related: Laptop Camera or Webcam is not working.
3] Check if your webcam driver is outdated
If your webcam has started to freeze after a Windows update, it is possible that your system is running on outdated drivers for your webcam which is causing the conflict. You can check for them and update (in case) by following the steps below:
Press Windows+R to open the Run command. Type ‘Devmgmt.msc’ and click OK.
This would open your computer’s Device Manager, from which you can access all the installed drivers of your system. Alternatively, it can be opened via the Control Panel, too.
Search for Cameras in the list, expand it, right-click on the camera that seems to be glitching and uninstall it. Confirm it by pressing ‘OK’.
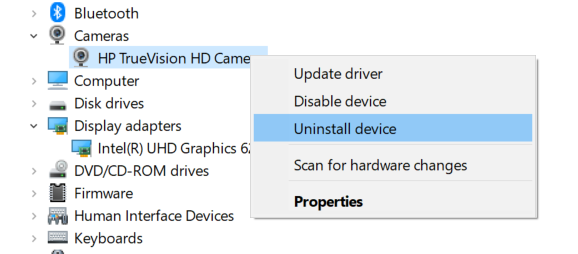
To ensure that the driver software has been completely removed, restart your PC.
Follow the first two steps to open the Device Manager again, click on ‘Action’ from the array of options on the top of the window, and select Scan for hardware changes.
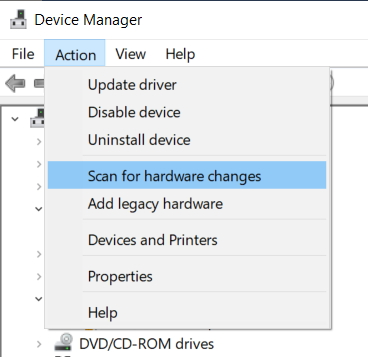
This should, ideally, be followed by Windows automatically installing an updated webcam driver to your system.
4] Download drivers
If the aforementioned procedure doesn’t do the trick for you, you can visit your device’s manufacturer’s official website, visit your product’s link and download the driver software from there.
5] Check Security software
It is also possible for your computer to be affected by Antivirus software that is restricting the webcam from functioning properly, in which case you will have to locate and disable the feature temporarily.
Fix: Webcam Black Screen issue on Windows
Other solutions for the problem include updating the camera app from the app store and installing the latest Windows updates that may include possible fixes.
Leave a Reply