Here is a complete guide for you to learn what is a PLS file and how to create one in Windows 11/10. PLS is basically a file format used to store and organize multimedia playlists. It typically contains links or paths to MP3 and other audio files that you can play. Let us check the detail of this file format below.
What is a PLS playlist?
PLS is a playlist file that you can use to play your favorite soundtracks on the go. However, it doesn’t contain the actual audio, but it stores references or links to open and play audio files in a supported media player. It can be used locally as well as for streaming music playlists online. The online media servers use PLS playlists to stream audio on the web. You can also download a PLS file from an online radio or some other source to stream and play music playlists on their device.
How to open and play a PLS file?
A lot of media player software support PLS file to open and play. You can open and listen to PLS playlists in any of the supported media players. Here are some of the media players for Windows 11/10 that can open and play PLS files:
- Windows Media Player,
- VLC media player,
- iTunes,
- Winamp,
- PotPlayer,
- Clementine,
- AIMP,
and some more media players. These media players let you simply browse and import a PLS file and then play the audio files contained in the source playlist.
PLS is a text-based file containing links to files in an audio playlist. Hence, you can also view its main content in the Notepad application. It will show you the tracks saved in the playlist. However, to play the audio, you will need the above-listed media players.
How to create a PLS file in Windows 11/10?
To create a PLS file in Windows 11/10, you can use the following method:
- Create a PLS file in Winamp.
- Generate a PLs file in Clementine.
- Use Notepad to create a PLS file.
Let us discuss the above methods in detail now!
1] Create a PLS file in Winamp
You can use Winamp to create a PLS playlist file. It lets you create different multimedia playlists files including PLS, M3U, and M3U8. Let us check out how you can make a PLS file in Winamp.
How to create a PLS file in Winamp
Here are the main steps to create a PLS playlist file in Winamp on your Windows 11/10 PC:
- Download and install Winamp.
- Launch the Winamp application.
- Browse and import your music library.
- Add the desired songs to the playlist.
- Go to the File > Save Playlist option.
- Select PLS as the output file format.
Let us now elaborate on the above-mentioned steps!
First of all, download the Winamp media player and then install it on your PC. After that, start the software to open up its GUI.
Now, import your music library and add your songs and videos to Winamp from the File menu. Then, add the source media files to the Playlist section of this media player using the drag and drop approach.
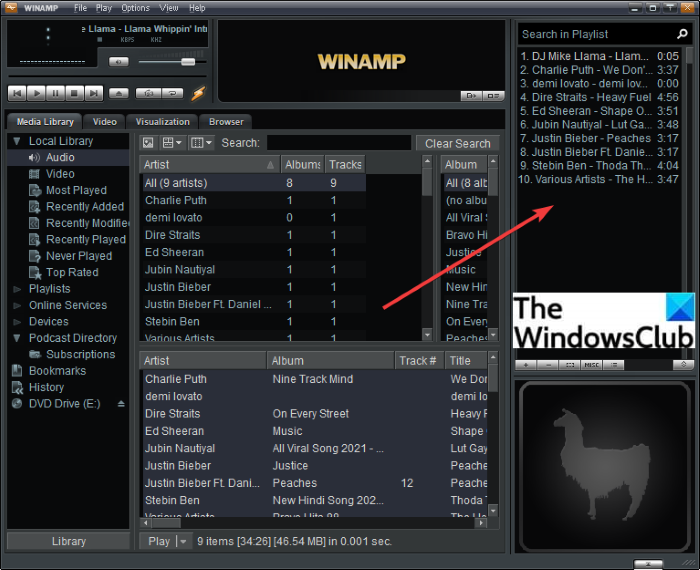
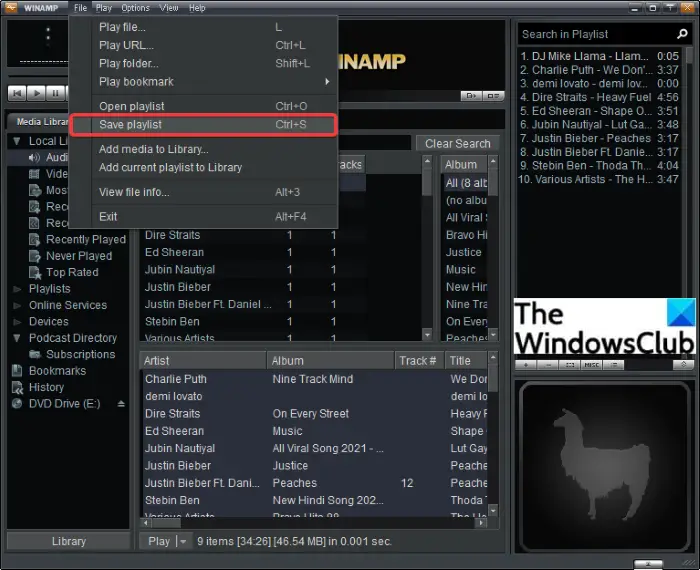
Next, go to the File menu and click on the Save Playlist option or simply press the Ctrl + S hotkey.
In the Save Playlist dialog box, select output playlist type as PLS and enter the playlist filename.
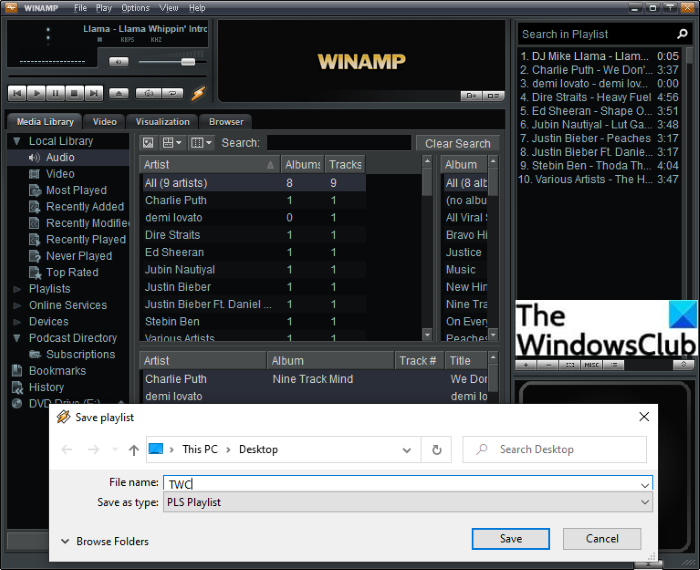
Finally, press the Save button and a PLS playlist file will be created at the selected location.
Similarly, you can create M3U and M3U8 playlists in Winamp.
See: Audacious: Free Multi-tab Music Player with a Winamp like interface
2] Generate a PLS file in Clementine
Clementine is a free and open-source music player that lets you create PLS playlists. Using it, you can listen to your music, organize your music library, view song and artist information, and manage music playlists. It lets you generate PLS and some other playlists like M3U, M3U8, ASX, CUE, etc. Let us check out the steps to create a PLS playlist file in it:
- Download and install Clementine.
- Launch Clementine.
- Add the source media files.
- Go to the Playlist menu.
- Click on the Save playlist option.
- Select PLS as output filetype.
- Press the Save button.
Firstly, you need to download Clementine from its official website and install it on your PC. Then, open the main GUI of this music player.
Now, browse and import your music library and files to it. Next, go to the Playlist menu and then click on the Save playlist option.
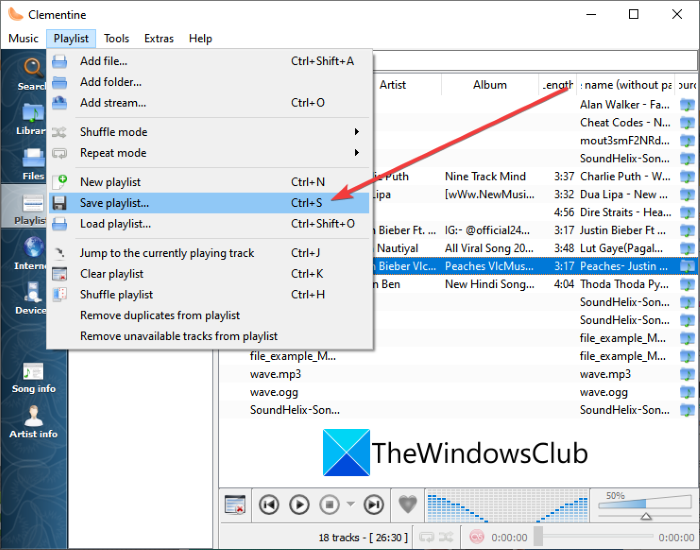
After that, choose PLS as the output file type and enter the filename for your playlist.
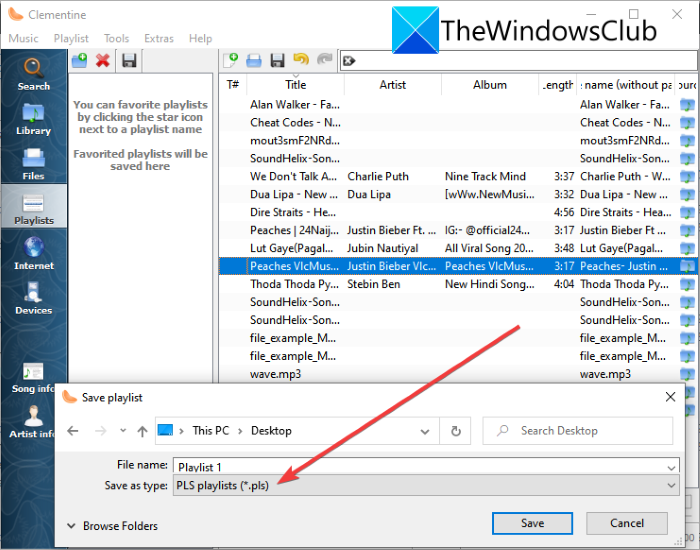
Finally, tap on the Save button to generate a PLS file.
See: How to collaborate on YouTube and YouTube Music Playlists
3] Use Notepad to create a PLS file
PLS is a text-based playlist file. Hence, you can view its content as well as create a PLS file in the Windows Notepad application. You just have to enter track entries that you want in the resulting PLS playlist file and then save the file with the .pls file extension. Let us have a look at the step-by-step procedure.
How to create a PLS file in Notepad:
These are the main steps to generate a PLS file Notepad:
- Open the Notepad app.
- Enter the header of the playlist file.
- Type track entry for the first media file.
- Repeat step (3) for all media files.
- Write the number of entries.
- Enter playlist version.
- Save the file as a PLS playlist.
Firstly, launch the Notepad application on your PC. Now, type the main header of the PLS playlist file. Just type playlist enclosed within square brackets in the first line in Notepad.
Next, you need to write track entries with the track number for the source media files. For the first track entry, write the below text:
File1=<location of media file/stream>
Title1=<type track title> -- (optional)
Length1=<length of track in seconds>
For example:
File1=\Users\KOMAL\Music\track1.mp3
Title1=Give Your Heart A Break
Length1=217
If you want to upload a PLS file to a media server for streaming, you can write your server’s IP address along with the port number of the stream in the “File” field.

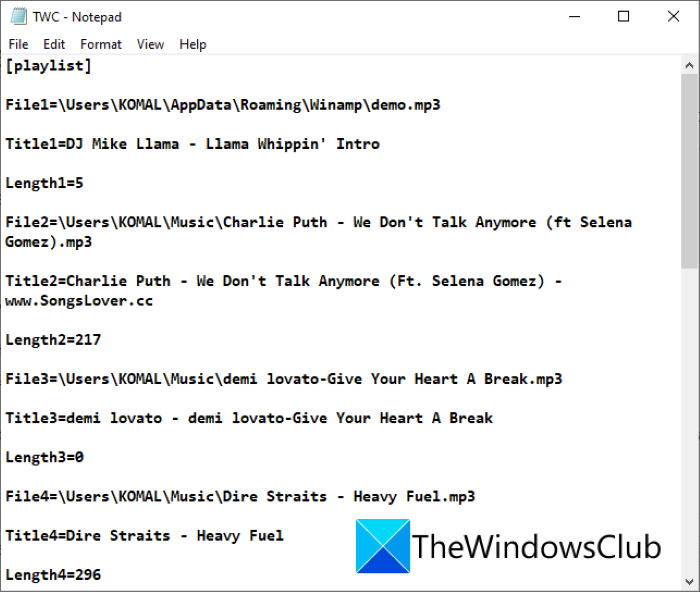
Next, you have to repeat the above step for all the media files that you want to include in the output PLS file. Just type the track number and then enter its respective detail, such as File2, File3, File4, and so on.
You can refer to the below example to understand how the commands will look like.
After that, you need to enter the footer of the PLS file at the end of the file.
NumberOfEntries=X
Version=2
In the above command, enter the number of entries in place of X. If there are 5 tracks, enter “5“, and likewise. And Version=2 is the version of the PLS playlist file that will remain the same.

Finally, you need to save the file as a PLS playlist. Simply click on the File > Save As option, and then in the Save As dialog, select the Save as type to All Files. Then, enter the playlist filename followed by the .pls file extension.
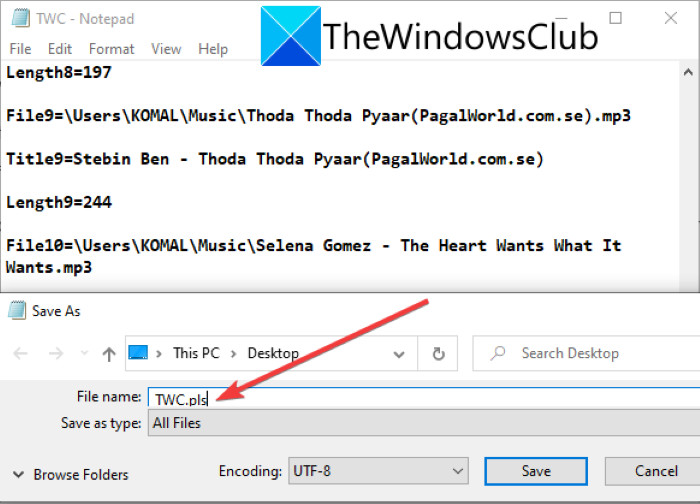
At last, press the Save button and it will create a PLS playlist file on your PC.
Read: How to create a Lyrics file in Notepad
Hopefully, this article enables you to create PLS playlists on your Windows 11/10 PC.
Now read: Create and edit Playlist or Radio Station on Groove Music.