Windows computers refresh their DNS records in the domain zones hosted by the DNS servers every 24 hours. When a Windows computer is removed from the domain or is not able to update its DNS record in the DNS Server, the DNS record of that Windows computer remains in the DNS database and is considered to be a stale DNS record. The stale DNS records remain in the DNS database unless it’s manually removed. DNS Aging and Scavenging helps to quickly identify the stale DNS records and remove them manually. In this post, we will describe what DNS Aging and Scavenging is, as well as outline the steps required to configure/enable this feature on the Windows server.
What is DNS Aging?
Aging is a feature that allows identifying stale DNS records. It actually uses two intervals and a DNS record is considered as stale once both are elapsed.
These intervals are:
- Non-Refresh Interval: It is a period of time during which a resource record cannot be refreshed (*). Refusing the refresh during this period of time reduces the replication traffic as there is no need to replicate the same information again.
- Refresh Interval: It is a period of time during which a resource record could be refreshed (*).
(*) A resource record refresh is a DNS dynamic update where the hostname and IP do not change. A DNS dynamic update to change the registered IP for a resource record is not considered as a refresh and is exempt from the Non-Refresh Interval.
What is DNS Scavenging?
Scavenging is a feature that allows the cleanup and removal of stale resource records in DNS zones.
A stale resource record will be removed only if scavenging is enabled on:
- The resource record
- The DNS zone where the resource record exists
- At least one DNS hosting a primary copy of the DNS zone where the resource record exists
Scavenging occurs on recurring intervals when enabled on a DNS server. A stale resource record can then still exist until the next cycle of DNS scavenging.
If you do not enable DNS Aging and scavenging, you might face the following situations:
- Domain zones will hold the DNS records that are not needed.
- Over a period of time, the DNS database size will be increased.
- It will take more time for the DNS server service to enumerate and load the DNS database in memory.
- It will take more time for the DNS server to respond to a DNS query. This is because the DNS server needs to enumerate all DNS records before it can find the required DNS record and then send a response.
- DNS servers might respond with an invalid DNS record that no longer exists on the network causing naming resolution problems on the network.
- Another Windows client computer might not be able to register its own DNS records if the same IP address is being used by a stale DNS record.
Enable & Configure DNS Aging and Scavenging

To successfully configure/enable DNS Aging and Scavenging on Windows server, you need to follow 3 steps in this order;
- Check Server DNS Records (very important first step)
- Enable DNS aging and scavenging on DNS zones
- Enable DNS scavenging on at least one DNS server hosting primary copies of your DNS zones
Let’s take a look at the steps involved in detail.
1] Check Server DNS Records (very important first step)
This step is crucial because if you don’t follow this step first, you could delete server DNS records. As a precaution, you may want to also backup your DNS server and/or records.
Scavenging works on timestamps, so any DNS record with a timestamp will get processed and possibly deleted. So it’s recommended you check your server DNS records and make sure they are static.
To check your records open the DNS console and check the Timestamp column, your servers should be set to static. If not, simply open the record then uncheck the Delete this record when it becomes stale box.
Once you have done that, refresh the DNS console the timestamp will now show static for that record.
Check all your server records and change them to static before moving onto the next step.
2] Enable DNS aging and scavenging on DNS zones
Do the following:
- Using DNS administrative tool (dnsmgmt.msc), go to the properties of your DNS zones and then click on Aging…
- Enable Scavenge stale resource records checkbox, specify the Non-Refresh interval, and Refresh interval periods.
- Click OK.
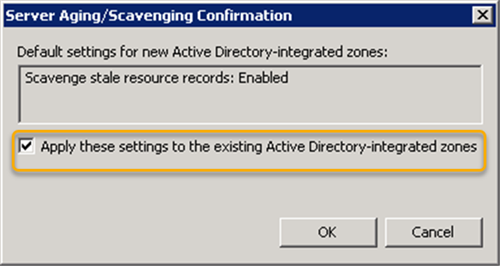
To make DNS aging and scavenging enabled by default for all DNS zones on a DNS server, you need to proceed as follows:
- Right-click on the server name and then click on Set Aging/Scavenging for All Zones…
- Enable Scavenge stale resource records checkbox, specify the Non-Refresh interval, and Refresh interval periods.
- Click OK.
- Check the Apply these settings to the existing Active Directory-integrated zones box (This will enable DNS aging and scavenging for the existing Active Directory-integrated zones).
- Click OK.
Now, proceed with the next and final step.
3] Enable DNS scavenging on at least one DNS server hosting primary copies of your DNS zones
Do the following:
- Go to the properties of your DNS server.
- Go to Advanced tab.
- Check the Enable automatic scavenging of stale records box.
- Once done, specify the Scavenging period (That is the recurring interval for Scavenging on a DNS server).
- Click OK.
That completes the setup of DNS Aging and Scavenging.
Leave a Reply