The SearchFilterHost.exe file, also known as the Windows Search Filter Host, is a component or service of this Windows Search Indexer. Search Indexer is a Windows application used to index and cache files in the system. Indexing helps us locate files quickly and efficiently. If you are experiencing SearchIndexer.exe high CPU usage, here is how to fix it on your Windows 11/10 computer.

What is SearchFilterHost.exe?
SearchFilterHost.exe is a legitimate Windows process located in the System32 folder. It is a component of Windows Search Indexer that helps index, cache, and search files on your computer.
Causes for High CPU usage by SearchFilterHost.exe
Various factors can lead to high or excessive usage of system resources for the SearchFilterHost.exe file, as detailed below:
- Corrupt Search Index: If corrupted, the search index can take up significant resources as the system may struggle to process the searches.
- Problems with Active Indexing: The CPU is generally overloaded if the system actively indexes files, especially when new files or folders are to be indexed.
- Issues with Windows Search Service: The Windows Search service executes the indexing process in the background. If the service encounters problems or does not function properly, such instability may lead to high CPU, memory, or disk usage.
- Corrupt System Files: Corrupt or damaged system files can also negatively affect the way SearchFilterHost.exe operates and, hence, lead to improper or high resource usage.
- Incomplete Windows Installation: Incomplete Windows installation or OS update installations can lead to functional issues, including those that are associated with SearchFilterHost.exe
How to fix High CPU Usage by SearchFilterHost.exe
The below-mentioned steps can be performed to resolve the issue effectively:
- Check the Authenticity of SearchFilterHost.exe
- Reconfigure Search Index
- Run Search and Indexing Troubleshooter
- Reduce Indexed Locations
1] Check the Authenticity of SearchFilterHost.exe
The SearchFilterHost.exe file is generally stored in the C:\Windows\System32.
However, if the system is virus—or malware-infected, the same file may be disguised as malware and found in locations other than the above directory. Hence, scanning the system to identify the file’s location using Windows Defender or any other antivirus program and removing it can help disinfect the system and restore the program’s functionality.
2] Reconfigure the Search Index

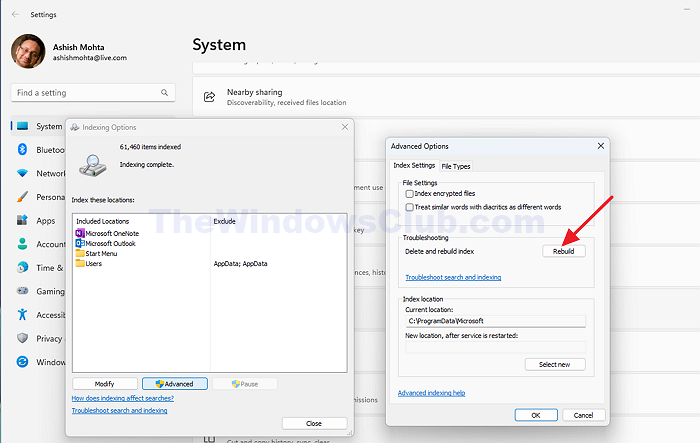
Rebuilding the search index can help restore the best possible performance of the Windows Search and create a fresh index free from corrupt entries. To do so,
- Open the Settings app by pressing the Windows + I key together.
- Select the Indexing Options and click on the Advanced button.
- Under Advanced options, click the Rebuild button to build a fresh index.
3] Run the Search and Indexing Troubleshooter

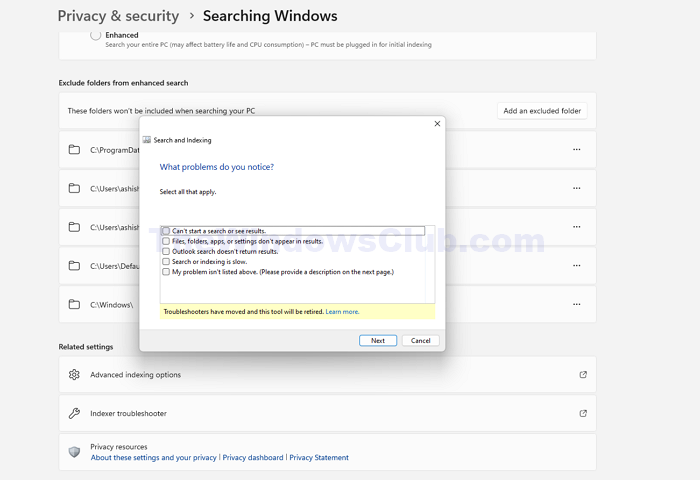
Windows comes with a built-in Search and Index Troubleshooter, which can help fix Windows Search issues by identifying and resolving the issues that lead to high system resource usage by the search and indexing service. To carry out the process:
- Press the Windows + I key on the keyboard to open the Settings application.
- Click on the Privacy and Security option on the left pane and then click on the Searching Windows option on the next screen.
- Click on the Searching Windows > Indexed Troubleshooter option on the next screen.
- In the following Window, please tick the checkbox that reads, My problem isn’t listed above, and then click Next twice to run the troubleshooter.
Once completed, the screen will show the possible issues detected, and the on-screen prompts can be followed to allow the troubleshooter to fix the issues detected.
4] Reduce Indexed Locations

Suppose the system uses old hardware, especially the hard drive. In that case, the disk may get overloaded due to continuous indexing in the background, which takes up a significant amount of CPU resources.
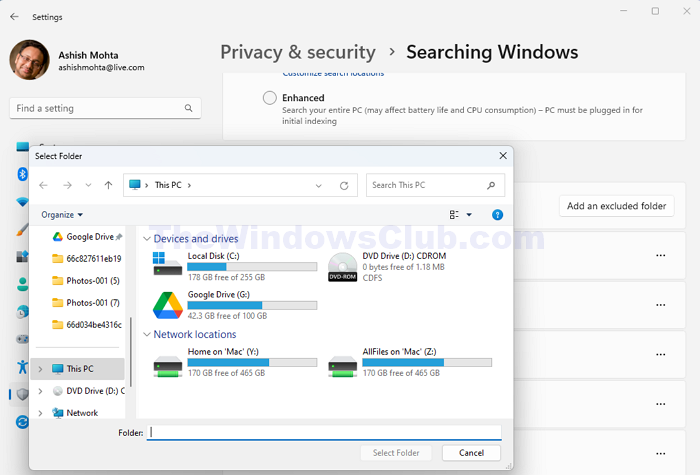
In such cases, reducing the indexed locations by excluding a few large folders can be tried to check if it can help resolve the issue. If it does, we can slowly increase the number of indexed locations so that it doesn’t take up too many resources simultaneously. To do so,
- Open Settings > Prvacy & security
- Click on Searching Windows on the next screen and then on Add an excluded folder.
- Browse the folder location to be excluded, select the same, and then click on Select Folder.
I hope the post was helpful.