Group Policy is a powerful tool that allows IT admins to configure policy across Windows PC in an enterprise environment. Every time a new setting is rolled out for Windows, the development team makes an ADMX template available that can be configured. The best part of this was ADMX or the Group Policy Settings is used to be backward compatible, and even if you had a mixed version of Windows across, it still used to work fine. However, things have changed with Windows 10 and Windows 11 in place. This post will briefly answer which GPO ADMX to use for Windows 11/10 in a mixed environment.
Which GPO ADMX to use for a Windows 11/10 Mixed Environment
The problem with the current scenario or the approach is that you cannot have a mixed template because Windows 11 has branched out on a different path, while Windows 10 will be supported for a couple of years. On top of this, Active Directory’s Central Store can only hold one set of ADMX files.
So which one should you choose? Windows 10 ADMX or Windows 11 ADMX? It will depend on your strategy. If you want to be on Windows 10 for a while, Microsoft recommends choosing the Windows 10 ADMX file. However, if you are ready for an upgrade and Windows 11 will be on more machines compared to Windows 10, then pick up the Windows 11 ADMX file.
How to configure Windows 10 policies when using Windows 11 ADMX files?
Assuming you have chosen to upgrade most of the PCs to Windows 11 but still need to keep Windows 10 PCs around, then it’s possible to configure Windows 10 policies even if the Active Directory’s Central Store uses the Windows 11 ADMX files. Follow the steps as mentioned below:
Make sure Windows 10 PC is on version 201H2 and you have joined it to your domain
Next login to the PC using an admin account.
Use Win + X to open the Power Menu and click on the Apps and Features menu
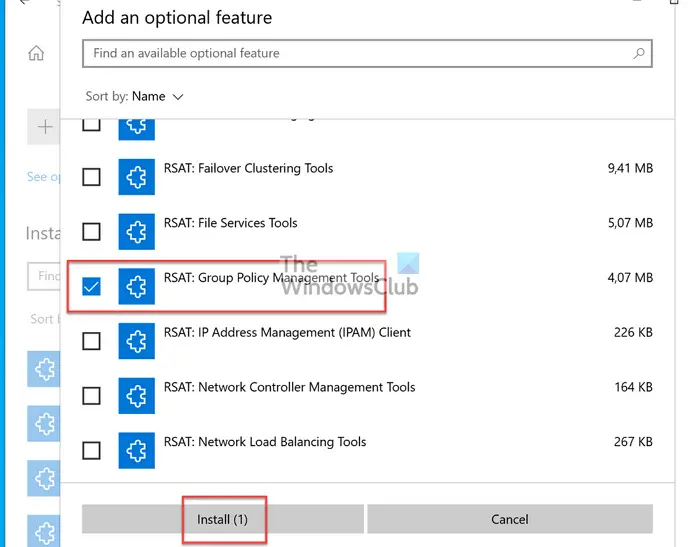
Click on the Optional Features link and then click on Add a feature button.
Search and install the RSAT: Group Policy Management Tools
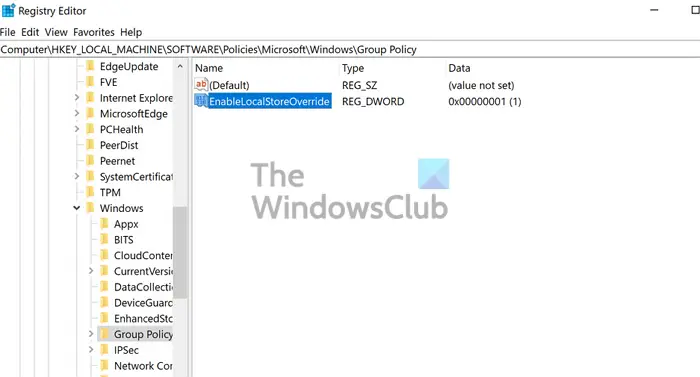
Next, open the Registry Editor and add the following.
Key:
HKEY_LOCAL_MACHINE\SOFTWARE\Policies\Microsoft\Windows\Group Policy
Value: EnableLocalStoreOverride
Type: REG_DWORD
Data: 1
Restart your computer and log on with a user account that has the right to edit domain Group Policy objects.

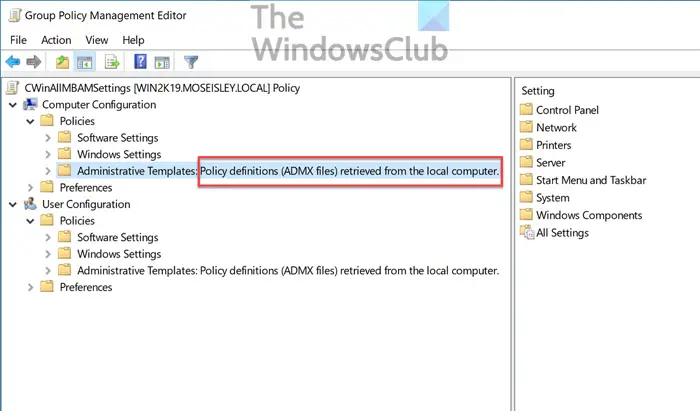
Once done, you can find the Group Policy Management editor in the Windows Administrative Tools. You can then open the desired GPO for edit.
The Administrative Templates should now be taken from the client’s local store instead of the central store.
You can check out the list of templates, and other details on microsoft.com.
Read: How to Install or Update Group Policy Administrative Templates (ADMX).
How do I add ADMX to GPO?
Adding a new ADMX file to Group Policy Central Store is straightforward. Download the new template, extract the ADMX and ADML file, and copy it to Group Policy Central Store. You can then create the new GPO, review the changes, and apply them.
Read: Group Policy settings you should not be using on your Windows computer.
What is the difference between ADMX and ADM?
ADM is a text-based template while ADMX is an XML-based document, but both of them offer administrative templates. That said, while ADMX files are stored in the central store, you can temporarily load ADM files into your current session. Fun fact, any change you make with these templates is stored in the registry database.
Leave a Reply