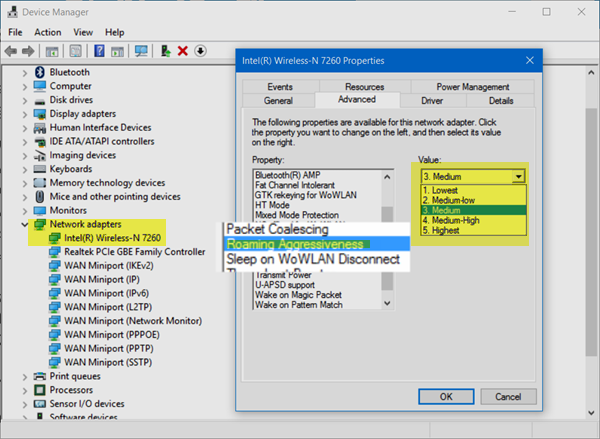
If you wish to improve the Wi-Fi reception and performance on your Windows PC, you may want to consider changing the WiFi Roaming Sensitivity or Aggressiveness. Roaming Sensitivity is the rate at which your device selects and switches to the nearest available point of access, offering a better signal. It is based on the signal strength and quality – and not on the distance to the WiFi point. Roaming Sensitivity depends on the signal strength and quality, not on the distance to the Wi-Fi point.
Intel products use the term Roaming Aggressiveness, whereas Ralink and some others use Roaming Sensitivity. But they basically mean the same.
WiFi Roaming Sensitivity or Aggressiveness
Automatically improve Wi-Fi reception & performance and switch to the strongest WiFi Signal! If you are facing poor Wi-Fi reception you may also change the WiFi Roaming Sensitivity or Aggressiveness to improve Wi-Fi reception & performance and see if that works for you.
- Open Device Manager.
- Locate Network Adapters.
- Select your network or wireless device
- Right-click > Properties > Select the Advanced tab.
- Choose Roaming Aggressiveness (or Sensitivity)
- Set the preferred value from the drop-down menu:
- Lowest
- Medium-low
- Medium
- Medium-High
- High
To configure the WiFi Roaming Sensitivity, in Windows 11/10, open the WinX Menu by right-clicking on the Start and selecting Device Manager.

Expand Network adapters and identify your WiFi or wireless device. Double-click on the entry to open its Properties box.
Now under the Advanced tab, scroll down the Property list till you see Roaming Aggressiveness or Roaming Sensitivity.
Next, under the Value drop-down, you will see the following options:
- Lowest: Your device will not roam.
- Medium-Low: Roaming is allowed.
- Medium: It is a balanced setting between roaming and performance.
- Medium-High: Roaming is more frequent.
- Highest: The device continuously tracks the WiFi quality. If any degradation occurs, it tries to find and roam to a better access point.
Select Medium-High or High. to improve your Wi-Fi performance.
Click on OK and exit.
How to reset Roaming Aggressiveness in Windows 11?
To check the existing value of Roaming Aggressiveness run the below command from an administrative PowerShell prompt:
Get-NetAdapterAdvancedProperty –Name “Your-WiFi-adapter-name”
To set Roaming Aggressiveness, execute the following commands from the administrative PowerShell prompt:
Set-NetAdapteradvancedProperty -Name “Your-WiFi-adapter-name” -DisplayName “Roaming Aggressiveness” –DisplayValue “1. Lowest”
Set-NetAdapteradvancedProperty -Name “Your-WiFi-adapter-name” -DisplayName “Roaming Aggressiveness” –DisplayValue “5. Highest”
Automatically switch to the strongest WiFi Signal
If you are receiving a poor WiFi performance you should configure the wireless network adapter to use the Maximum Performance setting and automatically switch to the strongest WiFi. You could also try updating your network adapter drivers to their latest version and see if that helps you. These tips to increase WiFi speed & and coverage area and how to improve Wireless Network Signal may also help you.
Is higher roaming aggressiveness better?
It depends on the situation. Having said that, if you are in a situation where you need to find more access points in a short span of time to get a better connection, you can set a higher roaming aggressiveness. However, you must know that your device will drain the battery whenever you try to use a higher roaming aggressiveness.
What should I set my roaming aggressiveness to?
It is always recommended to use the Medium level for roaming aggressiveness – no matter which laptop or desktop computer you use. It is the default setting for almost all manufacturers. However, if you want to change this setting, you can go through the aforementioned steps to get the job done.
Let us know if this makes a difference.