The Win+Shift+S keyboard shortcut in Windows 11/10, lets a user capture a part or full screen and copy it to the clipboard. On most occasions, the feature works well as desired but sometimes it may fail to respond. If you face this issue, then this post will help you.
Why is Windows Shift S not working?
This can occur if there is some conflict between the Snipping Tool, Snip and Sketch Tool, and the OneNote keyboard shortcuts. You have several ways to fix this issue. A third-party process could also be interfering with its functioning.
How do I enable Windows Shift S screenshot shortcut?
You may reset your Keyboard, physically clean the keys, enable the Clipboard history toggle, check Snipping Tool toggle, reset Snipping Tool to enable this keyboard shortcut.
Fix Win+Shift+S not working in Windows 11/10
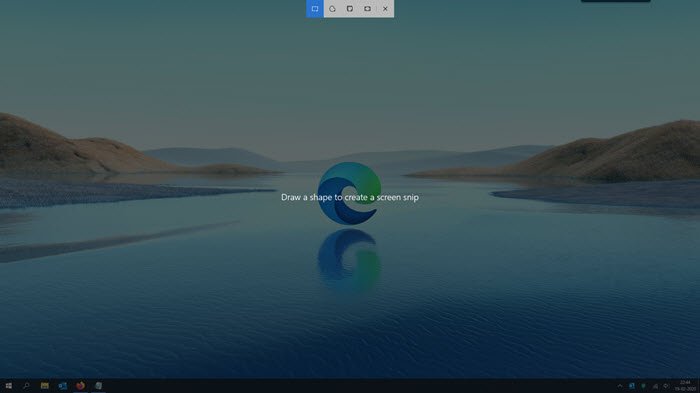
When you press ‘Win+Shift+S’ keys together, your computer screen is covered by a white/gray overlay. The mouse cursor turns into a plus (+) symbol, indicating the capture mode is on. So, when you select an area and release the cursor, the selected screen area is automatically copied to the clipboard. However, when you don’t see this happening, here is what you need to do to enable Win+Shift+S keyboard shortcut:
- Physically clean the keys
- Enable the Clipboard history toggle
- Check Snip & Sketch toggle
- Reset Snip & Sketch
- Unplug and replug your USB devices
- Use PrntScrn in place of Win+Shift+S
- Troubleshoot in Clean Boot State.
1] Physically clean the keys
Check if anything is stuck in the Win, Shift, and S keys and physically clean the keys on the keyboard.
2] Enable the Clipboard history switch
Make sure that the Clipboard history switch is turned on. You can check it in Windows 11/10 Settings app. If it is turned off, turn it on.
Windows 11
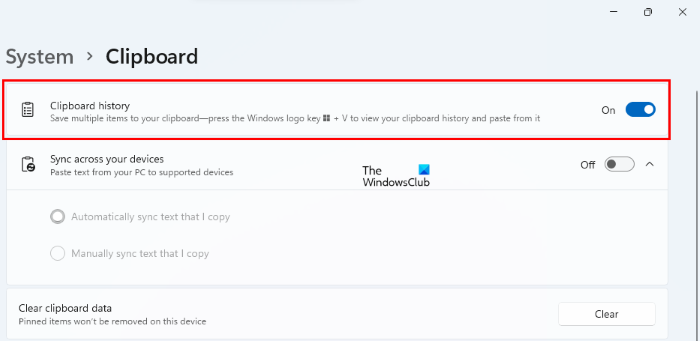
Launch the Settings app and go to “System > Clipboard.” You have to scroll down on the System page to find the Clipboard tab. Now, turn on the Clipboard history switch.
Windows 10
Press the Start button and select ‘Settings’.
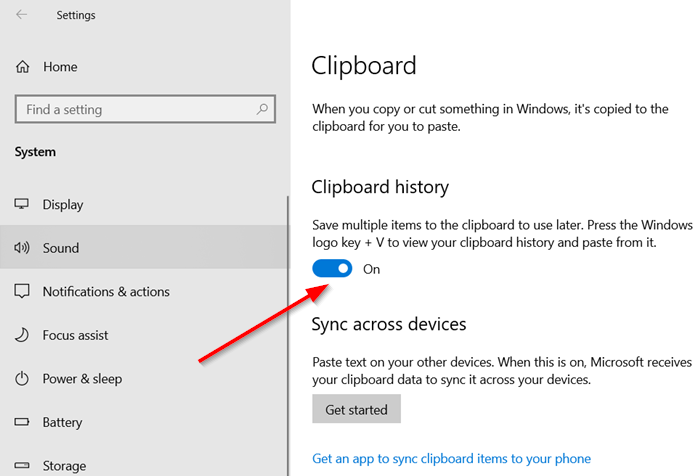
Choose the ‘System’ tile > Sound and scroll down to locate ‘Clipboard’ option.
Click it and in the right-pane see, if the ‘Clipboard History’ switch is enabled.
If not, toggle the switch to ‘On’ position.
3] Check Snipping Tool switch
Check whether the Snipping Tool switch is turned on or off. The steps to do so are listed below for both Windows 11 and Windows 10 operating systems.
Windows 11
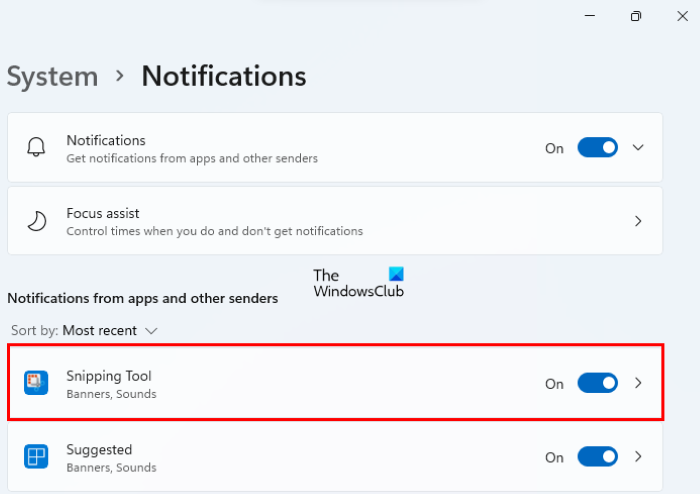
Open Windows 11 Settings app and check if the Snipping Tool switch is turned on. The following steps will help you with that:
- Launch the Windows 11 Settings app and select the System category from the left pane.
- On the right side of the page, click on the Notifications tab.
- Turn on the Snipping Tool switch under the Notifications from apps and other senders section.
Windows 10
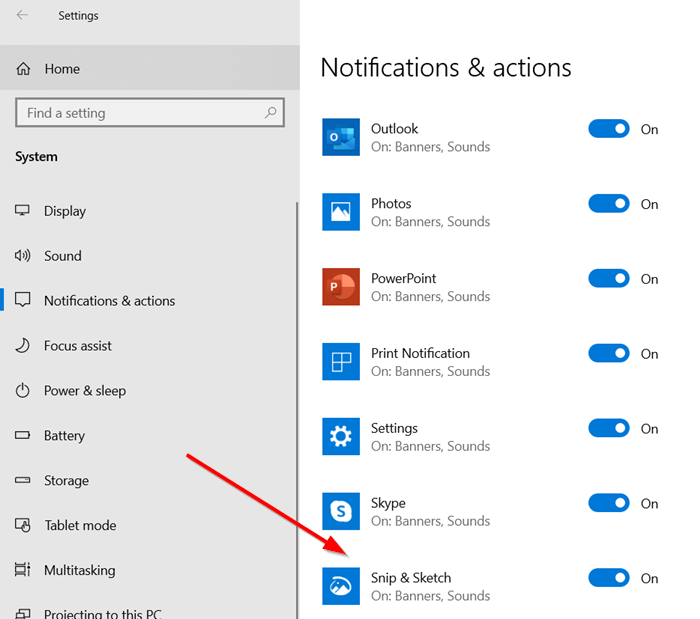
Open ‘Settings’, choose ‘System’ tile and navigate to the ‘Notifications & actions’ section.
Here, make sure that ‘Snip & Sketch or Snipping Tool’ switch is set to ‘On’ position.
4] Reset Snipping Tool
If the above methods fail to yield the desired results, Reset Snipping Tool. We have explained the steps to reset the Snipping Tool in Windows 10 and Snipping Tool in Windows 11 below.
Windows 11
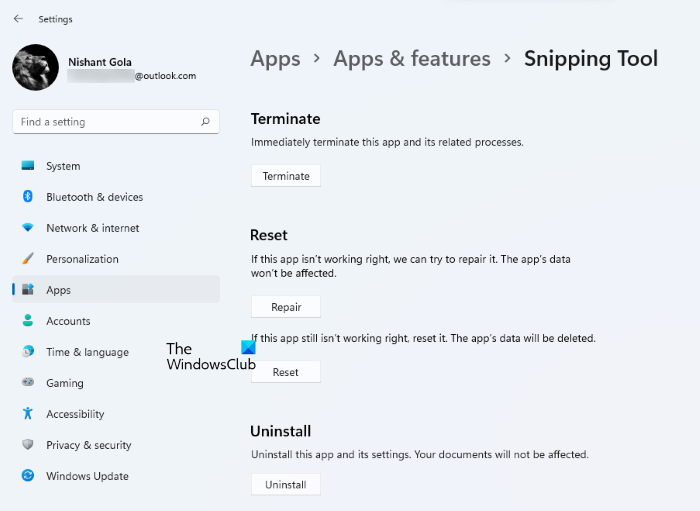
The steps to reset Snipping Tool in Windows 11 are listed below:
- Launch Windows 11 Settings app and select the Apps category from the left side.
- Now, click on the Apps & Features tab. The Apps & Features page will show you all the apps installed on your system.
- Scroll down the list of apps to locate the Snipping Tool. Once you find it, click on the three vertical dots next to it and select Advanced Options.
- Now, scroll down and click on the Reset button.

Windows 10
If the above methods fail to yield the desired results, Reset Snipping Tool. For this, go to Settings > Apps > Apps & features. Here, click on ‘Snip & Sketch or Snipping Tool’.
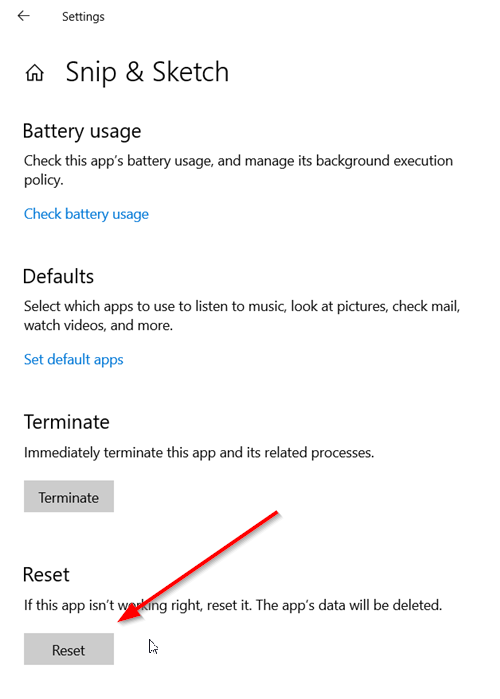
You should see the ‘Advanced options’ link appearing under the option. Click on it and hit the ‘Reset’ button in the follow-up screen.
Also, you may uninstall and reinstall the app from Microsoft Store. Go to ‘Settings’ > Apps > Apps & features and you will see an Uninstall button for Snipping Tool. Go ahead and uninstall the app. Later, go to Microsoft Store and re-install the app.
5] Unplug and replug your USB devices
Unplug, replug your USB devices like the Game Controller, etc, and see if that helps.
6] Use PrntScrn in place of Win+Shift+S
As an alternative, you may use the PrntScrn key in place of Win+Shift+S.
To do so, press Win+I to open Settings > Ease of Access > Keyboard > Locate Use the PrtScrn button to open screen snipping > Enable it.
7] Troubleshoot in Clean Boot State
A third-party process could also be interfering with its functioning. To identify the offender, perform a Clean Boot and troubleshoot manually as described in that post.
Related: How to reset the Keyboard to default settings.
How do I fix keyboard shortcuts on Windows 11/10?
If your keyboard shortcuts are not working, first, you should clean your keyboard. You can also test it on another computer (if available). The outdated or corrupted keyboard drivers are also one of the causes of this problem. Hence, updating or reinstalling your keyboard drivers may fix the issue.
I hope something here helps you.
Leave a Reply