Being a Windows 11/10 user, you definitely know how important creating a backup is. By using the Windows Backup and Restore feature, you can backup all the system files and create a system restore point. These backup files are useful in case of data corruption, disk failure, and malware infection. Sometimes, due to an error, Windows 11/10 fails to create a backup. This article lists the possible solutions for Windows 11/10 backup not working or failed.

Windows backup not working, failed or did not complete successfully
If your Windows 11/10 backup did not complete successfully and fails to complete, then one of these suggestions is sure to help you:
- Delete or move the WindowsImageBackup folder files.
- Delete EFI System and Recovery Partitions.
- Check the disk for errors and bad sectors.
- Assign a new drive letter to System Reserved Partition and set it active.
- Disable System Protection and delete the previously created system restore points.
- Recreate a new partition.
- Update Windows 10 File History.
Let’s describe these methods one by one.
1] Delete or move the WindowsImageBackup folder files
Sometimes, Windows cannot create a system backup due to the previously stored system backup files. This problem can be fixed by either deleting the previous system backup files or moving them to another folder. In my opinion, moving the previous system backup files to another folder is a better choice than deleting them.
2] Delete Recovery Partition and EFI System Partition
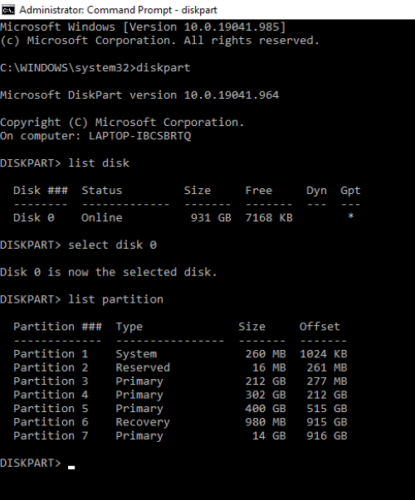
Sometimes, when you install Windows 11/10 on a new hard drive or upgrade to Windows 11/10, some partitions from the previous Windows version might be left on your system. These partitions can cause system backup to fail. Such an issue can be solved by deleting the Recovery partition and EFI system partition.

Follow the below-listed instructions to delete these partitions:
- Launch the Command Prompt as an Administrator.
- Type
diskpartand press Enter. - Type
list diskand press Enter. This command will show you all the available disks on your system. - Select the disk from which you want to delete the EFI and Recovery partitions. For this, type the command
select disk #and press Enter. In this command, you have to replace the symbol # with the disk number. - Type
list partitionand press Enter. - Now, you have to select the partition that you want to delete. For this, type
select partition #and press Enter. Don’t forget to replace the symbol # with the partition number. - Please check once again that you have selected the right partition as this process cannot be reversed. To delete the selected partition, type
delete partition overrideand press Enter.
Did it help? If not, try the next solution.
Related: Windows Backup says 0 bytes.
3] Check the disk for errors and bad sectors
Sometimes disk errors may also cause Windows 10 backup to fail. Hence, checking the disks for errors and bad sectors can help. For this, you have to use the ChkDsk /r parameter. The /r parameter repairs not only the errors but also the bad sectors on the selected disk.
chkdsk /r X:
Replace the letter X in the above command with your drive letter.
By using this command, you can check all the disks one by one. You will get the following message if the disk is currently in use, which most probably happens when a user scans the C drive.
Chkdsk cannot run because the volume is in use by another process. Would you like to schedule this volume to be checked the next time the system restarts? (Y/N).
On getting this message, simply type Y and press Enter. Your computer will automatically scan the disk with the ChkDsk utility on the next restart.
4] Assign a new drive letter for System Reserved Partition and set it active
Try to assign a new drive letter to the System Reserved Partition on an MBR disk. After that, you have to set it as active. To do so, open the Command Prompt as an Administrator and follow the below instructions:
- Type
diskpartand press Enter. - Type
list diskand press Enter. It will display all the disks that you have on your computer. - Now, you have to select the disk on which the System Reserved Partition is created. For this, type the command
select disk #and press Enter. Please replace the symbol # with the disk number. - Type
list volumeand press Enter. - Now, you have to select the disk volume to which you want to assign a new drive letter. For this, type the command
select volume #and press Enter. Don’t forget to replace the symbol # with the volume number. - Type
assign letter Xand press Enter. You can assign any letter. - After assigning a new drive letter, select the same disk partition by typing the same command listed in step 5.
- Type
activeand press Enter. This command will set the System Reserved Partition on the MBR disk as active.
Hope this helps.
5] Disable System Protection and delete the previously created system restore points
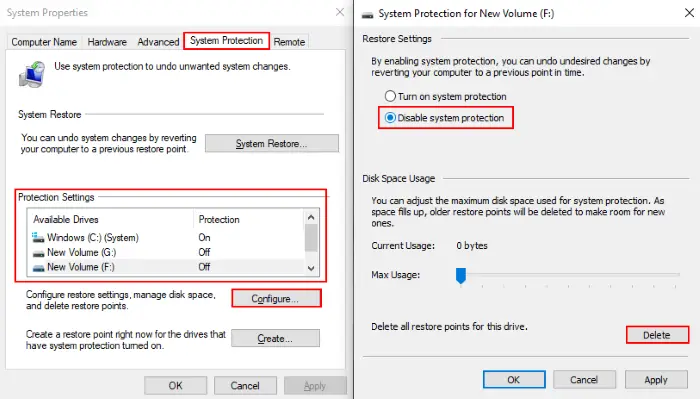
Sometimes, disabling the System Protection and deleting the previously created system restore points can help fix Windows 10 backup failure issue.

Following instructions will guide you on how to do this:
- Type System Protection in the Windows 10 search bar and press Enter.
- Select your disk and click Configure.
- Now, select Disable System Protection and click on the Delete button.
- Click OK.
Repeat these steps to delete the system restore points on different hard drives.
6] Recreate a new partition
If Windows is not able to create a backup on a particular partition, try to create a new partition for Windows 10 backup and see if the issue gets fixed. You can use the Disk Management tool to create new partitions.
7] Update Windows File History
File History is a Windows built-in backup tool. After creating a backup, Windows automatically updates the File History status. One of the reasons for the Windows 11/10 backup failure is the out-of-date File History. Open the Settings app and check whether the File History status is updating after a backup or not.
Why does my Windows backup not working?
There can be many reasons why your Windows backup is not working. If your system files are corrupted, Windows backup will not work. Another cause is disk errors. Disk errors can be fixed easily by using the Chkdsk utility. Sometimes, previously stored system backup files cause Windows backup to fail.
How do I fix error code 0x81000033?
The backup error code 0x81000033 in Windows 11/10 occurs due to several causes like outdated drivers, installation of too many language packs, disabled System Protection, etc. To fix this error, first, free up space on your system using the Disk Cleanup utility. If this does not help, update your drivers, and repair your system files and disk.
We hope, this post helped you solve the issue.
These posts offer specific help:
System Image backup failed with error code – 0x80780172 | 0x807800A1, 0x800423F3 | 0x807800C5, 0x8078004F | 0x80780038 | 0x807800C5, 0xC03A0005 | 0x807800C5, 0x80070020 | 0x807800C5, 0x80780081.
Windows backup failed with error code – 0x80780119 | 0x8078011E | 0x8078012D | 0x8100002F | 0x800700E1 | 0x81000019 | 0x80070716 | 0x80070001, 0x81000037, 0x80070003 | 0x80080005 | 0x80004005 | 0x81000038 | 0x81000015 | 0x80780166 (0x80070002).
Leave a Reply