Is your Windows 11/10/8/7 computer displaying the wrong Time in the Taskbar? If it is this, then this post gives you some tips on how to fix the problem and make Windows 10 display the correct system time in the Taskbar.

Sometimes Windows Time can act strangely! The Windows Time Service may just stop working or Time Synchronization may fail. There have also been cases when the Windows System Time may jump backward!
Windows 11/10 Clock Time wrong
If your Windows Time is wrong, to fix the issue you will have to see which of the following helps you:
- Change Date & Time settings
- Ensure that the Windows Time Service is started and set to run automatically on the startup
- Change Internet Time Server & see if it helps
- Re-register Windows Time DLL file
- Re-register Windows Time process
- Force Windows to sync Time using CMD
- Replace your CMOS battery if it is drained.
Before we start troubleshooting this issue, it would be a good idea to run the System File Checker. To do so, you have to type sfc /scannow in an elevated CMD and hit Enter. Wait for a while and when the job is completed, restart your Windows computer. Once you have done this, we can move forward to try to troubleshoot the issue.
1] Change Date & Time settings
From the Windows 11 WinX Menu, open Settings > Time & Language > Date & Time.
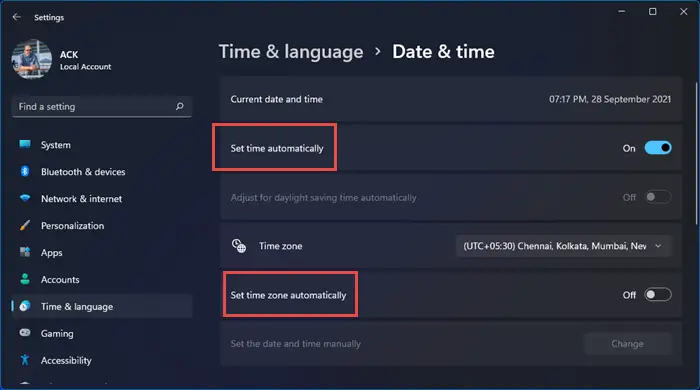
Here you have to ensure that Set time automatically and Set time zone automatically are ‘On’. See if this works for you.
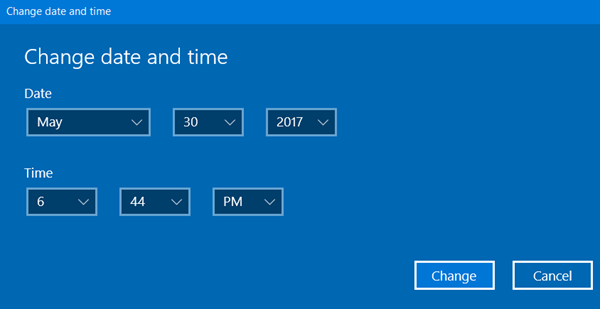
If it does not help, change Set time automatically to ‘Off’ and then click on the Change button to set the time manually. The following panel will open where you can make the necessary changes.

If this does not help, change Set time zone automatically to ‘Off’ and then from the drop-down menu, set your time zone manually.
So you will have to see if playing around with any of these changes is able to help you.
In Windows 10, the setting is here:
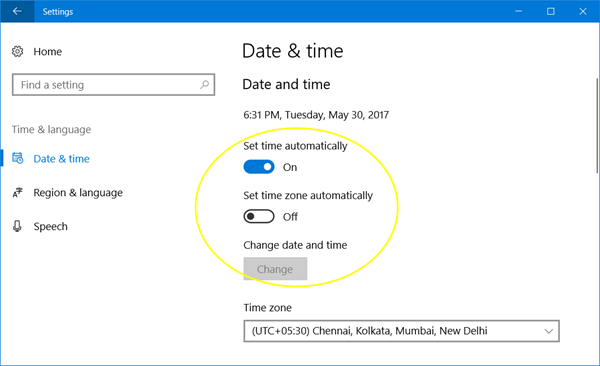
If this does not help, read on.
2] Check Windows Time Service status
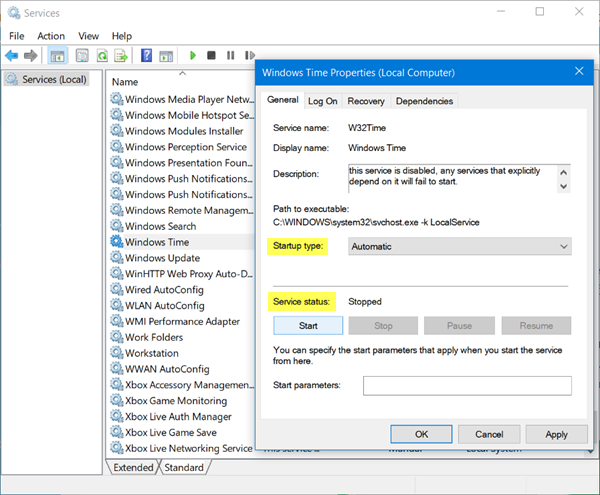
To do so, type services.msc in Start Search and hit Enter. In Services Manager, navigate to Windows Time service and double-click on it.
Check and see if the Service Status is Started and the Startup type is set on Automatic. You may click on the Start button to start the service. Do the needful, click on Apply/OK and exit.
3] Change Internet Time Server
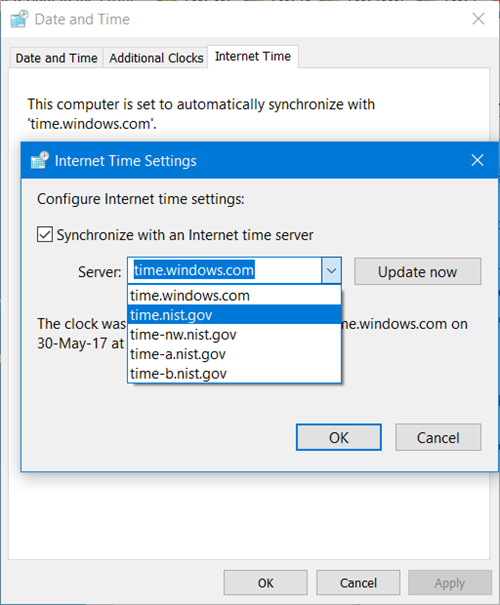
To manually sync and update your system time with an Internet Time server like time.windows,com, you have to right-click on the Time in the taskbar > Adjust Time & date > Internet Time tab > Change Settings > Update now.

If you wish, you may change the Time Server from time.windows.com from any other time server of your choice.
You can also configure the Windows Time service to use an internal hardware clock or an external time source. Microsoft Support offers a Fix-It download that lets you do this automatically with a click.
TIP: See this post if Windows 10 Clock Colon is missing.
4] Re-register the Windows Time DLL file
You may want to re-register a dll file. The concerned dll file here is w3time.dll. To do so, open a command prompt as an Administrator, type the following, and hit Enter:
regsvr32 w32time.dll
If this does not help, you should try and re-register the Windows Time exe process.
5] Re-register the Windows Time process
The Windows Time Service or W32Time.exe maintains date and time synchronization on all clients and servers in the network. If this service is stopped, date and time synchronization will be unavailable. If this service is disabled, any services that explicitly depend on it will fail to start.
The Windows Time file or W32tm.exe, located in the System32 folder, is used to configure Windows Time service settings. It can also be used to diagnose problems with the time service. W32tm.exe is the preferred command-line tool for configuring, monitoring, or troubleshooting the Windows Time service.
You will have to use the /register parameter. This parameter, when run for W32tm.exe, registers the time service to run as a service and adds the default configuration to the registry.
To do so, in an elevated command prompt, type these commands one after the other and hit Enter:
net stop w32time

w32tm /unregister

w32tm /register
6] Force Windows to sync Time using CMD
You can also force Windows to sync Time using W32tm.exe. W32tm.exe is a command prompt line used to configure, monitor or troubleshoot the Windows Time Service in Windows 10 PC.
To do this, open an elevated command prompt and type the following commands one after the other:
net stop w32time

w32tm /unregister

w32tm /register

net start w32time

w32tm /resync
Reboot your computer and see if it has helped.
7] Check your BIOS Battery
If nothing helps, check and replace your CMOS battery if it has been drained.
I am sure that something here will help you. If nothing works, make use of some free Time synchronization software.
Once the time is being displayed correctly, you may want to check the accuracy of your System Clock.
Bonus Tip: See how you can change the Internet Time Update interval in Windows.