Windows 11/10 offers Color Calibration that allows you to get the best display setting as per your preference. However, it has been reported that the color calibration keeps resetting even when changed. It happens every time you log in, or what you see in the preview doesn’t get applied. One of the users reported that he could see the preview, but the screen reverts to the default color setting as soon he quits the tool.
This post will look at possible reasons and how to fix the problem where Windows color calibration keeps resetting. If you have a multiple monitor setup, this happens to every monitor.

Display Color Calibration keeps resetting on Windows 11/10
If Display Color Calibration is not saving but keeps resetting on your Windows 11/10, then one of these suggestions is sure to help you.
- Disable or Remove software related to the color calibration
- Use Windows Display Calibration
- Use OEM Color Control Panel
- Disable Calibration Schedule
- Update or rollback graphics driver
You may need an admin user account to try some of these.
1] Disable or Remove software related to the color calibration
Software such as F.lux and Night Light (Windows feature) can take over the default or the changed settings and make it look different. We would strongly suggest you disable Night Light and uninstall any other software that can do that.
2] Use Windows Display Calibration

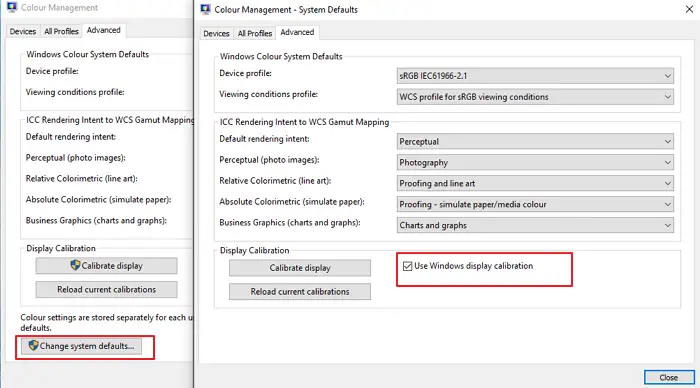
Type Color Management in the Start menu, and click to open it once it appears. Select the monitor, and check the box which says—Use my settings for this device. Additionally, click on the Advanced tab, and click on Change System Defaults.
Check the box which says—Use Windows display calibration. Apply and exit. Now you should be able to see the change as you make it.
3] Use OEM Color Control Panel
OEM’s such as NVIDIA offer their own control panel to calibrate color settings. These settings are available to multiple monitors, and they have a priority over the ones from the OS. If you change it here, it will keep them.
4] Disable Calibration Schedule

Windows runs a schedule every time you log into the computer. If you encounter this problem when restarting the computer, you can choose to disable the scheduler.
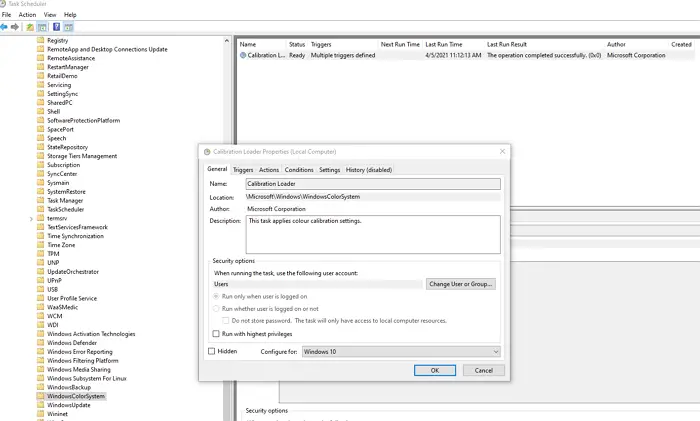
Open Task Scheduler, and navigate to Microsoft\Windows\WindowsColorSystem. Then locate the Calibration Loader Properties task. Double click to open it.
Switch to the Triggers tab, and disable the “At log on” trigger. To modify, double click to open it, and uncheck the box next to Enabled.
Calibrate the monitor again, and restart. This time it should fix the problem.
Related: Color Management not working in Windows.
5] Update or rollback graphics driver
The last resort is to either update or roll back the graphics driver. If you recently updated Windows, check for a new version of the driver. If the driver has been updated, it’s a good idea to roll back.