If your Windows 11/10 computer stutters every few seconds then this post may be able to help you. Some users have reported that they have started experiencing this issue after updating their Windows PC. When this error occurs, the mouse either lags or its movement is blocked for an instant, and audio and video stutter constantly. This makes the computer difficult to use.
Computer stuttering is usually caused by outdated drivers, operating systems, browsers, or applications. Faulty hardware may also cause these issues. It causes the time between frames to noticeably vary.
Windows computer stutters every few seconds
Rolling back the Windows update can eliminate the stuttering problem, but it is not a permanent solution because Windows update also includes the security updates that protect your system from different types of security attacks. The following methods may help you fix the problem without uninstalling the Windows update. Go through the list first before deciding which one or more of the solutions may apply to you.
- Disable and re-enable CD/DVD drive.
- Update IDE ATA/ATAPI controllers driver.
- Update Display driver.
- Uninstall the software causing the problem.
- Download and install the latest chipset drivers.
- Check Power Management settings.
- Disable Notifications and Action Center.
- Disable wallpaper slideshow.
- Run SFC Scan.
- Update BIOS.
1] Disable CD/DVD drive
According to some of the users facing this issue, disabling and re-enabling the CD/DVD drive on their system helped them fix the error. Maybe this method also works for you.
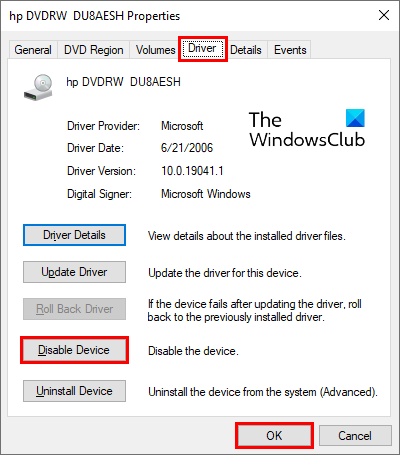
The steps to disable and re-enable CD/DVD drive are listed below:
- Type Device Manager in Windows 10 search bar and click on the app to launch it.
- Now, expand CD/DVD ROM drives node and right-click on its driver. Select Properties.
- In the Properties window, click on the Driver tab.
- Now, click on the Disable Device button. A warning message will be prompted on your screen, click Yes.
- Click OK to save the changes.
This will disable the CD/DVD drive immediately. To enable the drive again, repeat the first three steps and click on the Enable Device button. Now, click OK to save the changes.
2] Update IDE ATA/ATAPI controllers driver
Try updating the IDE ATA/ATAPI controller driver. Some users have stated that this method helped them solve the issue.
In Windows 10, you can now run Windows Updates and see if any driver updates are available under Optional Updates. It’s a quicker and easier way. If you don’t see any driver updates, then you may download the drivers and use Device Manager to update.
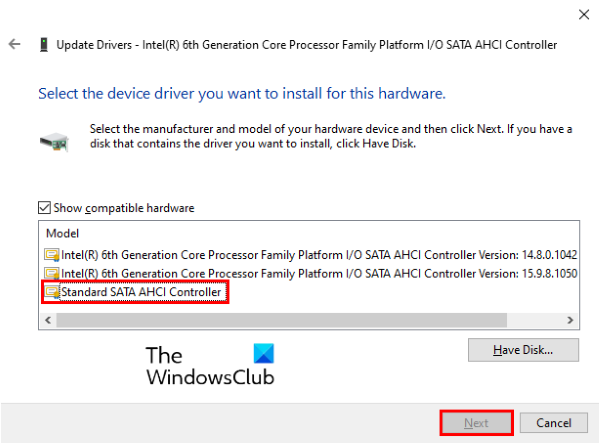
Follow the below-listed instructions:
- Open Device Manager and look for IDE ATA/ATAPI controllers.
- Expand it and right-click on its driver. Select Update driver.
- A new window will appear on your screen showing two options, Search automatically for drivers and Browse my computer for drivers. Select the latter one.
- Now click “Let me pick from the list of available drivers on my computers.”
- Select the Standard SATA AHCI Controller, click Next, and follow the on-screen instructions.
Hope this helps.
3] Update Display driver
Sometimes, the graphics card driver also causes Windows 10 PC to stutter. Update the graphics card driver and see if it helps.
You may need to download the drivers. You may visit your computer manufacturer’s website, or you may visit the graphics hardware manufacturers site:
HP | Dell | AMD | Intel | NVIDIA | GeForce.
You could also use the Device Manager,
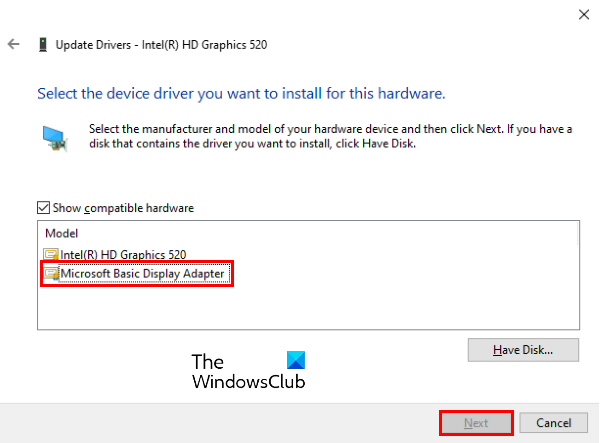
The following steps will help you with that :
- Open Device Manager and expand the Display adapters node.
- Right-click on the driver and select the Update driver option.
- Now, click on the Browse my computer for drivers option.
- After that, click “Let me pick from the list of available drivers on my computers” and select Microsoft Basic Display Adapter.
- Click Next and follow the on-screen instructions to install the driver.
If the issue persists, consider reinstalling the graphics card driver. For this, right-click on the driver and select uninstall. Follow the on-screen instructions to complete the uninstallation process. After that, visit the manufacturer’s website, download the latest driver, and install it on your system.
4] Uninstall the software that is causing the problem
You may also get this error due to a problematic program running on your computer. In this case, uninstalling the program may help. Launch the Task Manager and view the CPU graph. If you see spikes on the graph, you might have installed a program that is causing such spikes. Click on the CPU under the Processes tab to know which software is causing the spikes. Uninstall it.
5] Download and install the latest chipset drivers
Visit the official website of your motherboard manufacturer and download the latest chipset drivers. Now, reinstall them on your system after uninstalling the existing drivers. When you are done, restart your computer.
6] Check Power Management settings
Every computer has a power plan. It is a set of software and hardware settings that tells a computer how to consume and conserve power. There are many options that a user can customize on the power plan. Incorrect settings of the power plan may also cause stuttering errors in a system. You can try to restore the power plan settings to the default. If it is the main cause of the problem, it should fix the error.
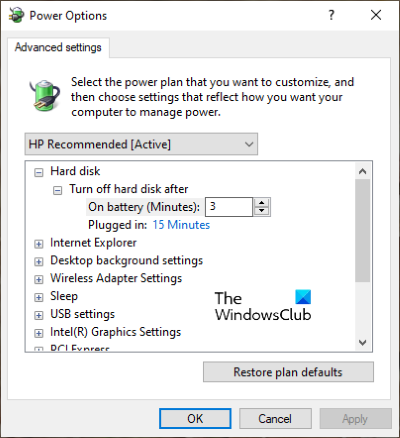
The following steps will guide you on how to reset the power plan settings:
- Launch Control Panel and click on the Hardware and Sound.
- Click Power Options and then click on the Change plan settings link.
- Now, click on the “Change advanced power settings.”
- A new window will open in which you will see various power plans. Select each plan and click on the “Restore plan defaults” button. A confirmation window will appear on your screen, click Yes.
After restarting the device, check whether the issue is solved or not.
7] Disable Notifications and Action Center
Some users have found Notifications and Action Center the culprit of the issue. According to them, the stuttering problem was eliminated after disabling the Notification and Action Center in Windows 10. You can also try this method and see if it helps.
8] Disable wallpaper slideshow
If you are running a dual-screen setup and using wallpaper slideshow on both the screens, disable it and see if it helps. Some users have noticed that the wallpaper slideshow was generating spikes in the CPU. This might happen when Windows is not able to process rendering for wallpaper slideshow on both screens.
Read: Game Stuttering with FPS drops.
9] Run SFC scan
System File Checker (SFC) is a utility that lets users scan their system for errors and corruption in Windows system files. SFC also fixes the corrupted system files. Therefore, running the SFC scan may help you fix the stuttering problem.
10] Update BIOS
If you have tried all the solutions described above in this article, but the error still exists, you can try to update the BIOS.
We hope this article helped you solve the issue.
Leave a Reply