The Dynamic Lock feature of Windows 11/10 makes it easy for users to lock their computers as soon as they move away from them. They do not need any special hardware like IR Cameras to use these features. If their computer supports Bluetooth, they can use this feature. Even if their computer does not have Bluetooth hardware, they can just use a third-party external Bluetooth dongle and use it as it is meant to.
Dynamic Lock is not working or missing in Windows 11/10
First of all, we would recommend you create a System Restore point. Because we will be playing with registry files and modifying some critical Windows settings. Having done this, we will continue on our quest of fixing our issue of Windows 11/10 Dynamic Lock not working after an update.
1] Using the Settings App
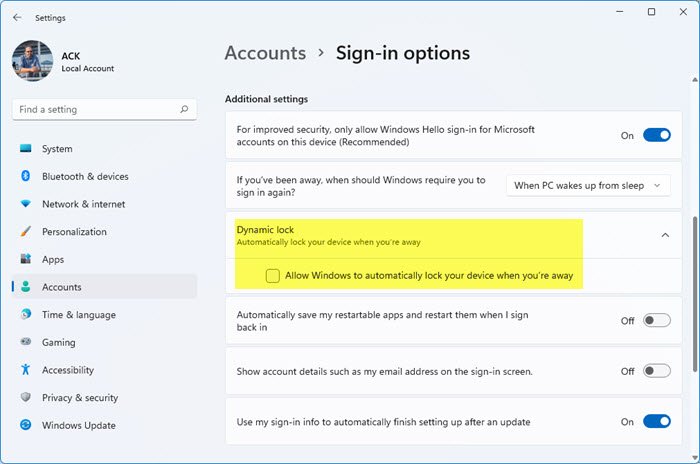
- Start by hitting the WINKEY + I button combinations to open the Settings app.
- Now navigate to Accounts > Sign-in options.
- Next, scroll down to the section called Dynamic Lock.
- Make sure that the checkbox that says Allow Windows to automatically lock your device when you are away is checked.
- You are all set. You can now exit the Settings app.
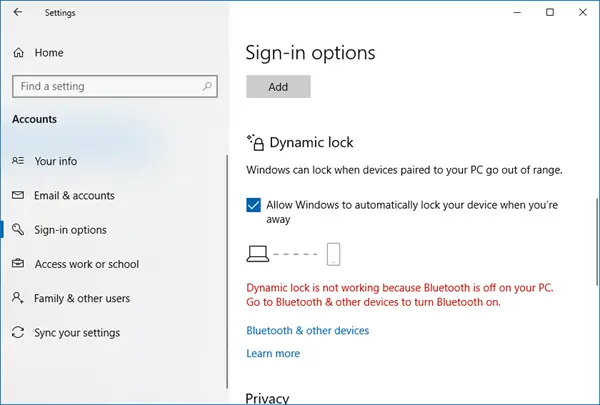
If for some reason the above basic solution does not work, and you find that the Dynamic Lock is grayed out or missing, then you may need to troubleshoot further.
2] Pair your Bluetooth Device & Update the driver
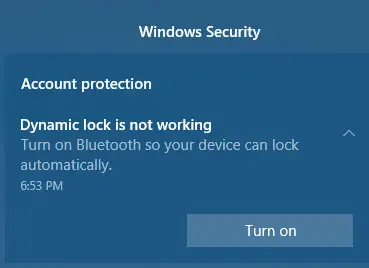
If you see the following message in Settings or the Notifications Center:
Dynamic Lock is not working because your PC has no paired device
then you need to open Settings > Devices > Bluetooth & other devices. Here make sure Bluetooth is turned On and pair the Bluetooth device.
If you open the Windows Defender Security Center, you will find this warning there as well.
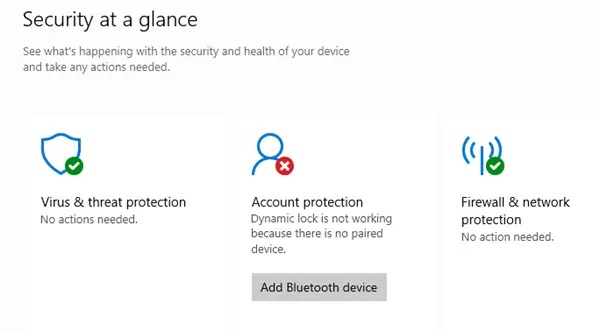
If you click on Add Bluetooth device, the Bluetooth settings will open and you can pair the device.
3] Reinstall Bluetooth driver
If this does not help, you may need to uninstall and then reinstall your Bluetooth Drivers. You can do it via Device Manager.
4] Using the Registry Editor
Hit the WINKEY + R button combination to launch the Run utility, type in regedit and hit Enter. Click on Yes for the UAC or User Account Control Prompt that you get.
Once Registry Editor opens, navigate to the following key location-
HKEY_CURRENT_USER\Software\Microsoft\Windows NT\CurrentVersion\Winlogon
Look for a DWORD called EnableGoodbye on the right-side panel.
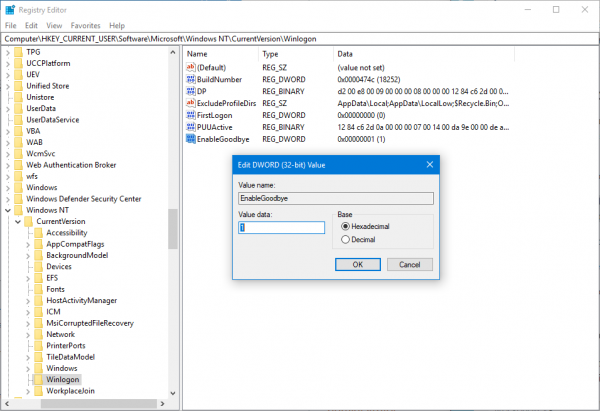
Make sure that its value is set to 1 which is enabled. 0 is for it being disabled.
Close the Registry Editor and reboot your computer for the changes to take effect.
5] Check Group Policy setting
If your version of Windows 10 ships with the Group Policy Editor, Run gpedit.msc to open it.
Now, navigate to the following path inside the Group Policy Editor-
Computer Configuration\Administrative Templates\Windows Components\Windows Hello for Business
Now, on the right-side panel, look for an entry called Configure dynamic lock factors.
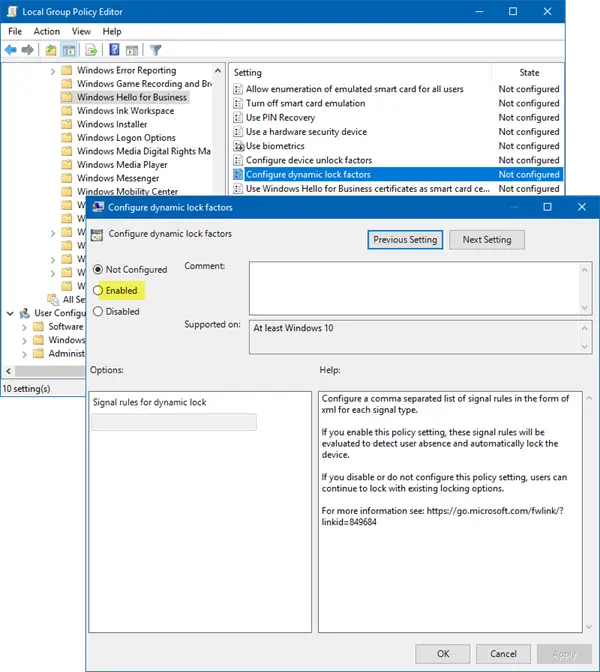
Double click on it and you will see a new window pop up.
If you enable this policy setting, these signal rules will be evaluated to detect user absence and automatically lock the device. If you disable or do not configure this policy setting, users can continue to lock with existing locking options.
It may be Not configured or Enabled, but should not be set to Disabled.
Select the Radio button for Enabled, set the Signal Rules and click on OK.
Exit the Group Policy Editor and reboot your computer for the changes to take effect.
Let us know if this helped.
Leave a Reply