At times, Windows Update may throw up error code 0x8007371b, especially when you are trying to install a Feature Update on your Windows 10 system. This indicates that one or more required members of the transaction are not present.
Error 0x8007371b, ERROR_SXS_TRANSACTION_CLOSURE_INCOMPLETE
![Windows Update Install Error 0x8007371b [Fix] Windows Update Install Error 0x8007371b [Fix]](https://www.thewindowsclub.com/wp-content/uploads/2021/03/0x8007371b.png)
Fix Windows Update Install Error 0x8007371b
Installation failure: Windows failed to install the following update with error 0x8007371b
If you face this issue, one of these suggestions is likely to help you.
1] Run Windows Update Troubleshooter
The best and fastest way to reset Windows Update is to use the traditional Windows Update Troubleshooter. So go ahead and run it.

Just follow the on-screen prompt to complete the process – it’s pretty standard and straightforward. Once it was done, I rebooted the system and tried it. It again failed.
2] Check Windows Update Services status
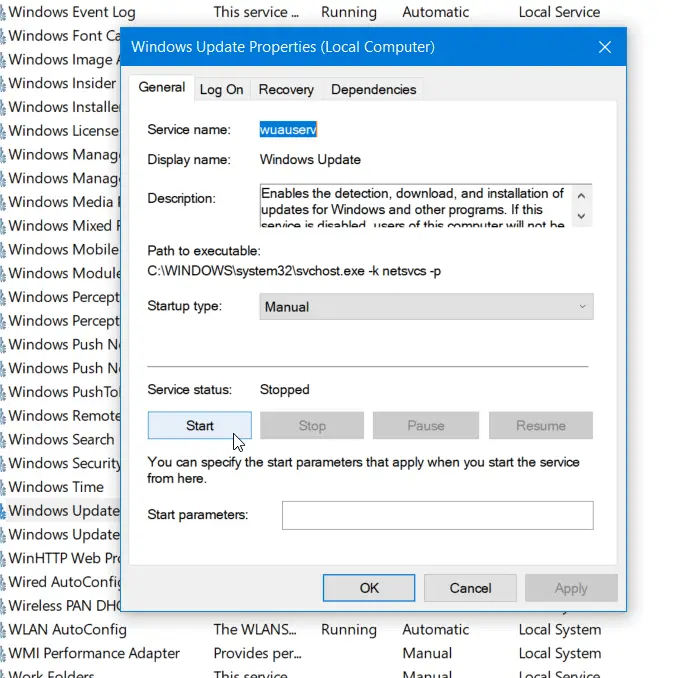
Open Windows Services Manager and check the Windows Update related Services like Windows Update, Windows Update Medic, Update Orchestrator Services, etc are not disabled.
The default configuration on a standalone Windows 10 PC is as follows:
- Windows Update Service – Manual (Triggered)
- Windows Update Medic Services – Manual
- Cryptographic Services – Automatic
- Background Intelligent Transfer Service – Manual
- DCOM Server Process Launcher – Automatic
- RPC Endpoint Mapper – Automatic
- Windows Installer – Manual.
This will ensure that the required Services are available.
Apart from the direct service, you should find the dependencies of Windows Update service and ensure if they are running or not.
To get started, search for “services” in the Taskbar search box and click on the search result. After opening the Services window, find out Windows Update, DCOM Server Process Launcher, and RPC Endpoint Mapper. Check if they are running or not.

If not, you need to start those services one after one.
3] Re-register Wups2.dll
Re-register the Wups2.dll file and check if it fixes the issue.
Open Command Prompt (admin) and execute the following commands and hit Enter after each one of them:
net stop wuauserv
regsvr32 %windir%\system32\wups2.dll
net start wuauserv
Now restart your computer and see.
4] Manually Reset Windows Update Components to default
You may use the Reset Windows Update Agent Tool and see if it helps you.
This PowerShell script will help you Reset Windows Update Client.
See this post if you want to manually reset each Windows Update component to default.
5] Fix Windows Update system files using DISM
You can also fix corrupted Windows Update system files using DISM Tool. The Dism.exe tool can be used in different situations, and one of them is to repair corrupted Windows Update files. Do note that you need to run a different command if you want to repair corrupted Windows Update System Files. If you run the usual /RestoreHealth command, it may not necessarily help.
DISM will replace potentially corrupted or missing system files with good ones. However, if your Windows Update client is already broken, you will be prompted to use a running Windows installation as the repair source or use a Windows side-by-side folder from a network share, as the source of the files.
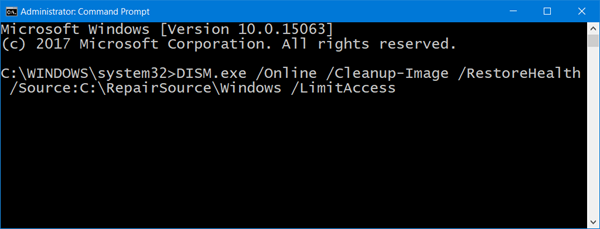
You will then be required to run the following command instead:
DISM.exe /Online /Cleanup-Image /RestoreHealth /Source:C:\RepairSource\Windows /LimitAccess

Here you have to replace the C:\RepairSource\Windows placeholder with the location of your repair source.
Once the process is complete, DISM will create a log file in %windir%/Logs/CBS/CBS.log and capture any issues that the tool finds or fixes. You could also check the CBS.persist.log file.
These can help fix problems that might prevent Windows Updates from installing.