After updating their Windows 11/10 computers, some users are at the center of another problem. They complained that the sound and audio are not working after updating their Windows 11/10 OS. Without audio, YouTube is pretty much a waste of time, and all of those crazy videos on Facebook wouldn’t hit the mark without sound. The same goes for Netflix and other related platforms. If you are facing this problem on your Windows 11/10 PC, the solutions covered in this post will be helpful.
Windows Sound & Audio not working after Update in Windows 11/10
OK, so we know what you’re going through so don’t fret if you’re one of the persons experiencing problems with sound. Some users might come across an unresponsive microphone, while others could experience popping or cracking sounds when playing back audio. For both cases, use the solutions covered below.
How to fix the microphone issue

It’s a simple fix. Microsoft has changed the audio settings layout to the new Windows 11/10 format. Because of this change, some computers might show an error. So to fix this problem, follow the simple steps below.
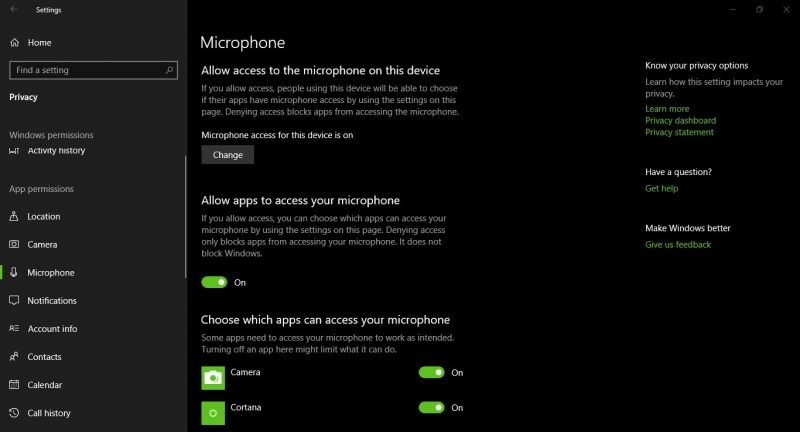
In Windows 10, Go to Settings > Privacy > Microphone and make sure “Allow apps to access your microphone” is active.
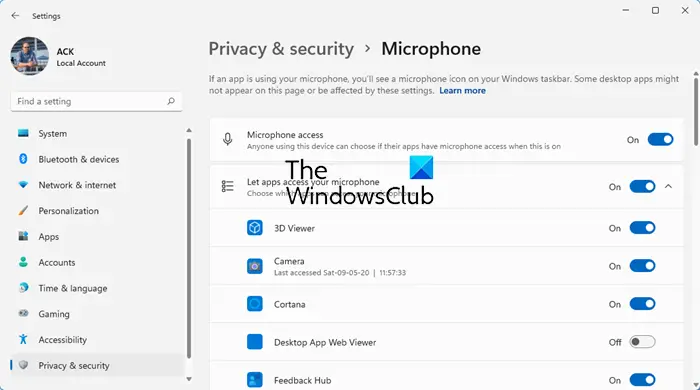
In Windows 11 you will see the Microphone Privacy settings here:

Open Windows 11 Settings > System > Privacy and security > Microphone under the App permissions section. Turn on the Microphone access button. After this, enable or turn on the Let apps access your microphone option and select which apps can access your microphone. This should solve the issue.
How to fix cracking sounds
The cracking sound issue tends to happen solely on laptops running in battery mode. In this mode, Windows 11/10 puts the audio driver to sleep at times in a bid to extend battery life.
Whenever the user attempts to play audio, Windows 11/10 automatically awakens the driver, but this tends to cause a popping sound. It’s a minor issue at best with a simple fix, so follow the steps below.
Press the Win+R hotkey to launch the Run Command box. Type regedit into the text field and hit Enter on your keyboard. It will open the Registry Editor window where you need to make a few changes. Before doing that, we advise you to backup the Registry Editor so that you can undo the changes if needed. Once done, navigate to the following key:
HKEY_LOCAL_MACHINE\SYSTEM\CurrentControlSet\Control\Class

Locate the key that says:
{4d36e96c-e325-11ce-bfc1-08002be10318}
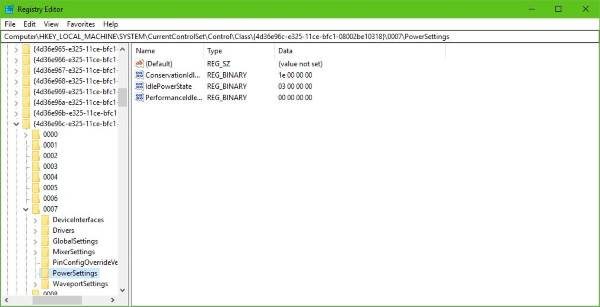
Expand this Registry key. You should now see a series of numbered keys. Select a key with the name, PowerSettings. If some Registry keys have sub-keys, then you need to expand those keys and select the PowerSettings Registry key.
Look for the ConservationIdleTime DWORD (32-bit) Value on the right side and change its value data to 1e 00 00 00. For this, double-click on that DWORD value, and set the Value data. Select the OK button.
Ensure that PerformanceIdleTime as well as IdlePowerState DWORD (32-bit) Values too are set to their default value data which is 03 00 00 00 and 00 00 00 00.
I hope these solutions will help.
Related posts:
How do I reset audio output in Windows 11?
If you are using a Windows 10 PC, then to reset the input and output sounds, open the Settings app > Sound > App volume and device preferences and press the Reset button (under the Reset to the Microsoft recommended defaults). On Windows 11, you need to access the Settings app > System > Sound > Volume mixer and press the Reset button to reset sound devices and volumes for all apps to the recommended defaults.
Why is the sound low after Windows 11 update?
If the computer sound volume is too low on Windows 11/10, the issue could be related to software or hardware. To fix this problem, first, update the audio driver and also check the connected speakers physically for loose connection or dust. If that doesn’t work, increase the speakers’ sound using the volume mixer, enable Loudness Equalization, and check the Communications settings.
Hi, How can I change ConservationldleTime value to 0? Thanks for your help!