Windows 11/10 offers a sync feature that allows features like themes, passwords, language preferences, ease of access, and a few other Windows settings. It works across computers. At times, the sync doesn’t work, or the sync option is greyed out, or you get an error that may say the Sync setting is not working or Sync is not available for your account. This post will guide you on how you can resolve the issue where Windows sync settings are not working.
Windows Sync settings not working
There can be multiple reasons why Windows 11/10 is unable to sync settings across devices. It can be a problem with the Microsoft account or restrictions from the administrator, or an Azure Active Directory situation.
- Verifying your Microsoft account
- Using a School or Work Accounts
- Enabling Microsoft account sync via Registry Editor
- Enable Syncing from the Azure Active Directory
You will need admin permission for some of the suggestions.
1] Verifying your Microsoft account

If the account were recently created, especially when setting up the account on the computer, it would have to be verified. Microsoft sends out an email or processes you through the verification process. If that is incomplete, the sync will fail.
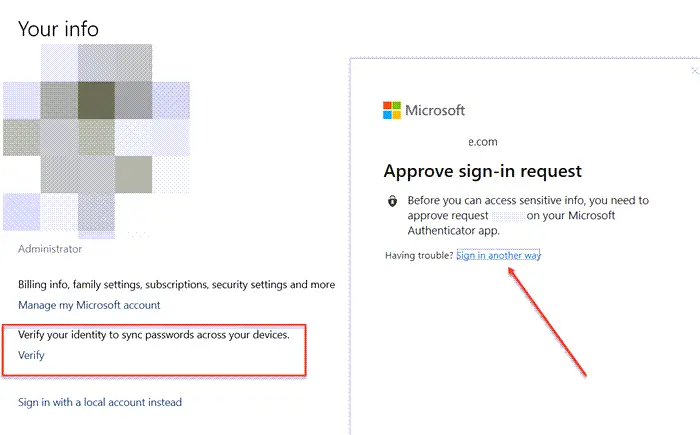
- Go to Settings > Accounts > Your Info
- Look for a link—Verify—and click on it.
- When you click on it, it will prompt you to verify using the Authenticator app or Phone Number or any other way.
Once done, the sync will start working.
2] Using a School or Work Accounts
When you have a school or work account, the power to enable sync stays with the administrator. Many companies allow the sync on authorized devices, and some only allow it to work on a single device. However, if you have a necessity, you will have to request your admin.
These accounts will show an error that sync is not available with your account.
3] Enable Microsoft account sync via Registry Editor or Group Policy
If you have verified, and the sync is still not working, you can use the registry method or Group Policy to enable the sync.
Registry method

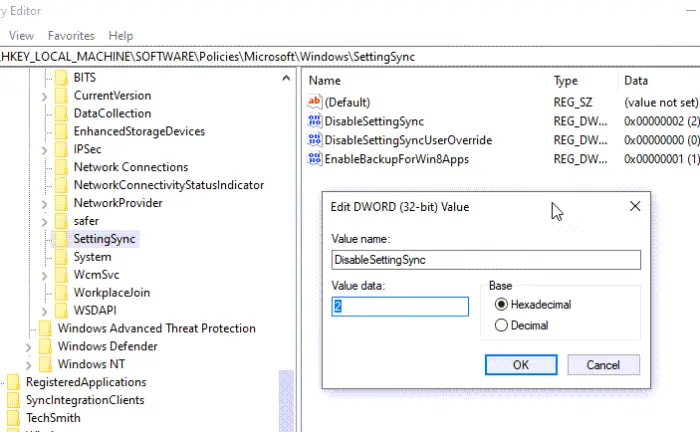
Open Registry Editor, and navigate to the following path.
HKEY_LOCAL_MACHINE\Software\Policies\Microsoft\Windows\SettingSync
Create a new DWORD with the name—DisableSettingsSync—and set the value as 2.
As an admin, you can create another DWORD—DisableSettingSyncUserOverride, and set the value as 2, – allowing users to enable the sync.
Detailed read: How to configure Windows Sync Settings using Registry Editor.
Using Group Policy

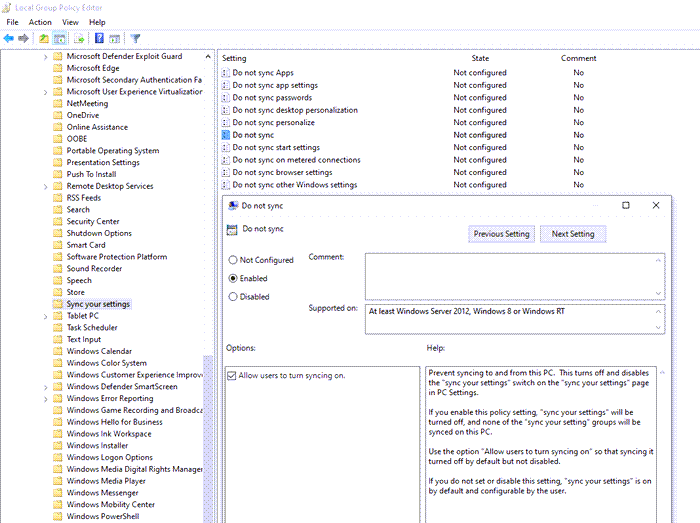
Open Group Policy Editor, and navigate to the following path:
Administrative Templates > Windows Components > Sync your settings
Locate the policy Do not Sync, and double click to open it. Set it to enable, and save it. If you are an administrator, you can check the box, allowing users to turn to sync on.
4] Enable Syncing from the Azure Active Directory

Syncing is also called Roaming as it allows you to roam with your settings as you switch between computers. If you are part of Azure Active Directory, the admin can follow these steps to enable it.
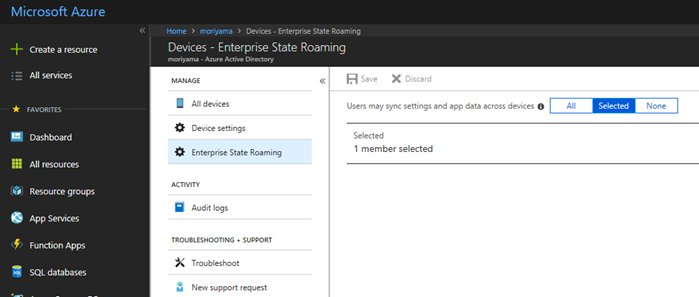
- Sign in to Azure AD admin center.
- Select Azure Active Directory > Devices > Enterprise State Roaming.
- Select Users may sync settings and app data across devices.
What does sync your settings do in Windows?
Sync Settings allows you to sync Windows settings, themes, password, language, preferences, and other Windows settings. When you log into another computer, verify yourself, all those settings will appear on that computer.
How do I turn on sync settings in Windows?
Go to Windows Settings > Accounts > Sync your settings > Toggle on Sync settings option, and whatever you want to sync.
Why is my Microsoft account not syncing?
It is possible that sync is turned off or disabled by the administrator or you haven’t verified your account.
Read next: Disable Sync Settings in Windows for Multiple Users, using Group Policy Editor.
Leave a Reply