Microsoft has introduced some new features in Windows 11 24H2 update. More features will be rolled out later. You can install this Windows 11 24H2 via Windows 11 Settings, by downloading Windows 11 2024 Update ISO from Microsoft website, or by using the Windows 11 Installation Assistant. If Windows 11 24H2 Update is not installing on your system, follow the suggestions provided in this article to fix the problem. I also experienced errors while clean installing Windows 11 24H2 Update on my HP Notebook. I will also share my experience and tell you what I did to resolve the error.

Windows 11 24H2 Update Version not installing
The easiest way to install Windows 11 24H2 Update is to use the Windows 11 Settings app. Open Windows 11 Settings and go to Windows Update. Now, click Check for Updates. However, if Windows 11 24H2 Update is not installing on your system, use the following solutions to fix the problem. Before you proceed, it will be better to check if your PC is compatible with Windows 11 24H2 Update.
If Windows 11 Version 24H2 is not installing on your computer, then follow these suggestions. Some users got to see an error message – We couldn’t install this update, but you can try again (0x8007001f) –
- Restart your computer and try again
- Temporarily Turn off your antivirus
- Clear SoftwareDistribution folder contents
- Use Windows 11 Installation Assistant
- Run Windows Update Troubleshooter
- Turn off Kernel DMA Protection in BIOS
- Reset Windows Update Components
- Install the update using Media Creation Tool
- Delete all System Reserved Partitions
- Change your boot order.
Let’s see all these fixes in detail.
1] Restart your computer and try again
The first thing that you should try is to restart your computer and try again. Sometimes, a minor glitch creates issues while installing a Windows update. Check if this helps.
2] Temporarily Turn off your antivirus
Sometimes, antivirus prevents Windows from installing updates. Such false positive warnings are not a threat and can be avoided. Your antivirus might be interfering with Windows Update. We suggest you disable your antivirus and then try to install the update. Check if this works.
Some users have found Avast the culprit of the problem. If you have Avast antivirus on your system, disable it. If this does not fix the problem, uninstall Avast and check again. Ensure you have its activation key before uninstalling Avast or any other third-party antivirus.
3] Clear SoftwareDistribution folder contents

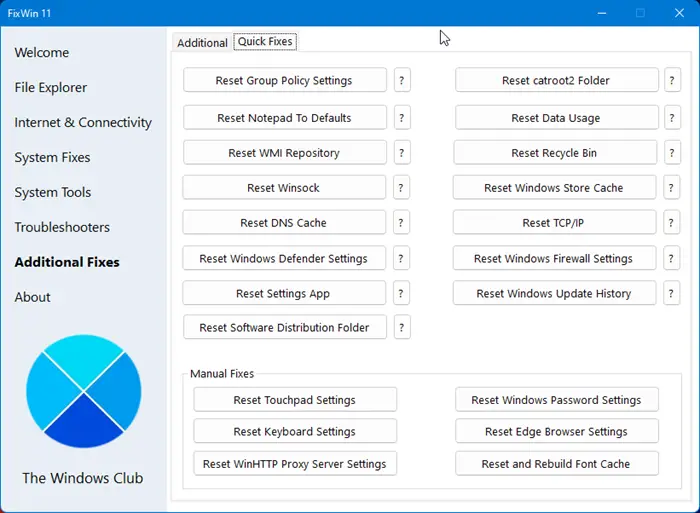
Clear the contents of the SoftwareDistribution folder and then try. The easiest way to do this is to use our portable freeware FixWin.
4] Use Windows 11 Installation Assistant
Use Windows 11 Installation Assistant. This is sure to help you.
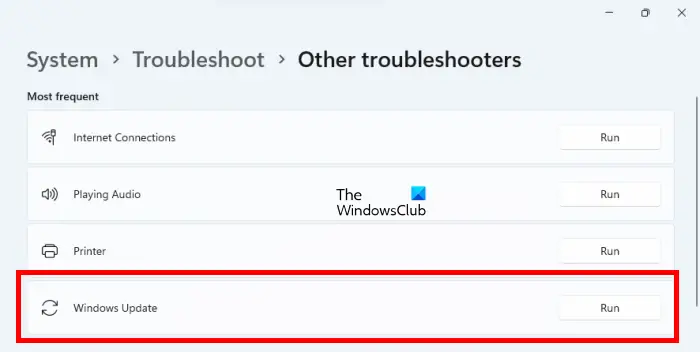
5] Run Windows Update Troubleshooter

Windows Update Troubleshooter is an automated tool that helps users fix issues and errors associated with Windows Update. It will check for errors and fix them (if possible). After the troubleshooting is completed, you can check whether you can install the update.
6] Turn off Kernel DMA Protection in BIOS
Kernel DMA Protection is a feature in Windows 11/10 that protects your computer from Direct Memory Attacks (DMA). By making the DMA attacks, the attackers can steal sensitive information from the users’ PCs and even inject malware into their systems to bypass the lock screen. In some cases, Kernel DMA Protection has been found to cause BSOD errors. Some affected users also reported that Windows 11 2024 Update was failing because the Kernel DMA Protection feature was enabled on their systems. Check if this feature is enabled on your system or not. If yes, disable it.
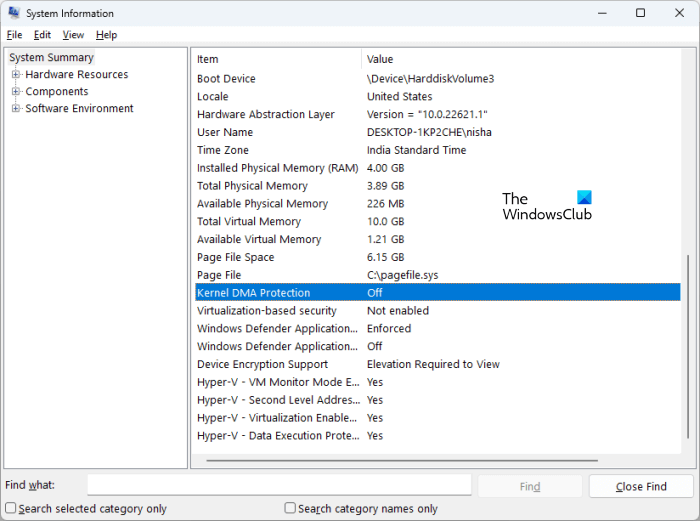
The following steps will help you check if Kernel DMA Protection is enabled on your device.

- Click on Windows 11 Search.
- Type system information.
- Select the System Information app from the search results.
- Select System Summary from the left side.
- Scroll down and locate Kernel DMA Protection. Check its status.
If it is turned on, turn it off. To turn off Kernel DMA Protection, you must access your system BIOS. Refer to your system manufacturer’s website to learn how to disable this feature in the BIOS. After disabling it, the issue should be fixed.
7] Reset Windows Update Components
Corrupted Windows Update Components also cause Windows Updates to fail. In this case, resetting the Windows Update Components can fix the issue.
Read: How to rollback Windows 11 24H2 Update
8] Install the update using Media Creation Tool
If the Windows 11 24H2 Update is still not installing on your system, you can use the Media Creation Tool for the same. It should help.
9] Delete all System Reserved Partitions
If you are clean installing Windows 11 24H2 Update using the ISO file, and Windows is displaying an error, the issue might be due to multiple System Reserved Partitions. I encountered this problem while clean installing the Windows 11 24H2 Update using the ISO file.
When you install Windows, a System Reserved Partition is created automatically. If Windows installation fails and you try again, Windows will create a new System Reserved Partition again. Multiple or pre-existing System Reserved Partitions also interfere with Windows installation. In my case, there were more than one System Reserved Partition due to which Windows 11 24H2 Update failed to install. When I tried again, one more System Reserved Partition was created and the update installation failed again.
To fix this issue, I deleted all System Reserved Partitions from my SSD and tried again. This fixed the error. You should also check this. Format your C drive, delete all pre-existing System Reserved partitions, and try again. This should help.
Read: Windows 11 Feature Update Stuck at 0 or 100 % downloading
10] Change your Boot order
This is another cause of Windows installation failure. If you have more than one hard disk installed on your system, you may experience issues while installing the Windows operating system. During a clean install, we have to format the disk we want to install Windows. If that disk is not selected in the boot order in your system BIOS, Windows installation will fail every time.
After fixing the above error, I encountered another error. This time, Windows displayed the error after restarting the device. When I looked in my system BIOS, my HDD was selected as the boot drive instead of the SSD. I changed the boot order and the issue was fixed. After that, Windows 11 24H2 Update was installed on my HP Notebook successfully.
The error that I encountered is:
Your PC/Device needs to be repaired
File: \windows\system32\winload.efi
Error Code: 0xc000000e
If you encounter this error, check your Boot order or sequence in the BIOS. Select the correct hard disk in BIOS. This should work.
Why is Windows 11 failing to install?
There could be many reasons why Windows 11 is failing to install. If you are clean installing Windows 11, make sure that the drive you are installing it is formatted completely. If its partition style is MBR, change it to GPT. Also, check if there is a pre-existing System Reserved Partition. If yes, delete all the System Reserved partitions.
Another cause is the incorrect Boot order. Check it in your system BIOS and change it (if required).
Why is my Windows 11 not updating?
If Windows 11 is not updating, the Windows Update Components might have been corrupted, or your antivirus might be interfering with the update. In this article, we have explained different methods to fix the issue where Windows 11 fails to update.
Leave a Reply