Windows 11 comes with a feature known as Quick Settings, which basically allows the user to easily modify frequently used settings without having to go through the menus or trying to remember complicated keyboard shortcuts. This was referred to as Quick Actions in Windows 10. However, some users have complained that Quick Settings is not working for them. Whenever they click the relevant section on the Taskbar, nothing happens

How to fix Windows 11 Quick Settings not working
OK, so when it comes down to using the panel, you shouldn’t have much of a problem. The same goes for fixing the problem you’re currently facing. The information below will explain everything you need to know.
- Since Windows 11 is a new OS make sure that it is updated
- Change the Action Center setting to “Not Configured” using Group Policy Editor
- Scan your computer with System File Checker
- Troubleshoot in Clean Boot State
- Use Cloud Reset option for Windows 11
- Report this issue using the Feedback Hub app
1] Update Windows 11
The first thing you will want to do here is to ensure that Windows 11 is updated. This is important since the operating system is brand new, which means, Microsoft is actively releasing updates for known problems.
To update your Windows 11 operating system, please press the Windows key + I to launch the Settings menu. From there, select Windows Update, then click on Update to have the system check online for new updates.
Should any be available, Windows 11 will download and install automatically. Now, depending on your update settings, the operating system could request your input before doing anything.
2] Change the Action Center to “Not Configured”

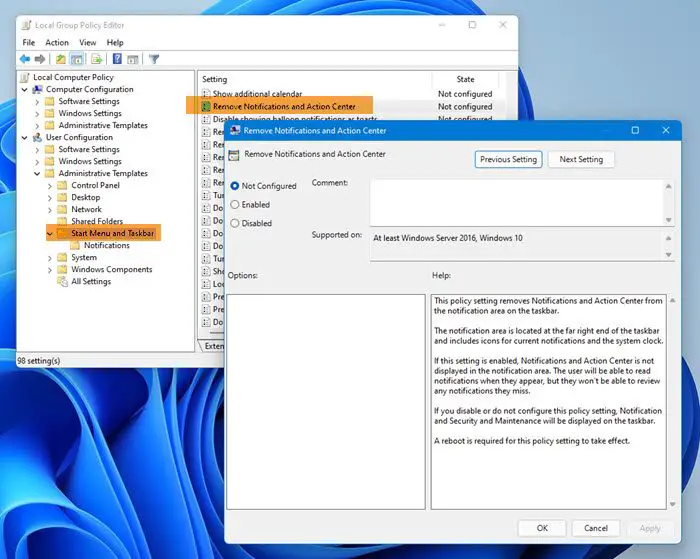
Some users on the web have stated that they’ve solved this issue by setting the Action Center to “Not Configured” and it worked really well. To do this, you must open the Run dialog box, then type gpedit.msc into the text area, and hit the Enter key to open the Group Policy Editor.
After you’ve done that, go to User Configuration > Adminstrative Template. The next step, then, is to select Start Menu and Taskbar, then be sure to navigate directly to Remove Notifications and Action Center and double-click on it.
From the new window that appears, you must click on Enabled if it hasn’t been selected before. Finally, hit Apply > OK, and from there, check to see if the error is still affecting your computer.
3] Scan your computer with System File Checker
There are likely some underlying issues with your version of Windows 11, so we suggest performing an SFC Scan.
We can do this by opening the Command Prompt as an administrator, and from there, type the following command and hit Enter:
sfc /scannow
Wait for the scan to complete, and it will make it known if there are any problems with the operating system. If there are any, the system will automatically try fixing things.
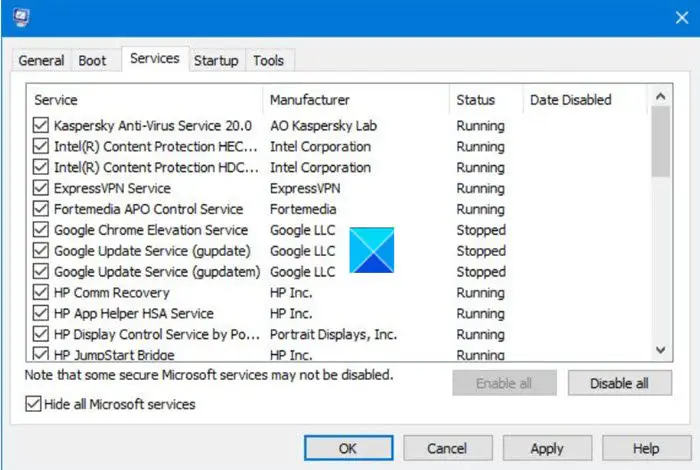
4] Perform a clean boot of Windows 11 and troubleshoot

Chances are, you may have to perform a clean boot of Windows 11 to solve this problem once and for all, or maybe just temporarily.
When you start the computer in clean boot, it uses a pre-selected minimal set of drivers and startup programs. Because the computer starts with a minimal set of drivers, some programs may not work as you expected.
To learn how to perform a clean boot & manually troubleshoot the issue, we recommend reading how to troubleshoot in Clean Boot State.
5] Use Cloud Reset option
Use the Cloud Reset option for Windows 11 to repair your operating system.
6] Report this issue using the Feedback Hub app
If you wish, you may report the issue. Open the Feedback Hub and Report this issue to Microsoft.
Read: How to enable or disable Quick Settings in Windows 11 computer
What can we do with Windows 11 Quick Settings panel?
If you want to change the volume or brightness, the Quick Settings panel located on the Taskbar is one of the best ways to do so. From here, you can also switch between Wi-Fi networks and activate Airplane Mode and Night Light, among other things.
Read: How to Add, Remove, Reset, Customize Quick Action Buttons in Windows 11.
How do I enable Quick Settings in Windows 11?
You don’t need to do anything to enable Quick Setting in Windows 11, as it is already turned on by default. You can press Win+A to open the Quick Settings panel on your Windows 11 PC. However, if it doesn’t work for some reason, you can follow the tips and tricks mentioned above.
Leave a Reply