We have noticed that even after configuring a device as a part of a domain AD, the Windows client does not register in the DNS and/or DNS table. This forbids the client machine from accessing the organization’s data and even limits its ability to connect to the internal network. In this post, we are going to talk about this issue and see what you can do if your client machine is not registered in the DNS.
Why is Windows server DNS client not working?
Windows Server DNS client may not work due to various reasons such as incorrect DNS configuration settings, network connectivity issues, and service malfunctions. However, if a Windows client fails to register DNS, then it is due to the disabled dynamic DNS update, or misconfigured network settings. In the next section, we will explore the latter issue in detail.
Fix Windows client does not register in DNS
If the Windows client does not register in DNS even after configuring a device as a part of a domain AD, follow the solutions mentioned below.
- Enable Dynamic DNS Updates on the client
- Register DNS manually
- Configure the domain-wide GPO
- Check if your computer is a part of the domain
- Set Dynamic Updates to accept Nonsecure and secure
Let us discuss them in detail.
1] Enable Dynamic DNS Updates on the client

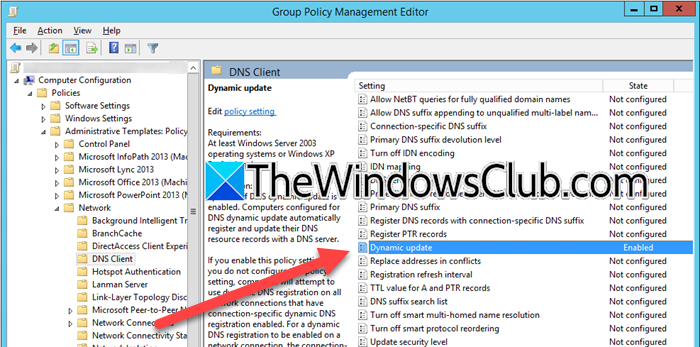
One of the reasons why your client is not automatically registering the change in the DNS is that the dynamic DNS allocation or update is not enabled on it. We need to configure the group policy on the client to enable the same. To do so, follow the steps mentioned below.
- Open Group Policy Management Console.
- Then, navigate to Computer Configuration > Administrative Templates > Network > DNS Client.
- Look for the Dynamic Updates policy there, double-click on it, and then set it to Enabled.
- Click Apply > Ok to save the changes.
Now check if the issue is resolved, in case, it persists, move to the next solution.
2] Register DNS manually

If after enabling dynamic allocation, you encounter the same issue, we recommend you register DNS manually using the Command Prompt. So, open the Command Prompt as an administrator, and then run the following commands one by one.
ipconfig /registerdns
net stop netlogon
net start netlogon
Once done, check if your client has registered the DNS. Hopefully, this will do the trick for you.
3] Configure the domain-wide GPO
Let’s check if the domain-wide GPO is configured to allow to refresh of the DNS registration. We will configure the Registration Refresh Interval, which determines the frequency of attempts a DNS client will make to register its DNS registration. This interval is crucial for ensuring that the DNS records for a client remain up-to-date, especially in environments where IP addresses can change frequently, such as those using DHCP. To configure it, follow the steps mentioned below.
- Open GPO on your domain computer.
- Go to Computer Configuration > Administrative Templates > Network > DNS Client.
- Look for Registration Refresh Interval, double-click on it, set it to Enabled, and then set its value to 1800 (or any other as per your choice).
- Click Apply > Ok.
Check if the issue persists.
Read: How to change Group Policy Refresh Interval for Windows 11
4] Check if your computer is a part of the domain

There is a possibility that after an update, your client computer is unregistered from the domain, and if that is the case, there is no way, that any change in DNS will be registered there. To check this, we need to see the domain that the system is a part of. To do so, we have two methods.
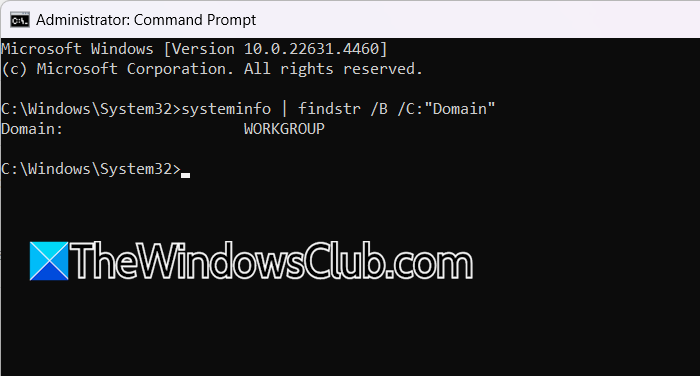
- Open the Run dialog box (Win + R), type “sysdm.cpl”, and hit Enter. In the System Properties window, under the Computer Name tab, check the Workgroup.
- Launch the Command Prompt as an administrator and then run
systeminfo | findstr /B /C: "Domain"to see your domain. If it says WORKGROUP, you are not a part of any domain.
If you are not part of the domain, you need to contact your organization’s IT admin, who will add your user to the Active Directory.
Read: Enable and Configure DNS Aging & Scavenging in Windows Server
5] Set Dynamic Updates to accept Nonsecure and secure

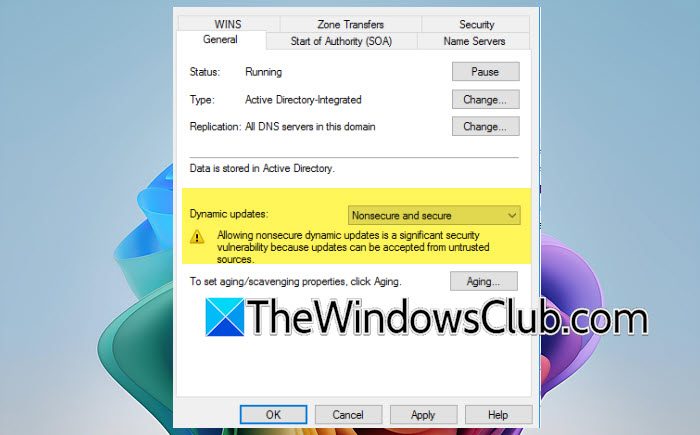
If all else fails, we have a workaround that you can try if the job at hand is very important. We will set the dynamic update to allow both secure and non-secure updates to the DNS records. So, if your device doesn’t support the secure update, doing this will do the trick. However, you can skip this solution if you want to maintain the utmost privacy and security. To do so, follow the steps mentioned below.
- Open the DNS Manager.
- Now, expand Server Node, and locate the zone you want to configure.
- Right-click on the zone and select Properties.
- Go to the General tab and in the Dynamic updates drop-down menu, select Nonsecure and secure.
- Click Apply > Ok.
Finally, check if the client can register DNS.
Hopefully, you can resolve the issue using the solutions mentioned here.
Read: Windows can’t resolve domain name
How do I enable DNS client service?
We can enable DNS client service from the Services app. So, hit Win + S, type “Services”, and open the utility. Now look for the DNS client, double-click on it, and click on Start. You can also set the Startup type to Automatic and then click on Apply > Ok.
Also Read: Fix DNS-related activation issues on Windows Server.