If Windows Defender keeps saying Threats found in a popup message of the original interface, this guide will help you get rid of the issue. Even if you have taken action already, it might continue to display the message on your screen and interrupt you from doing your work. Therefore, you need to go through these tips to troubleshoot the problem on Windows 11 and Windows 10 PC.

Windows Defender keeps saying Threats found but nothing found
If Windows Defender keeps saying Threats found message, follow these steps to address the issue on your Windows 11/10 computer:
- Delete scan history
- Clear Windows Defender log
- Add Exclusion
- Disable Real-time protection temporarily
Let’s check out these steps in detail.
1] Delete scan history

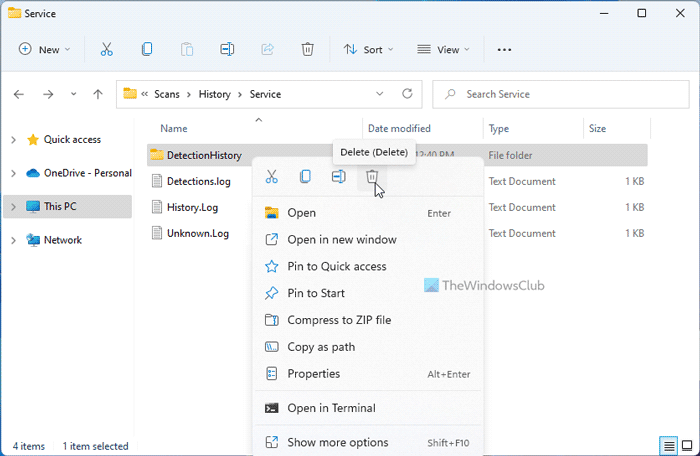
Windows Security or Windows Defender scans for the log or history to show the Threats found message on your computer. For your information, it stores the scan history files in the system drive or C drive. If you delete these history folders from your computer, it won’t be able to find the threats and eventually, it will stop showing the message.
Therefore, follow these steps to delete scan history in Windows 11/10:
- Open File Explorer on your computer.
- Navigate to this path:
C:\ProgramData\Microsoft\Windows Defender\Scans\History\Service - Right-click on the DetectionHistory folder and select the Delete option.
You might need to click the Yes button to remove this folder. However, if you get any permission-related error, you can follow the other method to get it done.
2] Clear Windows Defender log

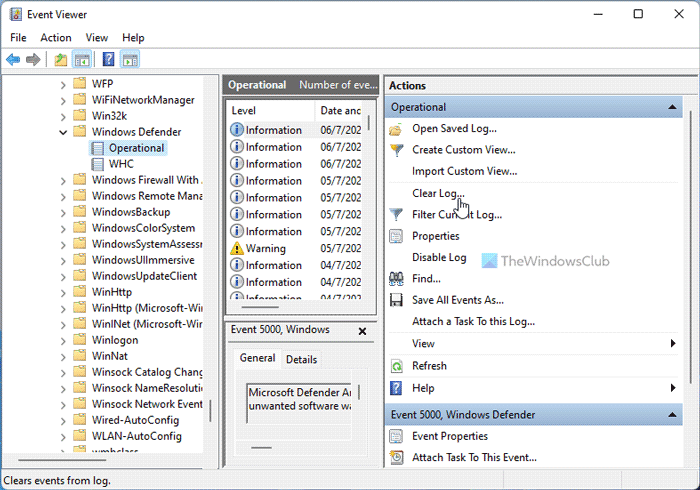
It is possible to delete the log of Windows Defender or Windows Security on Windows 11 PC using Event Viewer. As Event Viewer stores all the things happen on your computer, you can find the scan history of Windows Defender as well. Therefore, follow these steps to clear Windows Defender log using Event Viewer:
- Search for event viewer in the Taskbar search box.
- Click on the individual search result.
- Navigate to Applications and Services Logs > Microsoft > Windows > Windows Defender > Operational
- Click the Clear Log option.
It will clear the log. Following that, restart the Windows Defender application.
3] Add Exclusion

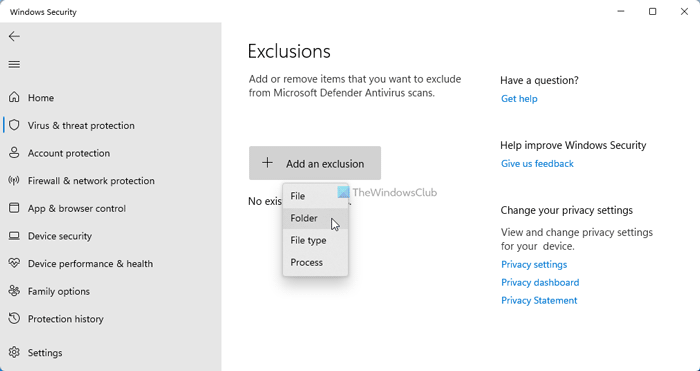
Windows Defender scans every file on your computer. However, if you do not want to allow a file or folder to be scanned, you can add it to the Exclusions list. If the first trick on this article has not worked for you, you can add the Service or DetectionHistory folder to the Exclusions list. For that, do the following:
- Open Windows Security on your computer.
- Switch to the Virus & threat protection section.
- Click the Manage settings button.
- Click on the Add or remove exclusions option.
- Click the Yes button.
- Click on the Add an exclusion > Folder button.
- Choose this folder: C:\ProgramData\Microsoft\Windows Defender\Scans\History\Service
Then, you should not find the same Threats found message again.
4] Disable Real-time protection temporarily
You should do this only if you have third-party antivirus software installed.

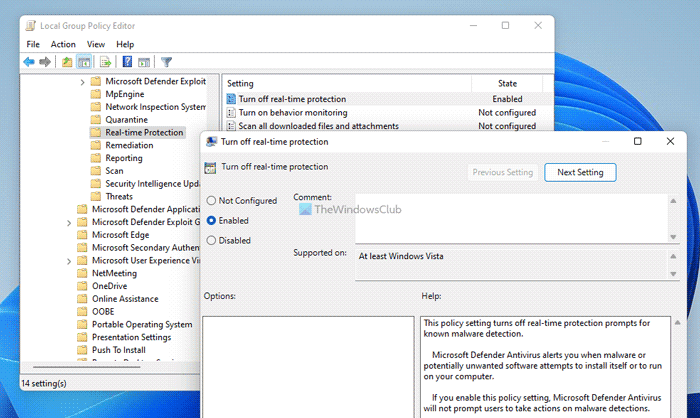
Real-time protection can be disabled using the Local Group Policy Editor. For that, follow these steps:
- Press Win+R > type msc > hit the Enter button.
- Navigate to this path: Computer Configuration > Administrative Templates > Windows Components > Microsoft Defender Antivirus > Real-time Protection.
- Double-click on the Turn off real-time protection setting.
- Choose the Enabled option.
- Click the OK button.
Then, you should not find the same message again.
Read: How to disable Microsoft Defender in Windows 11/10
Windows Defender Threats found, Start actions not working
If the Windows Defender Start actions option is not working, you need to restart your computer first. If it is happening due to a bug, it might get fixed immediately. Following that, you can disable any other installed security software, check the Local Group Policy Editor setting, verify the Registry files, etc. Finally, you can run the SFC and DISM tools on your computer.
Windows Defender keeps saying Threats found but nothing found
At times, Windows Defender could display the Threats found message, but it might not show the threats when you click on the notification. In such situations, you need to follow the aforementioned tips and tricks. In most cases, you need to delete the scan history folder, clear the log using Event Viewer, add an exclusion, etc.
However, if nothing helps, you can disable the real-time protection. For your information, it is possible to do that using the Local Group Policy Editor.
Read: Windows Defender will not turn off even when 3rd party AntiVirus is installed
How do I get rid of Windows Defender threats?
The easiest way to get rid of the Windows Defender threats is by removing them. You can either remove them from your computer or quarantine those threats. Both are possible using the Windows Security interface. Whether you use Windows 11 or Windows 10, the options can be found in the same location.
How do I get rid of quarantine threats in Windows Defender?
If you need to delete the quarantined files, you can simply open the panel and click the Remove button. However, if you need to restore the quarantined files in Windows Defender, you can open Protection History first. Then, find the file int eh Quarantined Items list. Following that, you can restore the file as per your wish.
Leave a Reply