Windows Security or Windows Defender displays a Start actions button when it finds malware or suspicious file, and you need to quarantine or remove them. However, if the Windows Defender Start actions button is not working or this option is grayed out, here is how you troubleshoot the issue. Whether you use Windows 11 or Windows 10, you can follow these suggestions.

Windows Defender Start Actions not working
If the Windows Defender Start actions button is not working on your Windows 11/10 computer, follow these steps:
- Restart computer
- Disable other security software
- Verify Group Policy setting
- Verify Registry files
- Try in another user account
- Run SFC and DISM tools
To learn more about these steps, continue reading.
1] Restart the computer
If you are using an Insider version of Windows OS, it is recommended to restart your computer first. At times, those builds come with various bugs and glitches that might prevent you from using certain features in different apps, including Windows Security. Therefore, restart your computer and check if it resolves the issue or not. If not, follow the other solutions mentioned in this article.
2] Disable other security software
Although Windows Security does the job pretty well, many people often rely on third-party security apps. They often install firewall software, antimalware apps, etc. If you have installed such programs earlier but haven’t removed them till now, it is recommended to disable them at least before trying Windows Security. Otherwise, there is a high chance of getting the aforementioned issue.
3] Verify Group Policy setting

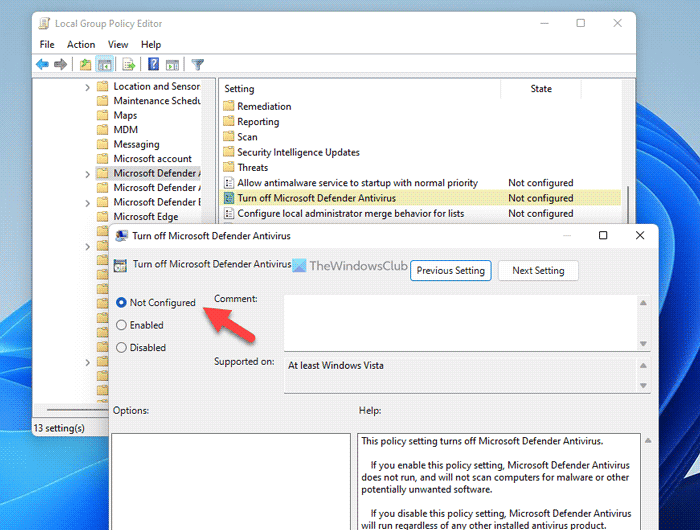
There is a setting in the Local Group Policy Editor which might be responsible for this error. If you have enabled this setting earlier, there is a chance of getting this problem on your computer. Therefore, follow the following steps and verify the Group Policy setting:
- Press Win+R > type gpedit.msc > hit the Enter button.
- Navigate to this path: Computer Configuration > Administrative Template > Windows Components > Microsoft Defender Antivirus
- Double-click on the Turn off Microsoft Defender Antivirus setting.
- Choose the Not Configured option.
- Click the OK button.
Apart from that, you can also check if any other setting is enabled in the same path. If yes, set them as Not Configured. For example, if you find the Turn off real-time protection setting is enabled, you need to double-click on it and choose the Not Configured option.
4] Verify Registry files

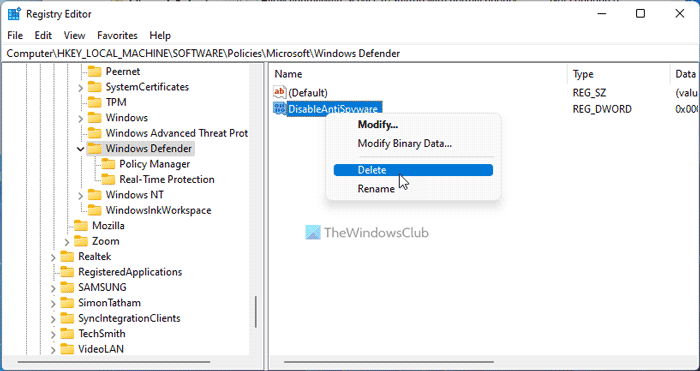
The same Group Policy settings can be configured using the Registry Editor as well. If you have enabled such settings, follow these steps to verify them:
- Press Win+R > type regedit > hit the Enter button > click the Yes option.
- Navigate to this path:
HKEY_LOCAL_MACHINE\SOFTWARE\Policies\Microsoft\Windows Defender - Right-click on the DisableAntiSpyware and select the Delete option.
- Click the Yes button.
Similarly, if you find anything else in the same key, you can set the Value data as 0. Finally, restart your computer to get the changes.
Note: You might find DisableRealtimeMonitoring REG_DWORD value in Real-Time Protection sub-key under the Windows Defender key. If so, you can safely set the Value data as 0 or delete this REG_DWORD value. To delete it, right-click on the REG_DWORD value, select the Delete option, and click the Yes button.
5] Try in another User account
If you get this error in one user account, it is recommended to check the same in another user account. Whether you use Windows 11 or Windows 10, the problem can be resolved by changing the user account. At times, you might not be able to use certain options in one user account due to not having the correct permission or some glitches. If the same thing is happening with your right now, you can solve it by changing the user account.
However, if you do not have another user account, you can enable the hidden Administrator account as well.
6] Run SFC and DISM tools
There could be times when adware or malware can remove certain system files that are responsible for this error. In such situations, you might be able to troubleshoot the issue by using the System File Checker and Deployment Imaging and Servicing Management tool on your PC.
Read: Cannot or Unable to turn on Windows Defender on Windows
How do I fix Windows Defender action?
If you get Action Needed notification frequently, you can try these solutions. Start the process by restarting File Explorer. Then, you can enable or disable the Windows Defender Real-Time Protection using Group Policy or Registry Editor. Following that, you can actively run a Quick Scan as well.
Read: Windows Security in Windows 11 not opening or working
How do I force Start Windows Defender?
There is a couple of things you can do in order to force start Windows Defender on Windows 11 or Windows 10 PC. For example, you can check the Local Group Policy Editor setting, Registry Editor values, etc. However, all these solutions work only when you do not have any other third-party antivirus program installed.
That’s all! Hope these solutions worked for you.
Leave a Reply