If you receive a message Windows deployment services encountered an error 0xc0000023 when deploying an ISO image, this post will help you resolve the issue. However, let’s first understand the reasons.
Causes for Windows deployment services error 0xc0000023
Various causes, both on the server and on the client end, are responsible for the error as detailed below:
- Corrupted Boot File: The Windows Image File (WIM), containing the OS image and other components necessary for booting and installing the OS, is stored in the boot.wim file. When a remote installation is initiated, the WDS Server transfers the boot.wim file to the target system, which, in turn, initiates the installation process. Hence, a corrupted boot.wim can majorly cause the said error.
- Improper OS Image Capture: The installation or OS deployment process may also fail if the OS image captured and stored in the WIM file is corrupt or if any of its components are missing. In such cases, the deployment process may fail while loading the necessary files to boot the system.
- Hardware Compatibility Issues: Incompatible hardware or outdated or corrupted device drivers on the target system can create conflicts with other devices or the system firmware, causing boot failure. Such failures may also lead to the error.
- Problem with WDS Configuration: The WDS server may sometimes fail to locate or transfer the WMI file to the target system. Various factors, including incorrect network settings, firewall restrictions, etc., may prevent the file transfer, leading to the error.
Fix Windows deployment services encountered an error 0xc0000023

The below-mentioned solutions can be implemented to resolve the issue as detailed below:
- Verify the WDS boot file for errors
- Recapture OS Image
- Check Hardware Compatibility
- Update and Reconfigure the WDS Server
1] Verify the WDS boot file for errors
Since the error directly points towards a corrupt boot image file, the first step to troubleshoot the error would involve checking the boot.wim file. The System File Checker and the DISM tool can be used to detect and correct the errors, if any, by following the below-mentioned steps:
- On the WDS server, open the Windows Terminal by typing cmd in the Desktop Search Bar.
- Open the Terminal as an administrator, and type the below-mentioned command to run the System File Checker:
sfc /scannow
- Once the above process is completed, run the DISM tool by typing:
dism /checkHealth /image:C:\wim\boot.wim
- If any errors are detected after running the above command, we can fix it by entering:
dism/repairImage /image:C:\wim\boot.wim
2] Recapture OS Image
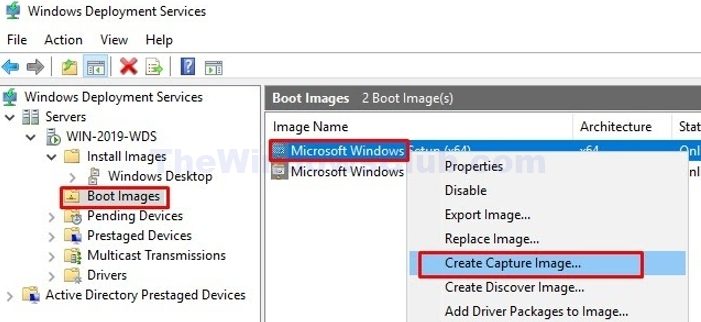
- Open the WDS Server Manager and double-click on the server name to expand it.
- Clicking Boot Images on the left pane will cover the boot image file details on the right.
- Right-click on the image and click on Create Capture Image to initiate the image capture process.
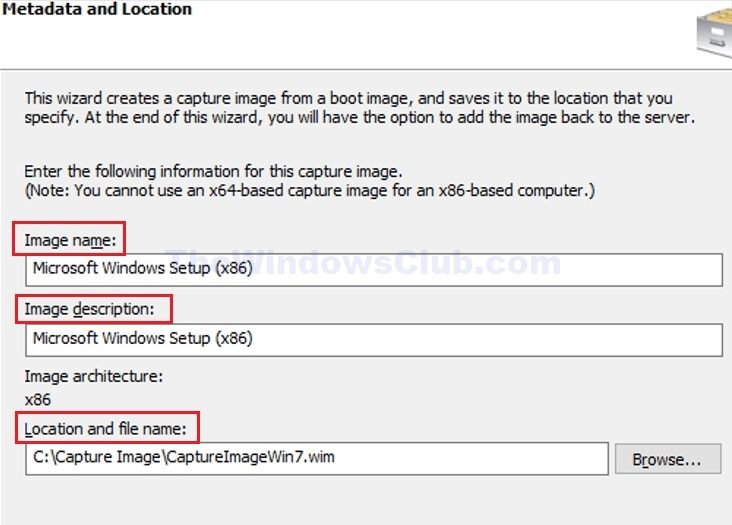
- On the next screen, enter the Image Name and Description along with the path to where the image file would be saved.
- Click on Next and wait till the image creation process is complete.
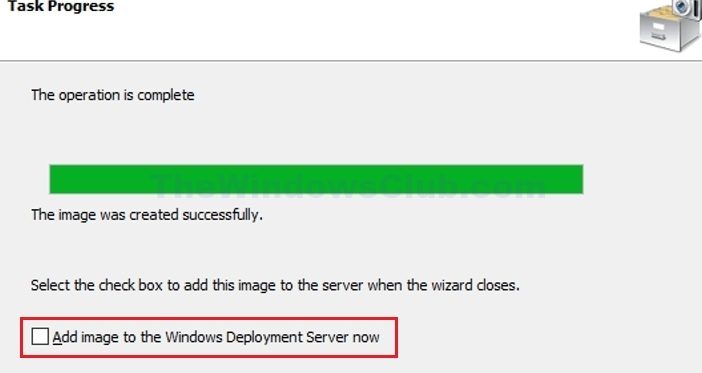
- Once completed, click on the check box beside Add Image to the Windows Deployment Server Now and click on Finish to complete the recapturing.
3] Check Hardware Compatibility
By verifying that the hardware components, like CPU, Storage, RAM, etc., meet the hardware requirements for deploying the OS, we can avoid any conflicts or failures during the said process. Hence, checking the minimum system requirements can be important in avoiding errors.
4] Reconfigure and Update the WDS Server
Reconfiguring the WDS Server by following the below-mentioned steps can help us avoid configuration or settings-related errors during the deployment:
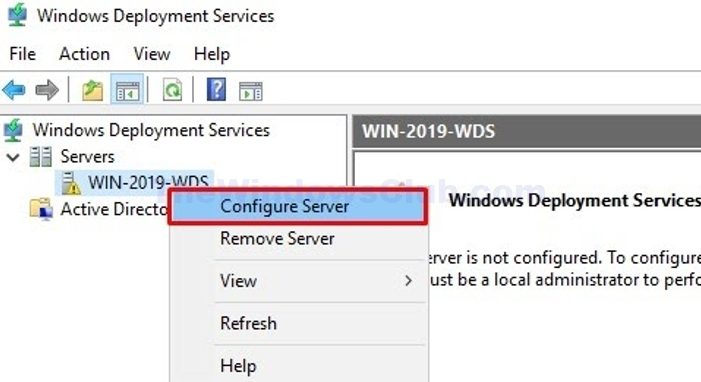
- Open the WDS Server Manager and right-click on the Server Name.
- Choose the Configure Server option after right-clicking the Server name and then click Next.
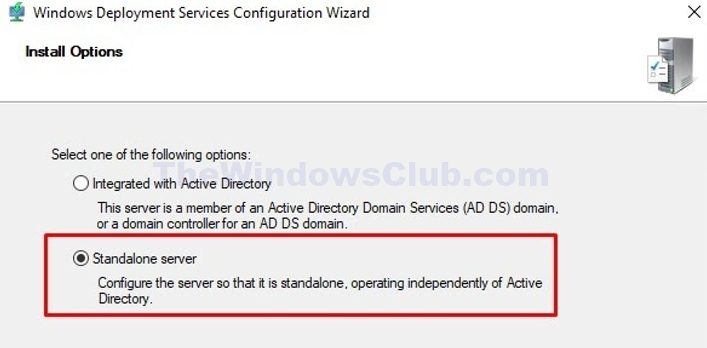
- On the very next screen, click on Integrated with Active Directory Domain if the server is part of an Active Directory Domain. Otherwise, click on Standalone Server and click Next to proceed to the next step.
- Select the path or folder on the next screen where all Windows Images would be stored and click Next.

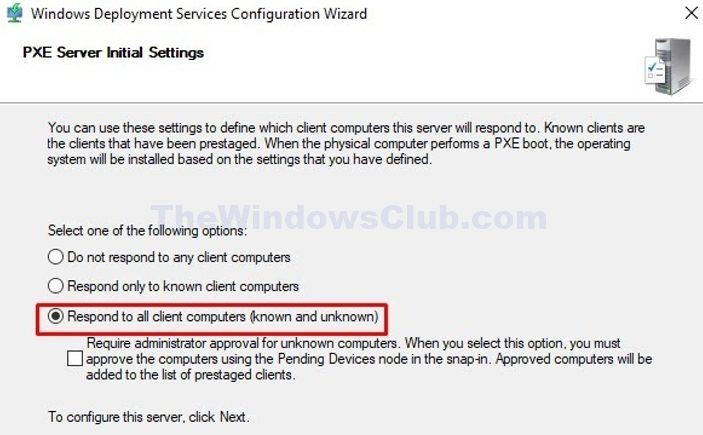
- Click on the option Respond to all client computers (Known and Unknown) and proceed to the next page.
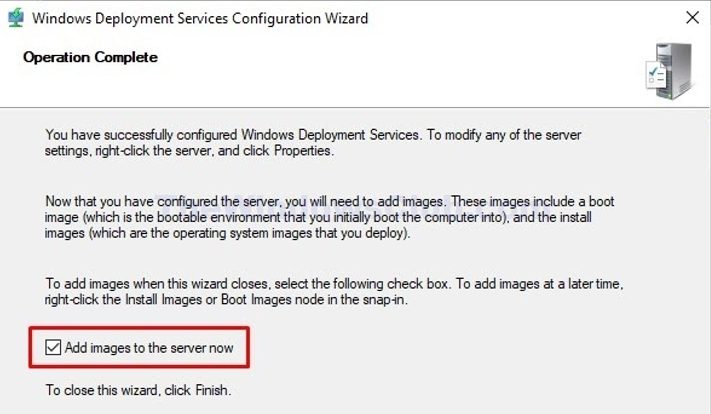
- Select the option Add Images to the server now to add the newly captured image to the server, and click on Finish to complete the process. To add the image, follow the steps detailed in the Recapture OS image section.
In addition to the above steps, we can check for any pending updates to ensure compatibility with the latest Windows versions.
What is Windows Deployment Service?
Windows Deployment Service or WDS is a Windows Server-based tool that allows us to install and configure the OS on systems over a network. The installation can be carried out on multiple systems simultaneously without using physical media. WDS is used alongside the Pre-boot Execution Environment or PXE to load the smaller version of Windows, called Windows Pre-execution Environment ( Windows PE), on the target system to perform the installation process. WDS stores the network boot images for the PXE and the actual OS images to be installed on the remote systems.
Where are Windows Deployment Services boot images stored?
For 64-bit boot images in Windows Deployment Services (WDS), the boot images are located at <RemoteInstall>\Boot\x64\Images. However, if you want, you can use Microsoft Configuration Manage to change it.
Leave a Reply