Sometimes, when you initially upgrade to Windows 11/10 or install any feature update of Windows 11/10, your desktop background settings may get messed up, and all the new modifications you make in order to fix them stay only until a reboot or a shutdown. This issue is caused by corrupt migration of the system files, damage caused to the registry files, issues with the syncing capabilities of Windows 11/10, etc.
Desktop background changes by itself on Windows 11/10
If your Desktop Wallpaper changes automatically by itself in Windows 11/10, here are a few things you need to look at to fix the problem.
- Modify Desktop Background Slideshow settings
- Disable Windows Sync settings
- Change the desktop background
These would work without an administrator account.
1] Modify Desktop Background Slideshow settings
First of all, start by hitting the WIN + R keyboard combination or search for Run in the Cortana search box to launch the Run box.
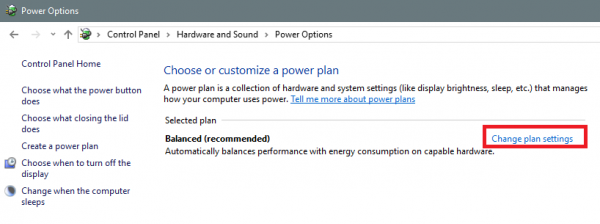
Type powercfg.cpl and hit Enter. This will launch the Power Options window.
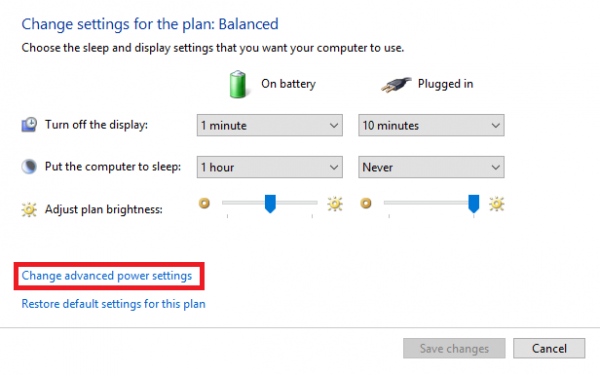
 For your selected power plan, click on Change Plan Settings. This will open a new page.
Then click on Change advanced power settings.
 This will launch a new window with a lot of power consumption options.
Expand the option that says Desktop Background Settings. Next, set the slideshow to be Disabled or Paused for both the scenarios: On Battery and Plugged in.
Click on OK and then reboot your PC for the changes to take effect.
Read: Windows slideshow feature not working.
2] Disable Windows Sync settings
Start by right-clicking on an empty space and click on Personalize, or hit WINKEY + Ito launch settings. Navigate to Personalize menu.
 Now, click on the left side menu named Themes.
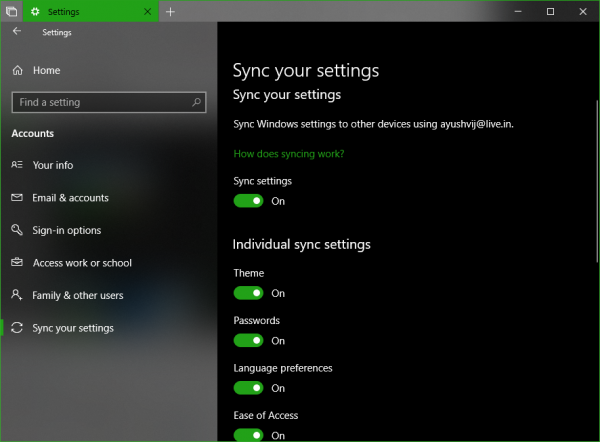
Then, on the options you get in the right panel, click on Sync your settings under the section of Related settings.
This will open a new section in the Settings app.

Inside there, turn off the button toggle that says Sync settings.
Reboot your PC for the changes to take effect.
Now after the PC has done rebooting, change your desktop background to your desired one and check if this has fixed your issue.
3] Change the desktop background
Start by right-clicking on an empty space and click on Personalize, or hit WINKEY + Ito launch settings. Navigate to Personalize menu.
Now, click on the left side menu named Background.
Then, on the right-side panel, click on the drop-down button labeled as Background and click on Picture.
Now, click on Browse and select the picture of your choice.
Now under the drop-down of Choose a fit, select the one that matches the resolution of your display.
Reboot your machine for the final changes to take place.
These are some of the common steps that help in fixing the issue of Desktop Background Changing Automatically on Windows 11/10.
How do I get rid of a black background on my PC?
Right-click on the desktop and select personalize. This will open the settings where you can change background, colors, themes, lock screen, and touch keyboard settings.
Click on Background, and here you can select a picture, or choose a solid background, or to a slideshow. This will remove the black background with something else.
Where are the Windows desktop backgrounds saved?
All the desktop wallpapers are saved into C:\Windows\Web. The wallpapers are categorized into 4K, Screen, touch keyboard, and Wallpaper. You can copy any wallpaper that Windows rolls out from here or add your own wallpaper.
Related read: Cannot change the desktop background.
my desktop background settings has only “paused” and “available” as options .. no “disabled”. which one do i choose, paused or available? thanks.
You can set it to “Paused” it will work. Thanks for pointing it out. I will update the article now.
O u did it
Good