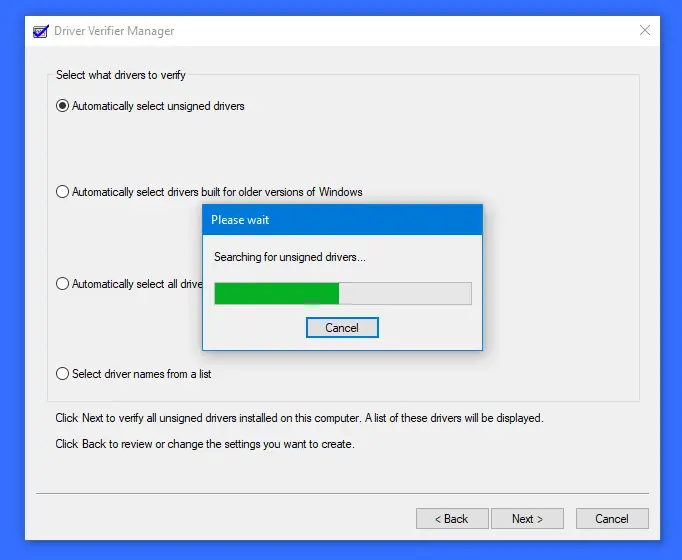
If your Windows freezes frequently or is encountering frequent Stop Errors or BSOD’s then, it is advisable to check if the problem is being caused by a faulty Driver. While in most cases, its usually the unsigned drivers which create problems, one cannot rule out the signed drivers too! Nevertheless, you can troubleshoot, identify & resolve common device driver problems with the help of the built-in Driver Verifier Manager.
How to use Driver Verifier Manager in Windows
Windows has, what is called, Driver Verifier Manager. It’s a very useful tool to identify problematic drivers.

To open it type verifier in Start menu search box and hit Enter. The Driver Verifier Manager tests each specified driver at startup. If it detects a problem, it identifies it and then stops it from running.
The tool allows you to verify any category of drivers to verify:
- Unsigned drivers
- Drivers built for older versions of Windows
- All drivers
- Select specified drivers only.
To use the Driver Verifier Manager:
- Type verifier in the search box and hit Enter to open Driver Verifier Manager
- Select Create Standard Settings
- Click Next
- Select Automatically select unsigned drivers
- Click Next.
- You will see a dialog box ‘Loading driver information‘ at the end of which you will be presented with a list of unsigned drivers.
There are other options, too, to select at every step. Choose what you think would be most appropriate in your case. I have only mentioned unsigned drivers as they are usually suspect. This way Standard Settings will first be created. This helps you in identifying what might be a buggy driver.
In the last stage of the wizard, you have two options: to click Cancel or to click Finish.
- It’s best to click Cancel. This way no changes are made to your system configuration. From the list which is presented, you can manually try to Rollback, Update, Disable or Uninstall the Driver.
- But if you click Finish, then on the re-start of the PC, you may be presented with an error message. This will include the name of the buggy driver along with an error code. Note down the driver’s name and the error code.
Next reboot, but this time in Safe Mode. Now you can choose to Rollback, Update, Disable or Uninstall the particular Driver.
Finally, you have to disable Windows Driver Verifier.
How do I disable Windows Driver Verifier?
To disable the Driver Verifier Manager, type the following in Windows Start Menu Search and hit Enter:
verifier /reset
Once done, it will reset all the verified driver information it holds, and also no more verify drivers’ digital certificates in the future until enabled.
I hope this helps.
Cannot boot into Windows normally with Driver Verifier Manager enabled
If you face issues booting normally into Windows with Driver Verifier enabled, do the following:
- Start your PC, just as Windows attempts to load, press and hold down the Power Button for 10 seconds to perform a Hard Shut Down
- Do this twice
- The third time, Windows will boot into the Recovery Environment or Advanced Startup Options.
- Now, Go to Troubleshoot > Advanced Option > Startup Settings and click Restart
- On restart, press 4 to enter Safe Mode
- Finally, open Command Prompt as Administrator and run these two commands
verifier /reset
verifier /bootmode resetonbootfail
Restart your PC.
Additional resources:
- How to use Device Manager to troubleshoot driver issues
- List of Windows Device Manager Error Codes & their solutions
- How to identify or verify unsigned/signed Drivers
- Identify computer hardware problems with Hardware Identify software.
I’m trying to prevent Windows 7 from automatically changing a printer driver whenever I reboot. I have a Zebra bar code tag printer. I don’t have any disks with it so I tried a couple of drivers I found on line. Finally found one that works but every time I reboot the PC, it reverts back to one of the previous drivers I tried that does not work???
I don’t understand why your site is marked as a malware distribution site (via a list my router has access to, “smart” router). Can you enlighten me? oregonnerd@yahoo.com
–The Windows Club site, pardon me.
Our site is totally clean: https://www.virustotal.com/en/url/45ae38aead4c41ca2c60f91d47844ed4329ffca055ae32dc454bca139d5ab4d9/analysis/1491418845/ You can check with any URL scanner and see: http://forum.thewindowsclub.com/windows-security/33855-online-url-scanners-scan-websites-malware-virus-phishing-etc.html Incidentally we use SUCURI to protect our website.
That was a comment to notify you. All and only.
I was notifying you, not complaining. It’s an ASUS RT-AC68U and just CHECK THEM OUT. I couldn’t go there without disabling security (or putting an OS on USB and going to the library).
Thanks I really appreciate that. But I really don’t know why your Router is acting this way.
Did the Verifier thingy on Win10 and I couldn’t get back into my system. It kept checking for the glitchy driver and crashing each time until it automatically began fixing Windows. And not I don’t see any info about which driver casued this!
Mind you, I don’t have a DVD drive so I can’t just boot it in a safe mode.
What to do?
I have this BSOD error once per week and can’t recreate it. It’s so random. I need some help in finding the culprit!
Tried the driver verifier and it hosed up my computer and kept coming up with blue screen “DRIVER VERIFIER DETECTED VIOLATION” and no way to get it back without reloading Windows.