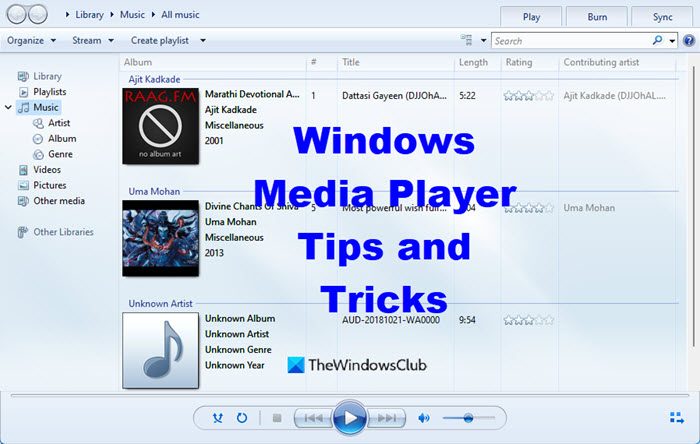
The classic Windows Media Player is still a popular media player for many Windows users. It does not require any introduction and is familiar to everyone. Most of us make use of it for playing audio and video files. We also know that it supports online streaming of videos and music and allows us to rate the music so that we can sort based on the rating and access those files easily. Almost everyone is aware of basic Windows Media Player tips, but there are more hidden and unknown tips and tweaks, which you may want to know.

Read: Where is Windows Media Player in Windows 11?
Windows Media Player Tips and Tricks
There are some hidden and lesser-known tips of Windows Media Player which are only accessible when we dig into the player. I will showcase to you the best 5 among them. By knowing these tweaks and tips, you can say that you are a power user of Windows Media Player:
- Search audio and video files using operators
- Search through years
- Stop sending Player Usage Data to Microsoft
- Stop others from playing high-rated DVDs in your Windows Media Player
- Set the smooth flow of Online Streaming.
1] Search audio and video files using operators
There might be many audio and video files in your Windows PC that are seen in Windows Media Player. Suppose there are many audio files with similar names, and you want to play a particular file among them. This would be really challenging if there were many such files. Then, using the Search with operators feature will be very helpful. You can use AND or OR operator to find the audio or video file. For example, you can find the audio file by song name and the singer name.
Now, even though there might be many songs with the same name, by using the AND operator with the singer’s name, it displays the matching file. Search results are displayed by searching through the information present in the audio and video files of your system. You can even perform the search with ratings and other parameters.
2] Search through years
Windows Media Player allows you to search through the years. If you are fond of old songs or the latest songs and if your Windows Media Player is full of songs from the 1980s to the latest date, then it would be very difficult to find old or new songs. Then, you can specify the search pattern like ‘starting year..ending year’. Then, it checks for the albums in your PC that have the year between the specified range, including the start and end year.
For example, if I want to search for albums from 2012 to 2014, then I would enter ‘2012..2014’ and all albums matching the specified year will be displayed.
3] Stop sending Player Usage Data to Microsoft
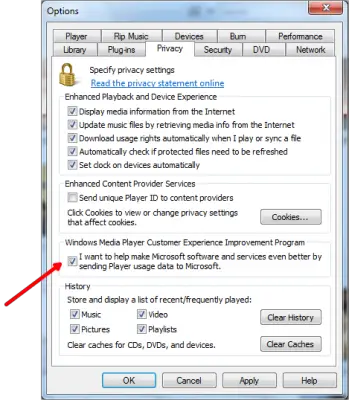
Microsoft, by default, enables the option in Windows Media Player, which sends your player usage data to it. It does this to improve the user experience of the player. If you do not feel like sending the player usage data to Microsoft, then you can stop that. To do that, go to Tools > Options and tap on “Privacy” tab. Uncheck one and only one option under the section “Windows Media Player Customer Experience Improvement Program”.
From now on, your player usage data is not sent to Microsoft. This is one of my best Widows Media Player tips.
4] Stop others playing high rated DVDs in your Windows Media Player
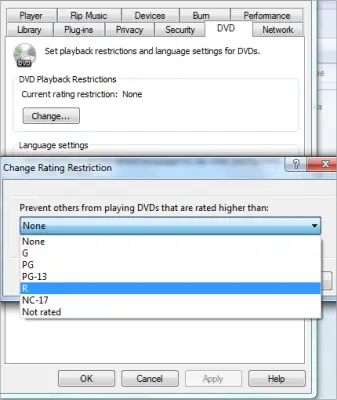
If you want your Windows Media Player to play certain good-rated DVDs and not to allow other high-rated DVDs, even that can be done with just a few clicks. You can put a restriction on your Windows Media Player for not playing DVDs than the specified rating. For this, go to Tools > Options and tap on DVD tab. Click on Change button which opens “Change Rating Restrictions” window. From the dropdown, select the DVD minimum rating that you want to restrict.
From then, DVD which is higher than the specified rating will not be played in Windows Media Player. For example, if I want to restrict my Windows Media Player not to play DVDs that are higher that ‘R’ rating, then I would choose the value ‘R’ from the dropdown.
5] Set the smooth flow of Online Streaming
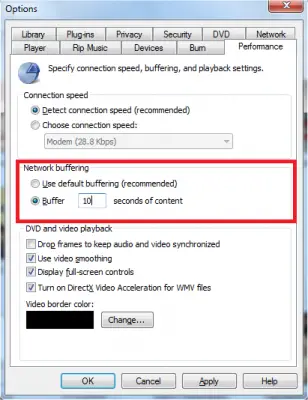
Windows Media Player allows you to Stream Online. Due to slow internet speed and some other reasons, there may be some problems with the streaming. To have a smooth flow of music or movies, Windows Media Players stores some content in the buffer before the start of playback. That is called as Buffer. This is helpful to compensate for the slow internet speed and playback. You can choose the value of the buffer through Tools > Options and tap on Performance tab.
Under Network buffering, specify the value between 0 to 60. Based on the specified value, content will be stored before the start of playback. Do not assign a high value to buffer as it may slow your downloads.
This post will show you how to play MP4 on Windows 11.
If you have any more to add, please do share with us.


Windows media player on windows 10 does not play dvds only CDs that’s why people use VLC player