Some Windows users have reported that their computer won’t switch from speaker to headphone automatically whenever they connect the headset to their PC or laptop. If you are also facing this issue, this post will interest you.

Why does my laptop not automatically switch to headphones?
If your laptop or PC is not switching from speaker to headphones, it is likely that the headset it not correctly connected to your computer or is not working fine. Apart from that, corrupted or outdated sound drivers can also be a reason for this issue. In case you are experiencing the same problem, follow the below-discussed solutions to fix it.
Windows 11 not switching between Headphones and Speakers
Here are the methods you can use if your audio device is not automatically switching between your headphones and speaker on Windows 11/10:
- Use these basic troubleshooting tips.
- Run Windows built-in troubleshooter.
- Update your sound drivers.
- Uninstall and reinstall sound drivers.
- Manually set the default audio device.
1] Use these basic troubleshooting tips
Before you get your hands on advanced troubleshooting methods, perform some preliminary checks as mentioned below:
- It is recommended to make sure your headphones are in proper working condition. You can plug your headset into a different PC or mobile phone and see if it works fine.
- Besides that, you can disconnect your headphones and then reconnect them to your PC to check if the problem is resolved.
- You can plug your headset into a different USB port and see if it helps.
- In case you have connected a Bluetooth headset, disconnect it from Bluetooth settings and then connect it again.
- You can also try rebooting your PC and then see if Windows is automatically switching from speakers to headphones.
- Also, make sure your Windows is up-to-date.
Read: How to stop interference on Bluetooth headphones?
2] Run Windows built-in Audio troubleshooter

You can also use Windows built-in Audio troubleshooter to fix this issue. Here’s how to do that:
- First, press Win+I to open Settings.
- Now, go to the System > Troubleshoot > Other troubleshooters section.
- Next, click on the Run button associated with the Audio troubleshooter.
- See if it is able to detect and resolve audio-related issues or not.
In case the Audio troubleshooter doesn’t work, you run the Hardware and Devices Troubleshooter using the below steps:
First, press Win+R to evoke the Run command box and enter msdt.exe -id DeviceDiagnostic in its Open field.
A Hardware and Devices troubleshooter window will open up.
You can press the Next button and proceed with the onscreen instructions to check if it can address audio device-related issues.
See: No sound after unplugging headphones in Windows.
3] Update your sound drivers

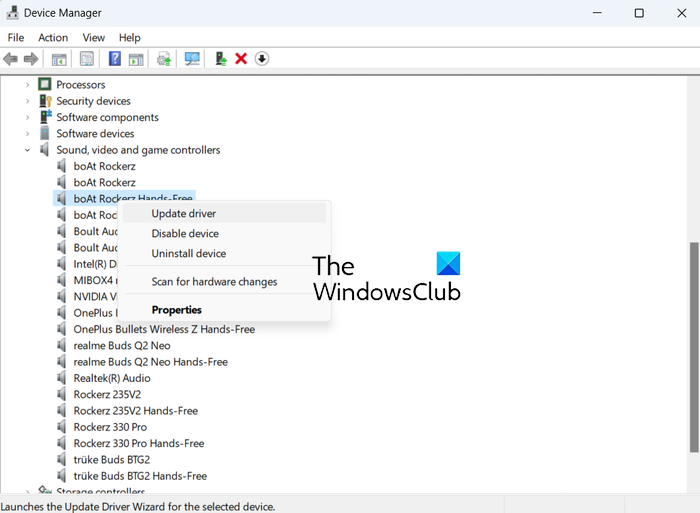
Some users have reported that updating their sound drivers fixed the problem for them. So, you can also update your sound driver to its latest version and check if the problem is fixed. To do that, you can use the Device Manager app using the below steps:
- First, press Win+X and select the Device Manager app from the appeared app list.
- Next, expand the Sound, video and game controllers category.
- Now, right-click on the sound driver you want to update and choose the Update driver option.
- After that, choose the Search automatically for drivers option and follow the prompted instructions to update drivers.
- Once done, see if the problem is resolved.
If you are experiencing this issue with a Bluetooth headset, update your Bluetooth driver and check if the issue is fixed.
4] Uninstall and reinstall sound drivers
If updating the sound driver doesn’t help, you can uninstall and then reinstall the sound driver to fix this problem. It has been proven to be effective for several affected users and should work for you as well. Here’s how you can do that:
- First, open the Device Manager app and expand Sound, video and game controllers.
- Now, right-click on the target sound driver and select the Uninstall device option from the context menu.
- Next, follow the instructions shown on your screen to complete the uninstallation process.
Once the driver is uninstalled, you can click on the Action > Scan for hardware changes option in Device Manager or reboot your PC to let Windows automatically detect the missing sound driver and install it. You can also try downloading the latest sound drivers from the official website of the device manufacturer and then installing them on your computer. Check if this method resolves the problem.
Read: Fix Channel Surround Sound not working in Windows.
I hope this post helps you fix the issue.
How do I change audio output from speakers to headphones?
You can manually set the default audio device to switch from speaker to headphones or vice versa. Here are the steps to do that:
- First, right-click on the volume icon from the taskbar and select the Sound settings option,
- Now, scroll down and click on the More sound settings option.
- From the Playback tab, select your active headphones and press the Set Default button.
- Finally, press the OK button to save changes.
Now read: Stop Windows from changing audio device.
Leave a Reply