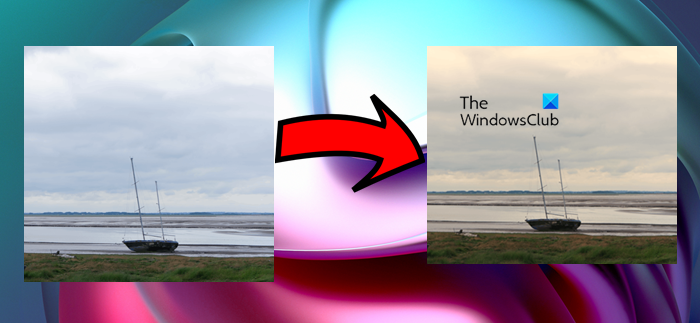
Windows Photo Viewer is an app to view images on a Windows system. It works fine on most computers, but some users are complaining that Windows Photo Viewer applies a Yellow Tint & Background to images making it look worse. In this article, we are going to address this issue and talk about ways by which you can fix the problem.

Why does Windows Photo Viewer look yellow?
Windows Photo Viewer isn’t supposed to make an image look yellow. It is a well-optimized and excellent Photo Viewer to make your image look the way it is. However, sometimes its color science got throttled and it starts adding weird tint to images. The reason why this happened is ambiguous, a third-party app could have done it, or it is manual, we don’t know that. What we know is how you can fix it, we just have to change the Color Profiles and hopefully, the issue should be resolved.
However, it is not the only reason, the issue can be a glitch or maybe some other setting has changed making the image look yellow. Whatever the case is, we are going to troubleshoot it. The guide that we have mentioned covers every solution you need to remove the yellow tint.
How do I remove Yellow from Photo Viewer?
To remove the yellow tint from the Photo Viewer you should execute the solutions mentioned hereinafter. Also, it is recommended to first check if the Night Light is on, because, it removes blue light and adds a lot of warm tones to your screen. You can click click on the Notification button from the Taskbar, and check the Nigh light icon. Also, try updating the Operating system, it will update the Graphics Drivers as well.
If nothing works, then move to the troubleshooting guide.
Windows Photo Viewer applies Yellow Tint & Background to images
If Windows Photo Viewer applies Yellow Tint & Background to images, then follow the mentioned solutions to resolve the issue.
- Restart the app and computer
- Change Color Profile
- Calibrate Display
- Reset Microsoft Photos
- Reinstall Display Drivers
- Troubleshoot in Clean Boot
Let us talk about them in detail.
1] Restart the app and computer
First of all, we should see if the issue is a temporary glitch that can be resolved by restarting it. What you have to do is just restart the app and see if the issue persists. If it doesn’t get resolved, restart your system and review that image.
Read: Windows Photo Viewer can’t display this picture
2] Change Color Profile

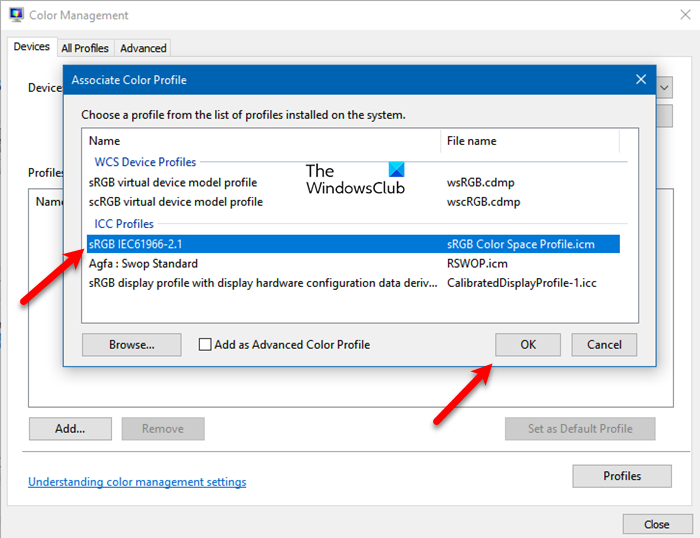
If restarting is to no avail, then we need to change the Color Profile from Color Management. Follow the given steps to do the same.
- Open Color Management by searching it out of the Start Menu.
- Make sure that you are on the Devices tab and click Add.
- From ICC Profiles, select sRGB IEC61966-2.1, and click Ok.
- Tick Use my settings for this device.
- Click Close.
Now, open the Photo Viewer and check if it worked.
3] Calibrate Display

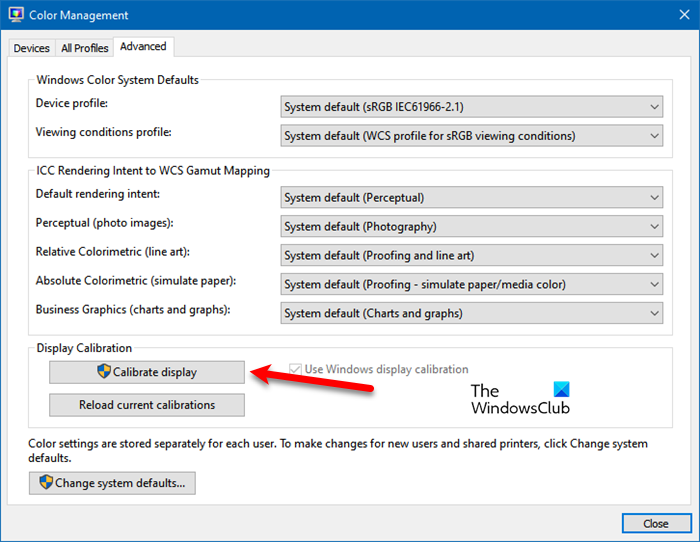
In case changing the profile is to no avail, we can use the Color Management app to recalibrate the display and see if that works. Follow the given steps to do the same.
- Launch Color Management.
- Go to the Advanced tab.
- From Display Calibration, click Calibrate display.
- Follow the on-screen instructions to complete the task.
Hopefully, the issue will be resolved.
Read: Color Calibration keeps resetting in Windows
4] Reset Microsoft Photos

If Color Profile is not an issue then there are some Microsoft Photos settings that can cause trouble for you. We won’t recommend you profile the setting of the app and tweak everything to remove the tint as it can make the situation worse. What we need to do is reset the Microsoft Photos app and it will revert its settings to default. Don’t worry! it won’t remove all your images.
- Open Settings.
- Go to Apps.
- Look for Microsoft Photos.
- For Windows 11: Click on the three vertical dots and click Advanced options. For Windows 10: Select the app and click Advanced Options.
- Click on the Reset button.
Wait for it to do its job and hopefully, your issue will be resolved.
Read: How to change Background Color of Windows Photo Viewer
5] Reinstall Display Drivers
Sometimes, your Display drivers can go corrupt causing issues for you. You need to simply reinstall it from the Device Manager to make it work. First of all, uninstall your Display Drivers. Then, restart your computer, Windows will automatically detect and install a suitable driver. If you are not happy with the installed driver, go to the manufacturer’s website and download the right driver for your computer. Hopefully, that will resolve the issue for you.
6] Troubleshoot in Clean Boot
There are a ton of third-party applications that can interfere with Microsoft Photos. To find out what’s causing the problem, we need to perform Clean Boot. Once you know which app is it, just uninstall the program and your issue will be resolved.
That’s it!
Also Read:
Leave a Reply