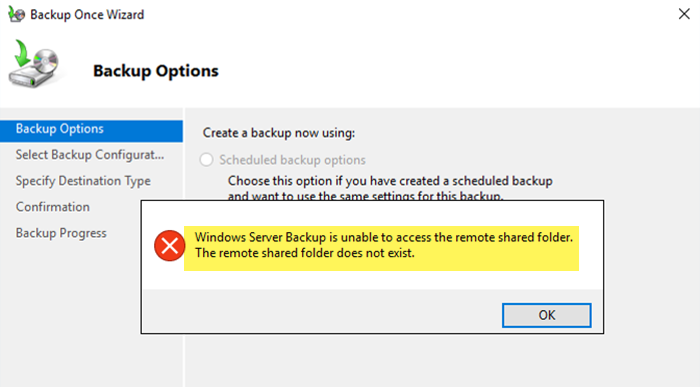
When trying to schedule a backup on a network location, we encountered an error that says Windows Server backup is unable to access the remote shared folder this means that the backup process has failed because the server cannot connect to the designated network location for storing backup files. In this post, we are going to talk about this issue and see how you can resolve it.
Windows Server Backup is unable to access the remote shared folder.
The remote shared folder does not exist.

Fix Windows Server backup is unable to access the remote shared folder
The Windows Server Backup is unable to access the remote shared folder due to various reasons. It can occur due to network connectivity issues, as there can be an unstable network link between the server and remote share. Also, you may encounter this issue due to the lack of required permissions for the backup account or if the credentials you are using are wrong. Additionally, if the firewall settings are blocking the connection, the Server won’t be able to communicate with the remote location. Now, let us see how to resolve this issue, to do that, follow the solutions mentioned below.
- Check the connection string
- Check your network connection
- Check the firewall settings
- Make sure that the backup account has full access to the shared folder
Let us talk about them in detail.
1] Check the connection string
As evident from the error message, Windows Backup is unable to access to shared folder. Therefore, we need to ensure that you are using the correct UNC path (e.g., \\RemoteHost\SharedFolder) when configuring the backup job. So, reconfigure the backup and pay attention to the UNC path, if there is nothing wrong with it, go to the next solution.
2] Check your network connection
Next up, we need to check and make sure that no network issue is stopping the server from accessing the shared path. There are a few things that you can do, first of all, use a free Internet speed tester to know your bandwidth. In case of low bandwidth, you need to reboot the router or modem. If it’s fine, open the Command Prompt and ping the shared folder, you can run ping <IP-address>. If you are unable to ping the shared folder, check the connection string again.
3] Check the firewall settings

If you are unable to ping or access the shared folder, we need to check the firewall settings and make sure that there is no rule that’s blocking the connection. To do the same, you can follow the steps mentioned below.
- Hit Win + S, type “Windows Defender Firewall”, and open the utility.
- Click on Advanced Settings to open Windows Defender Firewall with Advanced Security console.
- Click on Inbound Rules in the left pane to check the rules in place for incoming traffic.
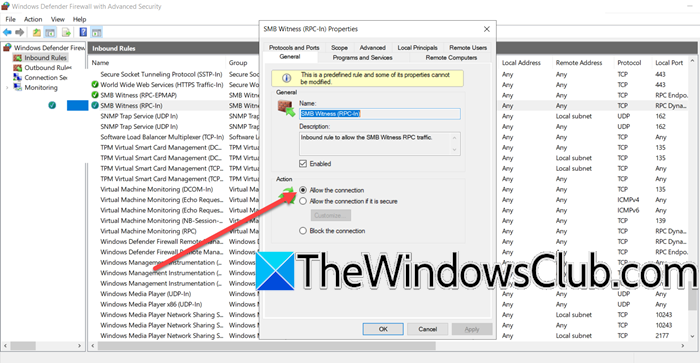
- Look for rules that could be blocking the backup service from accessing the remote shared folder. Specifically, check if any rule related to file-sharing or SMB (Server Message Block) protocol is disabled or set to block traffic.
- To modify a rule, right-click on it and select Properties; ensure that the rule is set to Allow the connection.
- Now, go to Outbounds Rules, and make sure that rules allowing outgoing connections for file sharing or SMB are enabled and set to Allow the connection.
- Make sure that the changes are applied to both Private and Public networks.
After making the necessary adjustments to your settings, check if the issue persists.
4] Make sure that the backup account has full access to the shared folder

Another reason for the inaccessibility of the shared folder is the lack of permissions. We need to make sure that the backup account has full access to the shared folder. To do so, you need to follow the steps mentioned below.
- Open the File Explorer and navigate to the shared folder.
- Now, right-click on the folder and click on Properties.
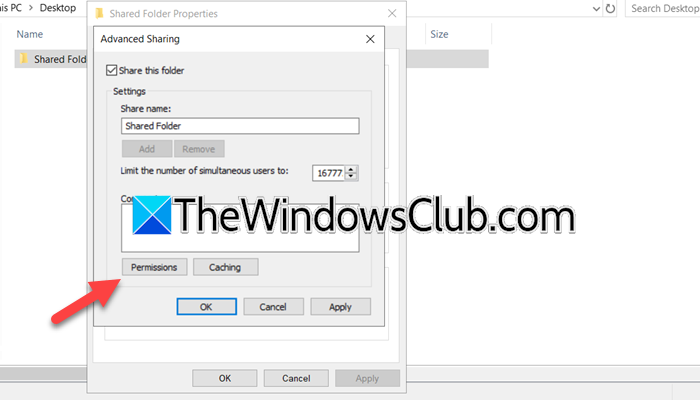
- Next up, you need to go to the Sharing tab to access sharing settings and click on Advanced Sharing.
- Once you are on the Advanced Sharing window, click on Permissions, and then on Add.
- In the Enter the object name to select field, write the name of the account you are using to take backup and click on Check Names.
- Once it is added, select it, and then tick the Allow checkbox for the Full access option.
- Click on Apply > Ok.
Finally, close the properties and check if the issue persists.
Hopefully, you will be able to resolve the issue with the help of the solutions mentioned in this post.
Read: Backup VMware Virtual Machines with Azure Backup Server
How do I access Windows Server backup?
If you want to access the Windows Server backup, search for “Server backup” from the Start Menu and then open the utility. If you can’t find anything, then most probably, you have not installed it, so, check our guide to install Windows Server Backup.
Read: How to backup and restore Active Directory in Windows Server
How do I restore a full backup of Windows Server?
To restore a full backup of a Windows Server, open the Windows Server Backup tool from Start, then select ‘Recover’ under the Action menu. Choose the location where your backup is stored (local or remote shared folder), and specify the backup you want to restore. Select the type of recovery you want to perform, such as restoring all volumes and system state for a full server restore, then choose the destination server and volumes to restore. Review the recovery options and click ‘Finish’ to start the process, and finally, monitor the progress and restart the server if necessary.
Also Read: Windows Server Backup GUI missing.