The Search option is a great way to quickly find something from the deepest pocket of your Windows 11/10 computer. With Search Indexing turned on, it allows you to search out any file or folder using the feature in question. However, for some users, the feature isn’t working well, according to them, Start Menu Search is too slow and is hindering their productivity. In this post, we are going to talk about this issue and see how you can fix it.

Why is the Start menu so slow?
The Start Menu can search slow because of various reasons. Usually, it can nothing but a glitch that is resolved by some restarts. If it’s the File Explorer, then just restart it, if it’s the search service, restart it, since we don’t know what actually is the cause, we are going to restart all of them.
If that doesn’t work, then the reason will be the fact that you are putting too much load on Start Menu. Web search and indexing of every single file type can put a lot of load on the Start Menu.
Start Menu Search is slow in Windows 11/10
If the Start Menu Search bar is slow to open or if the Search operation itself is slow in Windows 11/10, try the following solutions.
- Restart Start Menu
- Restart Windows Explorer process
- Stop and Start Windows Search Service
- Run Search and Indexing Troubleshooter
- Disable Web Search using Registry
- Alter Indexing Settings or Rebuild it
Let us talk about them in detail.
1] Restart Start Menu
First, restart Start Menu and see if that helps.
2] Restart Windows Explorer process
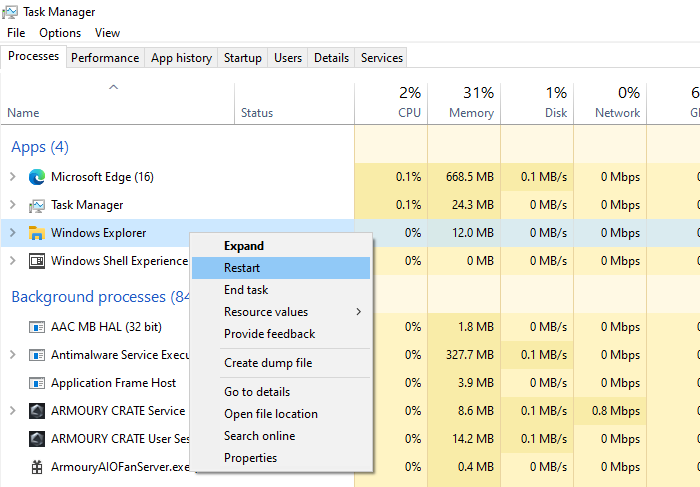
Next, try restarting File Explorer. We are just refreshing the explorer, Start Menu, taskbar, and some other things as they can get rid of the glitch. To do the same, follow the prescribed steps.
- Open Task Manager.
- Look for File Explorer.
- Right-click on it and select Restart.
It will take some time, but after some time, your issue will be resolved.
Read: Start Menu is very slow to open? Make it faster!
2] Stop and Start Windows Search Service
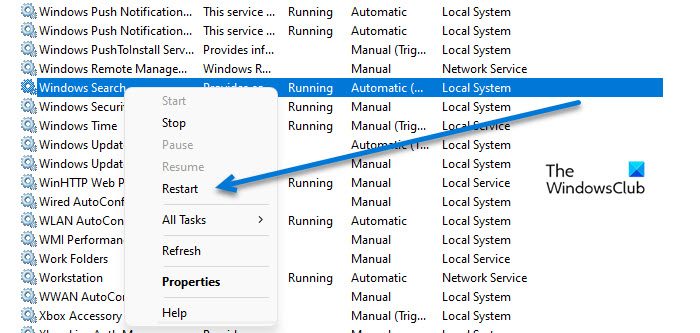
If restarting File Explorer doesn’t work, try restarting Windows Search Service using the Services app. This will flush out any glitches in the service and hopefully, will resolve the issue.
To restart Windows Search Service follow the prescribed steps.
- Open Services app.
- Look for Windows Search.
- Right-click on the service and select Restart.
- Close Services app.
Finally, check if Start Menu is searching quicker or not.
3] Run Search and Indexing Troubleshooter
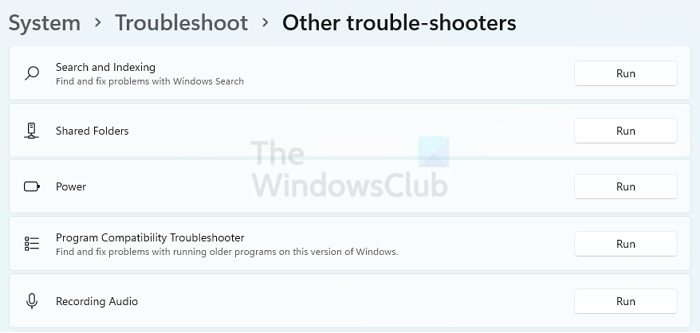
We can also try running Search and Indexing Troubleshooter and let it scan and repair any issue that your Search may have. Following are the steps to run Search and Indexing Troubleshooter.
Windows 11
- Open Settings from the Start Menu.
- Click System > Troubleshoot > Other troubleshooters.
- Look for the Search and Indexing troubleshooter, and click on the Run button.
Windows 10
- Open Settings.
- Go to Update & Security > Additional troubleshooter.
- Click Search and Indexing > Run the troubleshooter.
Hopefully, this will do the job for you.
4] Disable Web Search using Registry
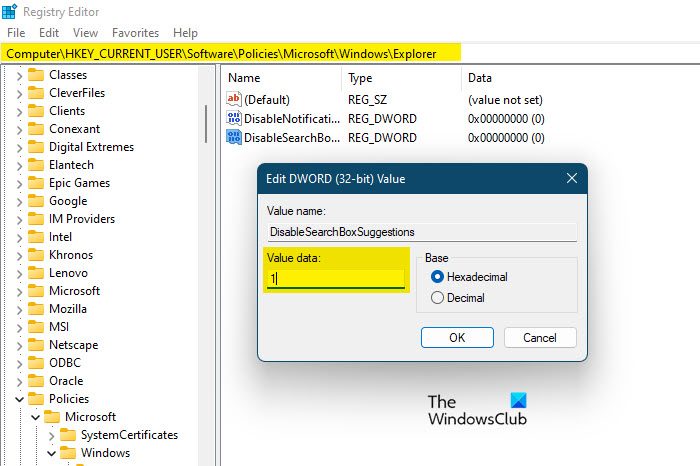
You must have noticed, that when you search for something from the Start Menu, you don’t only see searches from your computer, but also from the web. One of the reasons why Search is slow on your computer is that it searches the web for your result as well. You can actually disable it using the Registry Editor as it will make your search quicker. To do the same, open Registry Editor. You will be asked to confirm your action in UAC prompt, click Yes. Now, navigate to the following location.
Computer\HKEY_CURRENT_USER\Software\Policies\Microsoft\Windows
Now, right-click on Window and select New > Key. Name the key Explorer.
Right-click on the newly created key, Explorer and select New > DWORD (32-bit) Value. Name it DisableSearchBoxSuggestions. Double-click on the DisableSearchBoxSuggestions value to open it, then set the Value data to 1, and click Ok.
5] Alter Indexing Settings or Rebuilt it
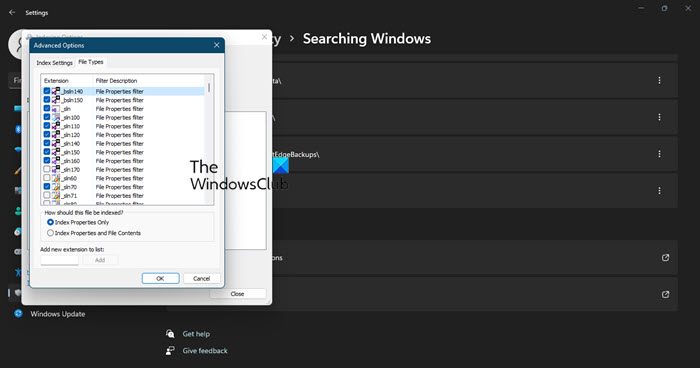
Windows built-in Search Indexing includes a lot of file types. So, every time you type a word in the search bar and ask Windows to look for it, it searces all the included file types and takes a lot of time. If there is a file type that you know you are not going to search for using this feature, then a wise option is to exclude it from Indexing.
Follow the given steps to configure Search Indexing options.
- Open Settings.
- Go to Privacy & security > Searching Windows.
- Scroll down to Related settings and click on Advanced indexing options.
- Click on Advanced.
- Go to the File type tab.
- Untick a few extensions that you don’t want to be indexed, the ones you don’t use a lot.
- Click on Ok.
It would make the searching process a little less cumbersome.
If changing the Indexing Options configuration didn’t work for you, then maybe this feature is broken. In case of that, you can easily rebuild the Search Index and resolve the issue. Follow the given steps to do the same.
- Open Settings.
- Go to Privacy & security > Searching Windows.
- Scroll down to Related settings and click on Advanced indexing options.
- Click on Advanced > Rebuild.
Hopefully, this will do the job for you.
How do I fix my Start menu search?
If Start Menu is too slow in searching your files and folder, check the solutions mentioned in this post and resolve the issue. In case, Start Menu is not working at all, check our guide on how to fix this issue. Hopefully, you will be able to resolve the issue with either of the set of solutions.
Also read: Start Menu Transparency not working in Windows 11/10.
Leave a Reply