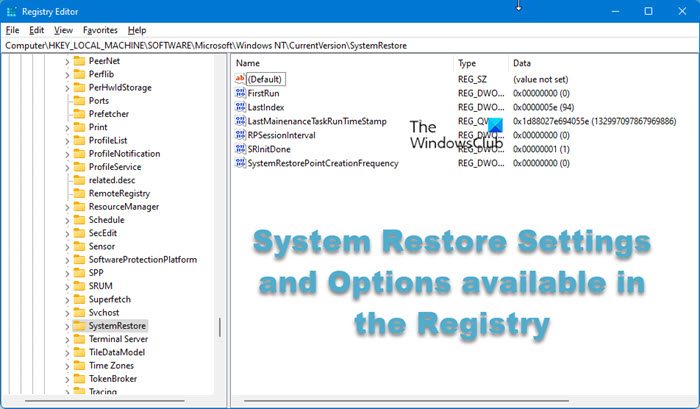
In this post we will talk about the registry values in Windows 10/8/7/Vista that deal with System Restore and how you can customize the Disk Space allocation, Restore Point creation frequency how long the Restore Point stays.

Normally Windows uses up to 15 percent of a drive’s available space to save restore points. In Windows XP, the option to change this figure was configurable from the System Restore tab of the System Properties dialog box. But sadly this option is no longer offered in later versions of Windows.
Windows System Restore Settings & Options
To do this, you will have to open the Registry Editor and modify a few values. Microsoft describes the Registry values as follows:
- DiskPercent: The maximum amount of disk space on each drive that can be used by System Restore. This value is specified as a percentage of the total drive space. The default value is 12 percent. Windows Vista receives a value from the Volume Shadow Copy Service (VSS). This is the maximum amount of disk space on each drive that can be used by System Restore. The default value is 15 percent of the total drive space or 30 percent of the available free space, whichever is smaller.
- RPGlobalIntervalData: The absolute time interval at which scheduled system checkpoints are created, in seconds. The default value is 86,400 (24 hours). Windows Vista receives a value from the task scheduler for System Restore. Zero if the task is disabled.
- RPLifeIntervalData: The time interval for which restore points are preserved, in seconds. When a restore point becomes older than this specified interval, it is deleted. The default age limit is 90 days.
- RPSessionIntervalData: The time interval at which scheduled system checkpoints are created during the session, in seconds. The default value is zero, indicating that the feature is turned off. Windows Vista receives zero if System Restore is disabled.
To begin, create a system restore point first and then type regedit in start search and hit Enter. Navigate to the following key:
HKLM\SOFTWARE\Microsoft\WindowsNT\CurrentVersion\SystemRestore\Cfg
Double-click DiskPercent.
The default is f (in hexadecimal) which is 15 in decimal. For making it say 10% type a.
How frequently you’d like to have your System Restore points auto-created can also be configured as follows. Navigate to the following key:
HKLM\SOFTWARE\Microsoft\WindowsNT\CurrentVersion\SystemRestore
You can change the value RPGlobalInterval from its default setting of 86,400 seconds (24 hours) to, say, 43200 (a8c0) if u want it created every 12 hrs.
As and when your new restore points get created, the older ones get deleted due to the available space constraint, on a FIFO or “First In First Out” basis.
By default, in Windows Vista and later, System Restore is set to delete restore points after roughly 4,294,967,295 seconds or 136 years, which was a mere 90 days in XP. The idea apparently, is to delete them only when absolutely necessary due to space constraints.
But if you’d like to, you can also change this interval too. Change the value of RPLifeInterval in the same key; a setting of 7,776,000 seconds (or 76a700 in hexadecimal) is equivalent to 90 days.
Read: How to configure System Restore Space and set System Restore Intervals.
Disk space used for System Restore Points
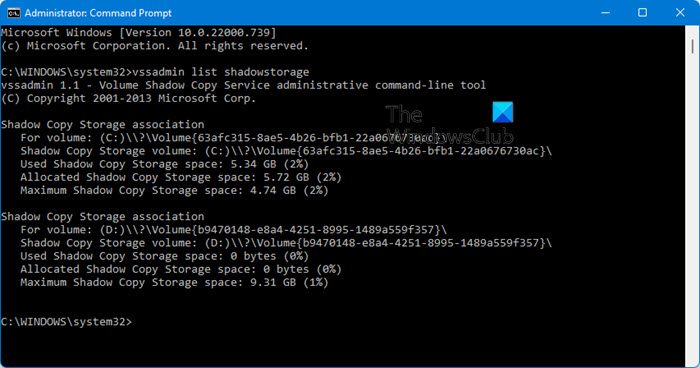
To find out how much disk space is being used for restore points in your Windows Vista, from an elevated cmd, simply run the following:
vssadmin list shadowstorage

And should you wish to change the amount of disk space to be allocated to System Restore, you can use the vssadmin command-line tool from the command prompt.
Let’s say you want to resize the shadow storage area on C Drive to, say, 5 GB. Then type the following command in the cmd and hit Ctrl+Shift+Enter together. This will make it Run As Administrator.:
vssadmin resize shadowstorage /For=C: /On=C: /MaxSize=5GB
On completion of the job, you will see a message :
Successfully re-sized the shadow copy storage association
To restore original values, simply disable and then re-enable System Restore.
To bring up System Restore, type rstrui in the Windows search bar and hit Enter. To bring up the System Properties dialogue box, which has the System Restore Options, you can press ‘Windows logo key + BREAK’.
Windows 10/8/7 users might want to check out our freeware System Restore Manager. It is a portable utility that allows you to completely manage your Windows system restore points and customize its options. Using this utility, you can even select a Drive and change the maximum amount of disk space to use, System Restore can use, change the System Restore Point Creation Interval, etc.
Leave a Reply