If you are a small business and have computers or a big company managing a lot of Windows 11/10 PCs, Windows Update for Business is an excellent solution if you wish to manage and deploy in bulk. It is a cloud-based Windows Update service that can be managed via Group Policy, MDM, or Intune to configure settings and control how and when Windows 10 devices are updated. Now that you know why you should use Windows Update for Business, in this post, we will share how you can deploy Windows Update for Business, who should use it, and how you can use it.

Why do you need Windows Update for Business?
When you need to manage updates for a lot of computers, you need a tool that can help you manage updates on each of them, offer flexibility, and save a lot of time for you. Windows Update for Business lets you do the same.
If you need some computers to run on an older version, some computers to be configured differently than others, and anything on a similar line, this is the feature you need to use.
How do I get Windows Update for Business?
Windows Update for Business is available for Windows 11/10 Pro (including Pro for Workstations), Education, and Enterprise (including Enterprise LTSC, IoT Enterprise, and IoT Enterprise LTSC). The feature is built-in, and hence you will not need to download and install any additional software on the client machine. The best part is that you can try it on your computer as an administrator, there is no policy violation, and there is no need for a domain.
How to deploy Updates using Windows Update for Business
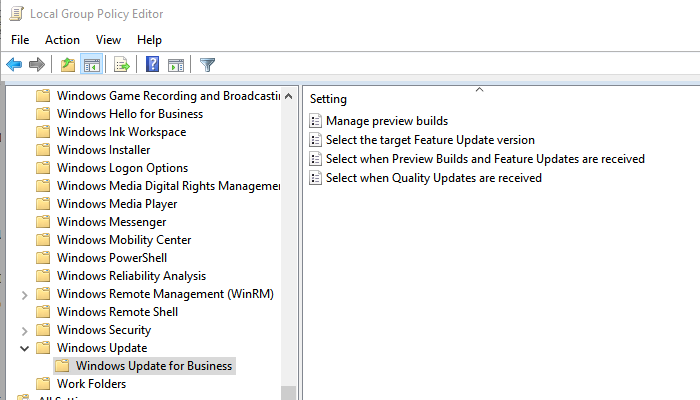
Windows Update for Business is deployed via the Local Group Policy Editor if your Windows 11/10 version supports it. There are four configurations that can be configured via Group Policy or MDM or Intune. In this post, I am showing the Group Policies that you can configure.

- Open Group Policy Editor, and navigate to the following
- Computer Configuration > Administrative Templates > Windows Components > Windows Update > Windows Update for Business
- There are four policies you can configure
- Manage Preview Builds
- Select the target Feature Update version
- Select when Preview Builds and Feature Updates are received
- Select when Quality Updates are received
These are similar to what is available for consumers, but options to control it specifically make it unique.
Manage Preview Builds
You can use this feature to disable the installation of Preview builds. It will prevent users from opting into the Windows Insider Program, through Settings -> Update and Security.
If you want to make sure all the devices which are currently using Preview Builds to stop receiving the future use this feature automatically. They will be opted out of the next public release. It is evident that if you want to run Preview builds on multiple machines, you can use this feature to Enable preview builds.
Select the target Feature Update version
You can enable this policy to specify a Feature Update version to be requested in subsequent scans. Make sure to note the exact version listed on aka. ms/ReleaseInformationPage
Select when Preview Builds and Feature Updates are received
If you want to test some computers with preview builds, this policy helps you set the level, i.e., Fast, Slow, Semi-Annual Channel, and more.
Select when Quality Updates are received
Here you can specify when to receive quality updates. They are similar to what you see in Windows 10 Updates for consumers.
- You can choose to defer receiving quality updates for up to 30 days.
- Temporarily pause Quality updates. (max of 35 days)
- To resume receiving Quality Updates, that are paused, clear the start date field.
- If you disable or do not configure this policy, Windows Update will not alter its behavior.
I hope the post was easy to understand, and that you could configure Windows Update for Business on all your computers. If you want to learn how to configure using Intune or MDM, follow the official document at Microsoft.
Related read: Windows 11 for Business and Enterprise – New Features
Leave a Reply