WinfrGUI is a free Windows File Recovery software for Windows 11/10 computers. This tool invokes the features of Microsoft’s official command-line Windows File Recovery Tool and lets you use all such features with a graphical user interface to recover deleted files and folders without executing commands. Those who find using GUI more convenient than a command-line tool can try this software as an alternative to the Windows File Recovery app.

WinfrGUI tool comes with two scanning modes to search for deleted files and folders from HDD, USB Drive, SSD, etc., with NTFS, exFAT, FAT file systems, etc. Whether you want to recover Office files, media files, ZIP archives, etc., this tool can be helpful. You will also be able to set target file types that include DOCX, TXT, PDF, CSV, MP4, 7Z, APZ, CUR, TIFF, PNG, ASPX, HTML, WAV, CDA, BMP, ICO, JFJF, and many other file formats, to make the scan more specific.
How to use WinfrGUI free Windows File Recovery software

To use this Windows File Recovery GUI software on your Windows 11/10 computer, you can get it from winfr.org. Install the software and launch it to open its interface. The software has a nice-looking interface where all the available options are self-explanatory making it convenient to use for all users.
Here is a list of available options or features that you can use:
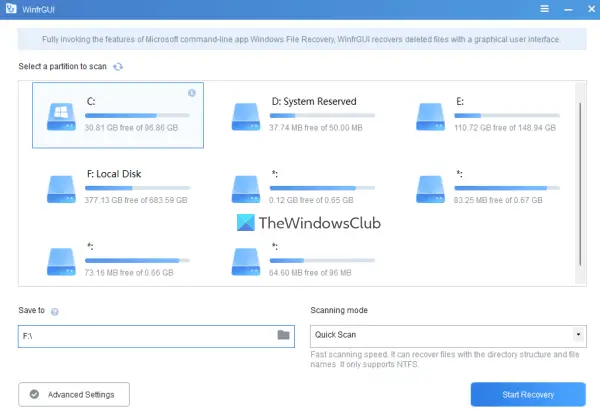
- Select a partition or drive visible on its interface. You can also refresh the list if the drive you want to scan is not detected
- A Scanning mode section comes with two different modes:
- Quick Scan: This scan mode is fast and it supports the NTFS file system and helps to find files that have file names and directory structure
- Deep Scan: This mode has a slow scanning speed but is more effective to find deleted files. It supports NTFS, exFAT, and other file systems and is helpful to recover those files also that don’t have file names and directory structure
- Save to option to select the location or folder where the recovered data will be stored. It automatically creates a folder based on the scanning mode and the drive letter (like Deep Scan I) and ) and stores files in another sub-folder with the Recovery name to help you easily find and access the recovery folder and data. Do note that the recovery folder cannot be the same as the scanning drive or partition. It must be some other partition or drive
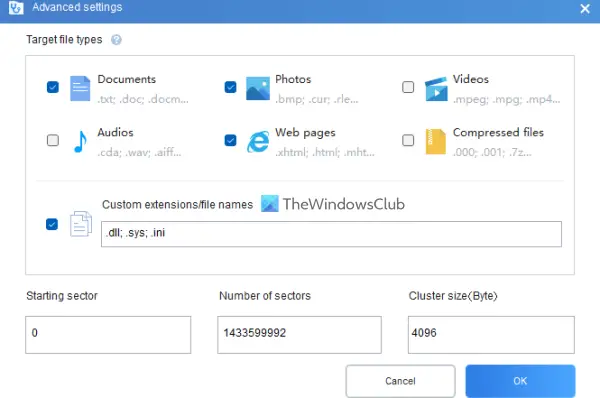
- An Advanced settings section which is very important to select the target file types for scanning. Available file types include Videos, Web pages, Photos, Documents, Audios, and Compressed files. Each file type category includes dozens of file extensions so there will be a high chance to find the data
- Add custom extensions to the scan list. This feature is a part of Advanced settings. It is helpful if you notice the selected file types don’t include the file extensions that you want to scan. Using this section, you can manually insert those file names or extensions (like .sys; .dll, etc.) in the given field
- Set the Starting Sector, Cluster size (the smallest amount of disk space that can be used to hold a file), and Number of Sectors on the hard disk for scanning the deleted files. Again, this feature is also present under the Advanced Settings.

Once you are familiar with the available options, you can start the scanning process. Just select a partition or drive, choose the scanning mode, and then open the Advanced settings box to make the search more specific. Press the OK button to close the Advanced Settings and come back to the main interface.
Press the Start Recovery button and wait till the scanning process is completed. Depending upon the type of scanning mode and other options set by you, the scanning will complete accordingly.
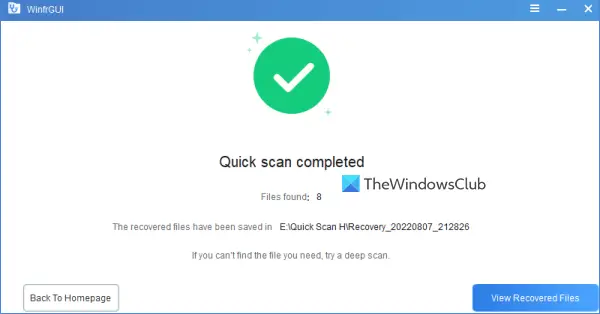
Once the process is finished, it will show you the number of files found by the tool. After that, you can press the View Recovered Files button to access the recovery folder containing the recovered data.

Related: How to recover Files lost during Cut and Paste in Windows.
Based on a few tests with some changes in the options, I can say the tool is useful and shows some valuable output. But it also has its limitations such as it won’t be able to get results if the data is completely overwritten on the partition or disk with advanced or complex overwritten passes. But, for other cases, you may get some expected results.
Hope this is helpful.
Which recovery software is free?
There are some good free Data Recovery software that you can try on Windows 11/10 OS. Recuva, Windows File Recovery tool, EaseUS Data Recovery Wizard (free edition), and Glarysoft File Recovery Free are some of those tools that can help you recover deleted files and folders. You can select the partition or drive, set scanning and other options, and begin the recovery process.
Is Recoverit a free software?
Yes, there is a Recoverit Data Recovery Free version available for this tool. But the free plan is limited (restricted to recover up to 100 MB data size). If you need more than that, then you should try some other free data recovery tools. WinfrGUI is one such tool that we have covered in this post that you can try.
Read next: How to recover Infected or Deleted files after a Virus Attack?
Leave a Reply