Not many of you may know this, nor has this been blogged anywhere—yet—but Windows 11/10/8.1/8 lets you safely clean up the WinSxS folder. In fact, you can even automate WinSxS folder cleanup using the Task Scheduler. The WinSxS folder, which stands for ‘Windows Side By Side’, is a Windows native assembly cache with Libraries stored there by multiple applications. It is the location for storing Windows Component Store files.
Some common questions that Windows users asked were: Is there a way to clean up the WinSxS folder so as to reduce its size? Can I delete the WinSxS folder? Or move the WinSxS folder to another drive? The short answer, as we saw in the earlier post, was No.
WinSxS folder cleanup in Windows 11/10
In Windows 11/10, however, things have become easier. Windows will automatically reduce the size of the WinSxS. These methods include internal processes, such as uninstalling and deleting packages with components that have been replaced by other newer components. Previous versions are then kept for a period, after which they are automatically removed.
We saw that Windows 8.1 introduced a new command-line option for DISM.exe, /AnalyzeComponentStore. Running this command, will analyze the WinSxS folder and tell you whether a Component Store Cleanup is recommended or not.
Delete Component Store Files in Windows 11/10
Windows 11/10 offers a number of ways to cleanup of the WinSxS folder which includes the Windows Component Store. It may compress certain files, or it may delete some packages. Let us see how you can clean up the WinSxS folder in these latest versions of the Windows operating system. There are three ways how you can do it.
1] Using StartComponentCleanup
The StartComponentCleanup task was created to regularly clean up components automatically when the system is not in use. This task is set to run automatically when triggered by the operating system. When run automatically, the task will wait at least 30 days after an updated component has been installed before uninstalling the previous versions of the component.
To run it, open Task Scheduler and navigate to the following task:
Task Scheduler Library\Microsoft\Windows\Servicing\StartComponentCleanup

In the right pane, under Selected Items, you will see Run. Click on it to start the StartComponentCleanup task.
This will start a process called TiWorker.exe or Windows Modules Installer Worker. You will not see any confirmation dialog box that the process has been started, but you will be able to see it in the Task Manager – and feel a lot of hot air coming out of your laptop’s vent! By default, in Windows 10/8, if this task runs for more than 1 hour, it will terminate automatically. To end this process, you can click on End. You will, in this case, see Windows asking you for confirmation: Do you want to end all instances of this task. Click Yes.

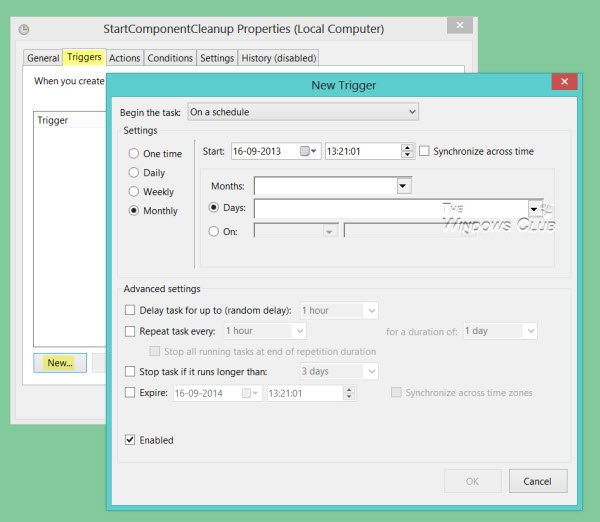
You may run it manually, or you may schedule it to run, say every month using the StartComponentCleanup command, to clean up and compress the components. You may automate the process by setting up a Trigger for the task to run using the Task Scheduler.
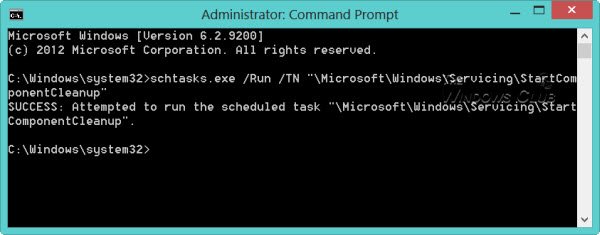
Alternatively, you can also run the StartComponentCleanup task using an elevated Command Prompt, using the following command:
schtasks.exe /Run /TN "\Microsoft\Windows\Servicing\StartComponentCleanup"
If you are successful, you will see a SUCCESS message returned.
2] Using Deployment Image Servicing and Management
Using DISM you can configure and update Windows features, packages, drivers and so on. The /Cleanup-Image parameter of Dism.exe, will provide you with advanced options to reduce the size of the WinSxS folder, writes TechNet.
A) Using the /StartComponentCleanup parameter of Dism.exe on a running version of Windows 8.1 gives you similar results to running the StartComponentCleanup task in Task Scheduler.
Open an elevated command prompt, type the following and hit Enter:
Dism.exe /online /Cleanup-Image /StartComponentCleanup
B) If you use the /ResetBase switch with the /StartComponentCleanup parameter, you will be able to remove all superseded versions of every component in the component store.
From the elevated command prompt, type the following and hit Enter:
Dism.exe /online /Cleanup-Image /StartComponentCleanup /ResetBase
C) If you want to reduce the amount of space used by a Service Pack, use the /SPSuperseded parameter of Dism.exe on a running version of Windows 8.1 to remove any backup components needed for the uninstallation of the service pack.
From the elevated command prompt, type the following and hit Enter:
Dism.exe /online /Cleanup-Image /SPSuperseded
Do note that if you carry out this command, you will not be able to uninstall existing service packs and updates.
3] Disk Cleanup Tool
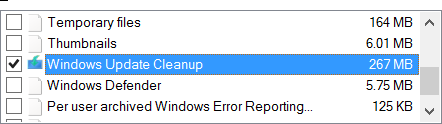
Home users should stick to using the Disk Cleanup Tool. Open the Disk Cleanup Utility and click on the Clean System Files button. You will see the option for Windows Update Cleanup. Check this option. This will help reduce the size of the component store.
Do note that deleting files from the WinSxS folder or deleting the entire WinSxS folder may damage your system and make it unbootable. You may not also be able to install, uninstall or update Windows components, so exercise utmost precautions. For regular Windows users, you may create a system restore point first and then try Method 1 or Method 3 mentioned above. Method 2 is for advanced users.
Windows 7 users too can now use the Windows Update Cleanup option in the Disk Cleanup tool.

I would cast doubt if StartComponentCleanup (method 1) or Windows Update Cleanup (method 3) actually does the same thing. It would seem to me that Windows Update Cleanup only cleans up the files in the “ServicePackFiles” folder. Is it true?
I’ve explained this in more details last year: http://www.msfn.org/board/topic/153742-dism-improvements-in-windows-8/?p=1015509^. Update KB2821895 offers a more cleamup: http://www.msfn.org/board/topic/153742-dism-improvements-in-windows-8/?p=1043736 You can also cleanup WinSxS by removing features you don’t need: http://www.msfn.org/board/topic/153742-dism-improvements-in-windows-8/?p=991025
Hi williamwclee, the TechNet link I mentioned throws more light on the subject.
Thanks for the links MagicAndre1981.
Thank you for the post! I run win8 and did everything suggested here yet my winsxs is still 15gb and my 60gb ssd is not pleased with windows folder now being 43gb. I’ve killed page file and disabled hibernation and system protection yet nothing seems to help – if you have any ideas and feel inspired please help.
goto advanced system properties and move the location of temp and tmp to another drive.
hey, thanks for the advice!
That is really great.
I used also these free tools and got gigabytes of free space:
http://www.mindgems.com/info/Disk-Cleanup.html
Well done! :)
Running “DISM.exe /Online /Cleanup-Image /AnalyzeComponentStore” it recommended a Cleanup (and it listed 3.22 GB of Backups and disabled features) therefore ran “DISM.exe /Online /Cleanup-Image /StartComponentCleanup” The result was WinSxS increased by 0.01 GB (10 MB) and C: free space decreased by 0.42 GB (420 MB) to 4.75 GB, so there was no benefit on this 32 GB SSD machine with Windows 8.1 and Hibernation and Restore turned off, a two-month-old machine which started with over 10 GB free and which has less than 2 GB of added program and user files; so somehow at least 3 GB has gone missing somewhere.
If your re-set boot media uses WinSxS to re-install windows components then id assume if you where to ever do a restore it would require less updates, as that extra space is holding newer files? (theory depends on how the oem restore is set up by the manufacture) But that lost space may save on windows updates bandwidth after a full system reset. I have not looked that much into win7 or win8 oem restore set ups (so what im saying is just a theory) but experience on xp oem systems makes me thing it could be plausible. All depends on how much of the OS is located in the recovery partition ;)
Guys Not working here :(
It is maybee a silly Question, but is there a way to upgrade Windows 7 Component Store to its 8 or 8.1 equivalent? –> Would like to have the full cleaning possibilities when removing packages and old stuff.