This post explains how to fix Event ID 10000, WLAN Extensibility module has failed to start error you may see in the Event Logs of your Windows 11/10 PC. The WLAN Extensibility module is a Windows component that allows independent hardware vendors (IHVs) and independent software vendors (ISVs) to offer custom wireless networking features and capabilities to their users. It extends the functionality of the native Windows networking components by incorporating features that are not provided in Windows by default.

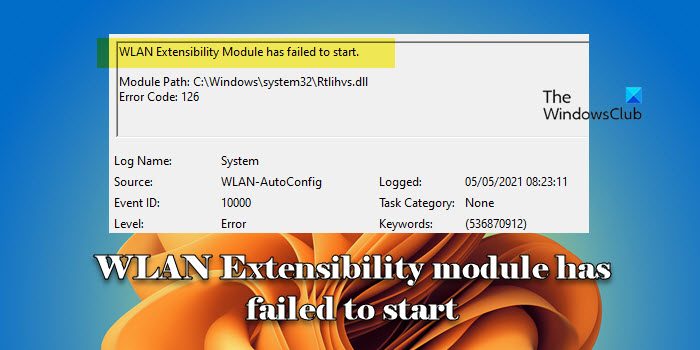
The WLAN Extensibility module starts as part of the initialization process when the operating system loads necessary networking components. If the WLAN Extensibility module stops unexpectedly or fails to start, you may see the following error message with Event ID 10000 in the Event Viewer log:
WLAN Extensibility Module has failed to start.
Module Path: C:\Windows\system32\Rtlihvs.dll
Error Code: 126
The message indicates that the WLAN Extensibility module could not start properly on your Windows 11/10 PC, since it might be encountering an error during the initialization process or facing conflicts that prevent it from starting.
WLAN Extensibility module has failed to start
If the WLAN Extensibility module has failed to start with Event ID 1000 on your Windows 11/10 PC, you should take the following troubleshooting steps:
- Disable and Re-enable the Wireless Network Connection
- Restart the WLAN AutoConfig service (Wlansvc)
- Update the wireless adapter drivers
- Remove the IHV key from Windows Registry
Let us see this in detail.
1] Disable and Re-enable the Wireless Network Connection

Disabling and re-enabling the wireless network connection allows the operating system to reinitialize the network stack, clear temporary glitches or conflicts, and establish a fresh connection to the wireless network.
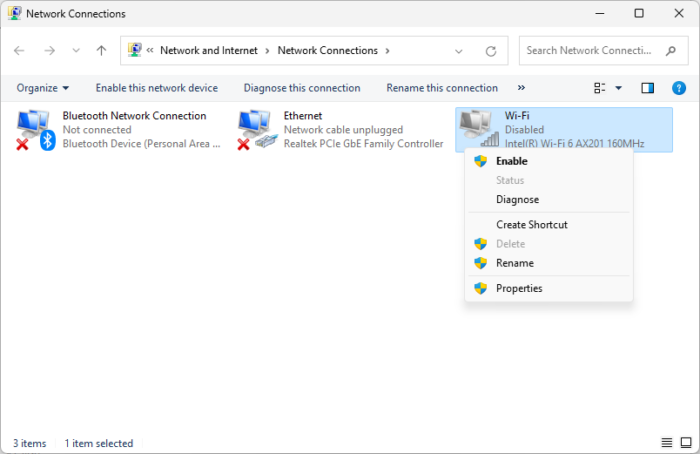
Type ‘control’ in the Windows Search bar. Click on Control Panel under ‘Best match’. Control Panel window will appear. Click on Network and Internet > Network and Sharing Center. Then click on the Wi-Fi network to which you’re connected.
Wi-Fi Status window will appear. Click on the Disable button at the bottom.
Now click on Change adapter settings in the left panel. Right-click on the Wi-Fi network and select Enable.
2] Restart the WLAN AutoConfig service (Wlansvc)

If the error persists, restart the WLAN AutoConfig service. The service is responsible for managing wireless connections on a Windows PC and plays a crucial role in the initiation of WLAN.
Type ‘services’ in the Windows Search bar and click on Services under Best match to open Windows Services Manager (Services.msc). Navigate to WLAN AutoConfig under Name, in the details pane.
Right-click on it and select Properties. On the General tab, select Automatic in Startup type and then click Start, followed by OK.
3] Update the wireless adapter drivers

The issue may occur due to corrupted or incompatible drivers, so update your wireless adapter drivers if the above solutions don’t work.
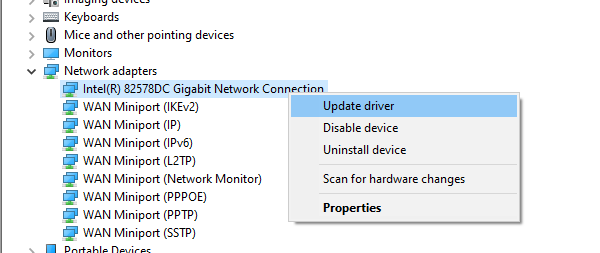
Right-click on the Start button icon and select Device Manager. Expand the Network adapters section. Right-click on your wireless adapter and select Update driver.
To reinstall the latest network adapter drivers, select the Uninstall device option. When you restart your PC, Windows will search and download the latest available drivers and install them automatically.
You can also contact the manufacturer of your wireless network adapter or your computer manufacturer for the most recent adapter drivers. Visit their official website for the latest driver updates and install them manually.
Related: WLAN Autoconfig detected limited connectivity, attempting automatic recovery
4] Remove the IHV key from Windows Registry

In order to extend the native IEEE 802.11 network functionality, the IHV provides an IHV Extensions DLL with the adapter driver. If this DLL is missing, you might see the extensibility error on start up of the WLAN.
To fix the issue, you need to remove the IHV key or the IHVExtensions key (and all its subkeys) from Windows Registry.
Note: Before making any changes, create a backup of the Windows Registry. This ensures that you can restore the Registry to its previous state if something goes wrong.
Press Win+R and type regedit in the Run dialogue that appears. Press the Enter key. A User Account Control prompt will appear. Click on Yes to continue.
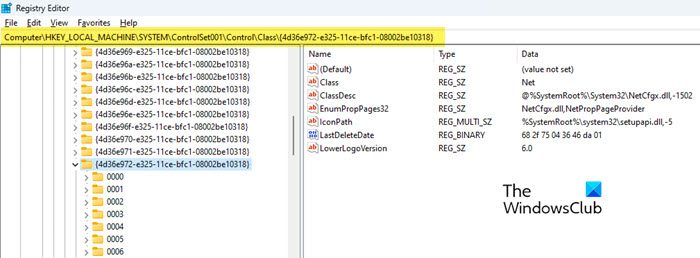
In the Registry Editor window, navigate to the following key for your Wi-Fi adapter:
[HKEY_LOCAL_MACHINE\SYSTEM\ControlSet001\Control\Class\{4d36e972-e325-11ce-bfc1-08002be10318}\0005\Ndi\IHVExtensions]
Delete this key and close the registry editor. You should stop seeing the WLAN Extensibility error message.
I hope this helps.
Read: Windows could not start the WLAN AutoConfig Service, Error 1068.
Why can’t I start the WLAN AutoConfig service?
The WLAN AutoConfig service relies on other services and components. If Windows cannot start the WLAN AutoConfig Service on your Windows 11/10 PC, make sure its dependency services (Remote Procedure Call, Windows Connection Manager, etc.) are running in the Services window. Also, update your wireless adapter drivers and use the SFC (System File Checker) tool to scan and repair corrupted system files.
How do I check my WLAN settings?
Click on the Start button icon and select Settings. In the Settings window, navigate to Network & internet > Wi-Fi. You will see available wireless networks. Click on a Wi-Fi network to see its properties. For advanced network settings, click on the Edit button next to the Advanced Wi-Fi network properties option at the bottom.
Read Next: Fix Wlanext.exe high CPU usage on Windows PC.
Leave a Reply