Users have reported that there is a process called wmpnetwk.exe that consumes high system resources on their Windows computer. The important thing to note here is that this executable is not malicious in nature. This program comes from Microsoft and can be found on almost every operating system. So why is it consuming so much resource in Task Manager? Let’s take a closer look here to find the solution.

What is Wmpnetwk.exe or Windows Media Player Network Sharing Service?
Wmpnetwk.exe belongs to Windows Media Player Network Sharing Service. It is an internal system process that is responsible for developing communications between Windows Media Player and external networks. The legit OS file is located in the following folder:
C:\Program Files\Windows Media Player
If located elsewhere, it could well me malware and you need to scan your computer with your security software.
In older versions of Windows, the process is disabled by default. According to the reports, the service mat at times consume 70% of the entire network’s resources even though it shouldn’t be resource-intensive at all. It’s not necessary to use this service unless you stream music and videos using Windows Media Player. So, it will have no effect on your system if you disable wmpnetwk.exe. In short, wmpnetwk.exe can be disabled without affecting your system.
Fix Wmpnetwk.exe High CPU or Memory usage
If Wmpnetwk.exe or Windows Media Player Network Sharing Service is consuming high resources on your Windows 11/10 computer, we offer the following suggestions that may help you resolve the issue:
- Stop Windows Media Player Network Sharing Service
- Disable wmpnetk.exe via Registry
- Uninstall Windows Media Player
Now let’s look at them in more detail:
1] Stop Windows Media Player Network Sharing Service
This solution requires you to stop the Windows Media Player Network Sharing Service and then switch it to Manual startup. This is how you do it:
- Click on the Start button, type Services, and then press the Enter key to access the Services window.
- Scroll down to find Window Media Player Network Sharing Service on the next page.
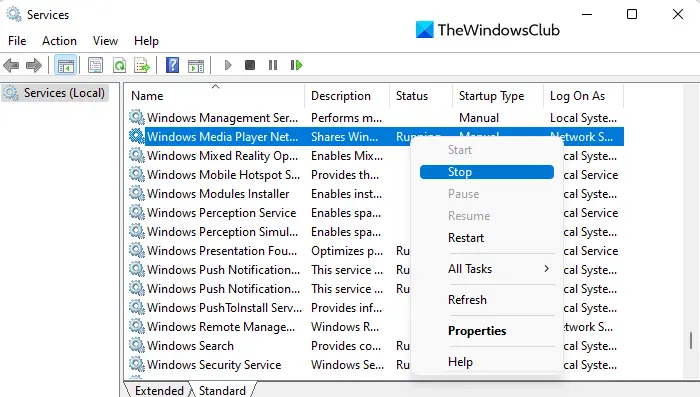
- When you find the service, right-click on it and select Stop from the menu.
- After you’ve stopped the service, right-click it again and select Properties.
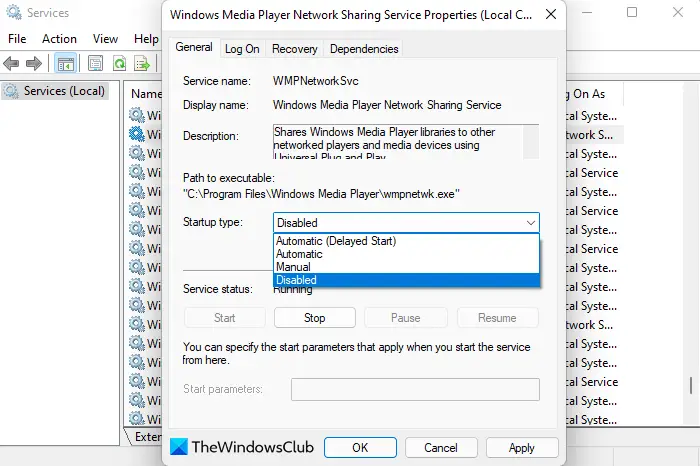
- Select the General tab in the Properties window and set the Startup method to Manual
- Once you’ve made your changes, click Apply and then restart your computer.
- After it starts up, open the Services window again.
- Scroll down and search for Window Media Player Network Sharing Service.
- Right-click on the service and select the Properties option.
- Go to the General tab and set Automatic for Startup type.
- Click the Apply button and then OK to save the changes.
- When you follow the steps, you can check Task Manager to see if it still consumes the same amount of processor resources.
In case you prefer not to use Window Media Player, the wmpnetwk.exe service doesn’t need to run again. In such a case, it’s better you disable the service.

To do this, change the Startup type in the Window Media Player Network Sharing Service properties to Disabled.
2] Disable wmpnetk.exe via Registry
Another way to fix this problem is to edit the registry, but be careful because doing so can be risky especially if you don’t know what you’re doing. If you are unfamiliar with this process, you might want to skip this one and try the next one. Please follow these steps to resolve this issue:
To get it started, open the Registry Editor.
Now navigate to the following key:
HKEY_CURRENT_USER\Software\Microsoft\MediaPlayer\Preferences\HME
Once you’re at the following location, you will find a DWORD called DisableDiscovery in the right pane.
In case it isn’t there, you should create the registry key.
Now double click on DisableDiscovery and set the Value data to 1.
Click OK and exit.
3] Uninstall Windows Media Player
The next method you can try to fix this issue is to uninstall Windows Media Player. Here’s how to go about it.
- Press the Windows key + R to open the Run dialog box.
- Type appwiz.cpl in the text box and click the OK button.

- On the left-hand side of the next page, you will find a link that says Turn Windows features on or off. Click that link to open the Windows Features page.
- Then scroll down to the Media Features category and double-click it to expand it.

- Uncheck the box next to Windows Media Player.
- Once the confirmation pop-up appears, click Yes.
- Now click on the OK button to save the changes.
Related: Troubleshoot Windows Media Player issues.
What is causing my CPU and memory usage to be so high?
CPU and RAM are the two main components of computer memory. However, the memory usage problem is actually a result of too many processes running at the same time. Another issue here is the incompatibility of the drivers. There are a few hardware manufacturers who have not updated their drivers for Windows and that is causing performance problems. Driver incompatibilities can cause memory leaks, which will cause the CPU and memory to run very high.
Related: How to Clear, Reset or Delete Windows Media Library WMDB Files.