Microsoft Word is a very useful tool for creating documents. Apart from entering text, the tool allows you to include images in your document to make it more illustrative. Displaying of this sort of arrangement makes a reader feel as if the picture added is well-aligned with the individual characters of the text. However, what users find quite puzzling is the method of wrapping text around pictures in Word. Here’s a post that shows you how to wrap text around pictures in Microsoft Word.
How to wrap Text around a Picture in Word
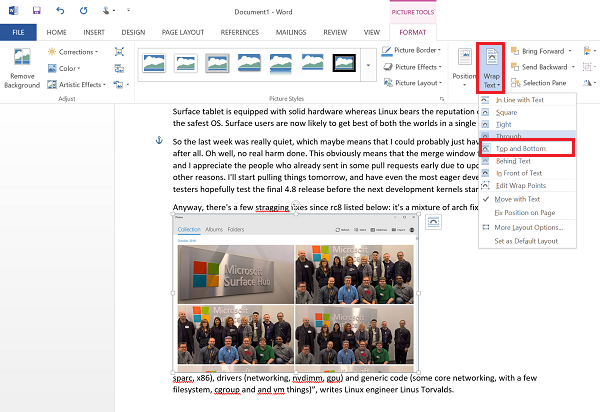
Open the Word document and choose the Format tab. Under its Menu, you can find ‘Wrap Text’ button, which further expands to a menu of alternative options offering text wrap choices. Here, you can specify how the picture should interact with the adjacent text.

- In Line with Text – Under this option, the text does not wrap around the picture but is a part of the paragraph.
- Square – Here, text invariably wraps around the picture’s outer frame.
- Tight – If the picture added is clip art with a colorless background, the text readily wraps around the edges of the image.
- Behind Text – the text of the document appears as an overlay on top of the picture.
- In Front of Text – The image appears above the text.
- Top and Bottom – The image is interspersed between the text. The text may occupy space above or below the text.
Next, you have to position the image. The options available under this heading help position a picture in a fixed place relative to the page and automatically wrap text around it.
To do so, click a picture to select it. Then, click the ‘Picture Tools Format’ tab, and in the Arrange group, click Position. However, if you use the latest version of Microsoft 365, you can find the same option as Picture Format.
Simply select the position and wrapping style you’d like to use.

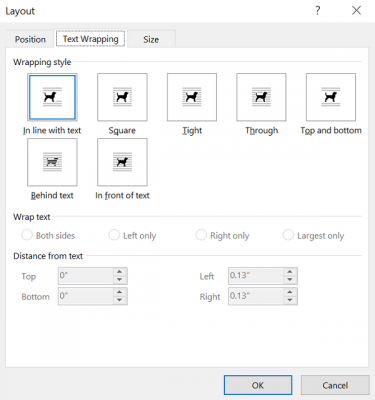
Next, select the desired layout for the image. In the above step, under ‘Arrange’ menu, select ‘More Layout’ options.

Then, from the layout box on the Text Wrapping tab, choose the wrapping style you’d like to use.
If you do not see your text wrapped around your image, it indicates that the image is too big in size. The possible solution you could give a try – resize the picture so that it is of appropriate size to be wrapped around the text. You can do this by clicking the picture and then adjusting the size by dragging the lower right corner towards the top left.
You might want to also read or post on how to wrap Text around a Picture in a Text Box in Word. It talks about adding images in SmartArt text and then wrapping text.
How do I wrap text around a copied image?
To wrap text around copied images in Word, you need to use the FORMAT section. Before that, you need to paste the image in the Word document. Next, insert the image and click on it. Here, you can find an option called Wrap Text. Once you click on it, you need to select an option based on how you want to wrap the text.
Why is wrap text not working in Word with picture?
To wrap texts around the image, you must have an image and text separately. If you insert the text in image form, you cannot wrap it around the image. The image and text must be in different layers to be wrapped. For your information, you may not need to do anything else except place those two things in different lines.
Also read: How to use Word picture editing tools to edit images.
Are you planning on releasing Pick Me v2?