If you want to allow or deny write access to removable drives that are not protected by BitLocker, here is how you can do that. It is possible to enable or disable this setting with the help of the Local Group Policy Editor and Registry Editor on Windows 11/10 PC.
Allow or deny Write Access to Removable Drives not protected by BitLocker
To allow or deny write access to removable drives not protected by BitLocker, follow these steps:
- Search for group policy and click the search result.
- Navigate to Removable Data Drives in Computer Configuration.
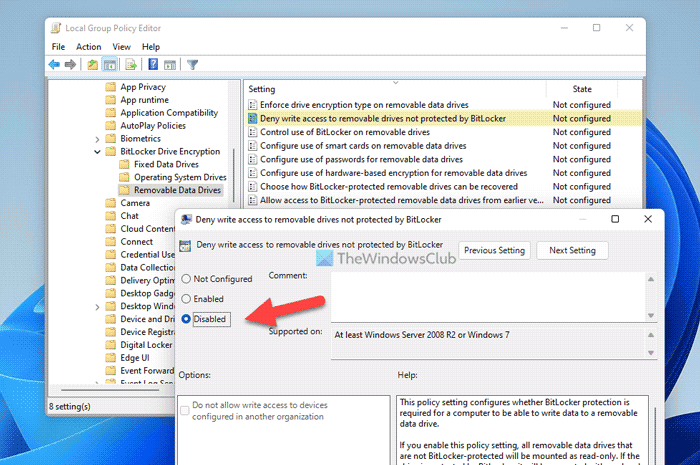
- Double-click on the Deny write access to removable drives not protected by BitLocker setting.
- Choose the Enabled option to allow.
- Choose the Disabled option to deny.
- Click the OK button.
Let’s delve into these steps in detail.
Open the GPEDIT panel on your computer. To do that, you can search for group policy in the Taskbar search box and click on the individual search result.
Once it is opened, you can navigate to this path:
Computer Configuration > Administrative Templates > Windows Components > BitLocker Drive Encryption > Removable Data Drives
In the Removable Data Drives folder, you can find a setting named Deny write access to removable drives not protected by BitLocker. You need to double-click on this setting to make the change.

Choose the Enabled option to allow and the Disabled option to deny the write access.
At last, click the OK button to save the change.
Allow or deny write access to removable drives not protected by BitLocker using Registry
To allow or deny write access to removable drives not protected by BitLocker using Registry, follow these steps:
- Press Win+R > type regedit > click the OK button.
- Click on the Yes button.
- Go to Microsoft in HKLM.
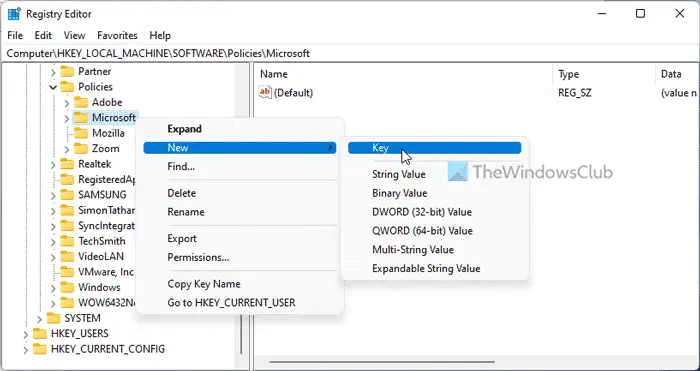
- Right-click on Microsoft > New > Key and set the name as FVE.
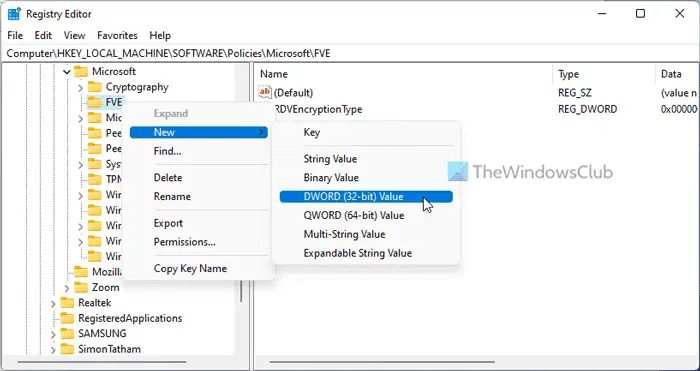
- Right-click on FVE > New > DWORD (32-bit) Value.
- Name it as RDVDenyCrossOrg.
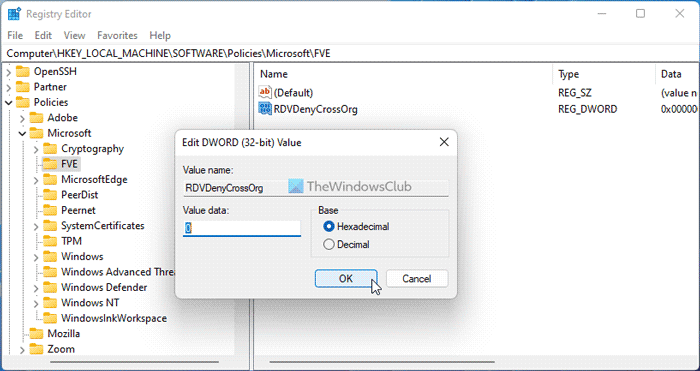
- Double-click on it to set the Value data.
- Enter 1 to allow and keep 0 to deny.
- Click the OK button.
- Restart your computer.
To learn more about these steps, keep reading.
At first, press Win+R > type regedit and click on the OK button on the Run prompt. Then, if the UAC prompt appears, click on the Yes button to open the Registry Editor.
Next, go to this path:
HKEY_LOCAL_MACHINE\SOFTWARE\Policies\Microsoft
Here you need to create a sub-key. For that, right-click on Microsoft > New > Key and set the name as FVE.

After that, right-click on FVE > New > DWORD (32-bit) Value and name it as RDVDenyCrossOrg.

By default, the Value data is set to 0. If you want to deny the write access, you need to keep that value data. However, if you want to allow the write access, you need to double-click on it to set the Value data as 1.

Click the OK button and restart your computer to apply the change.
In case you want to set the factory defaults, you need to delete this REG_DWORD value. For that, right-click on the RDVDenyCrossOrg, select the Delete option in the context menu and click the Yes button.
Read: Your recovery key couldn’t be saved to this location error for BitLocker
How do I disable Deny write access to fixed drives not protected by BitLocker?
To disable the Deny write access to fixed drives not protected by BitLocker setting, you need to open the Local Group Policy Editor first. Then, double-click on the setting mentioned above and choose the Disabled option. For your information, you can turn on or off this setting with the help of the Registry Editor as well.
How do I unlock BitLocker-protected removable media?
To unlock BitLocker-protected removable media, you need to insert the device first. Then, you can open the protected drive and enter the password. However, if you want to disable BitLocker on the removable drive, you can do that with the help of GPEDIT and REGEDIT as well.
Read: How to disallow Standard Users from Changing BitLocker PIN/Password.
Leave a Reply